Native Android Development Tutorial (Kotlin and Jetpack Compose) - Part 3
In Part 2 anybody could read and change every note. In this last part we add user accounts, make each user see only their own notes (and enforce it on the server, not only in the app), improve the empty state, and finally build and publish the app on Google Play.
Versions used in this part: the versions of Parts 1 and 2 (Appwrite Android SDK 28.x, AGP 9.4, Compose BOM 2026.09). Nothing new to install: authentication uses the same Appwrite SDK.
Visual guide. Use this map to locate the current part before starting the examples.
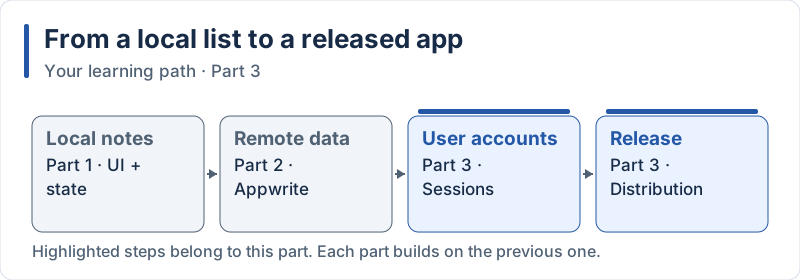
The highlighted steps are developed in this part.
Table of Contents
- Authentication for Notes App
- Filtering User Notes
- Empty State
- Building and Publishing
- Summary and Comparison
7. Authentication for Notes App
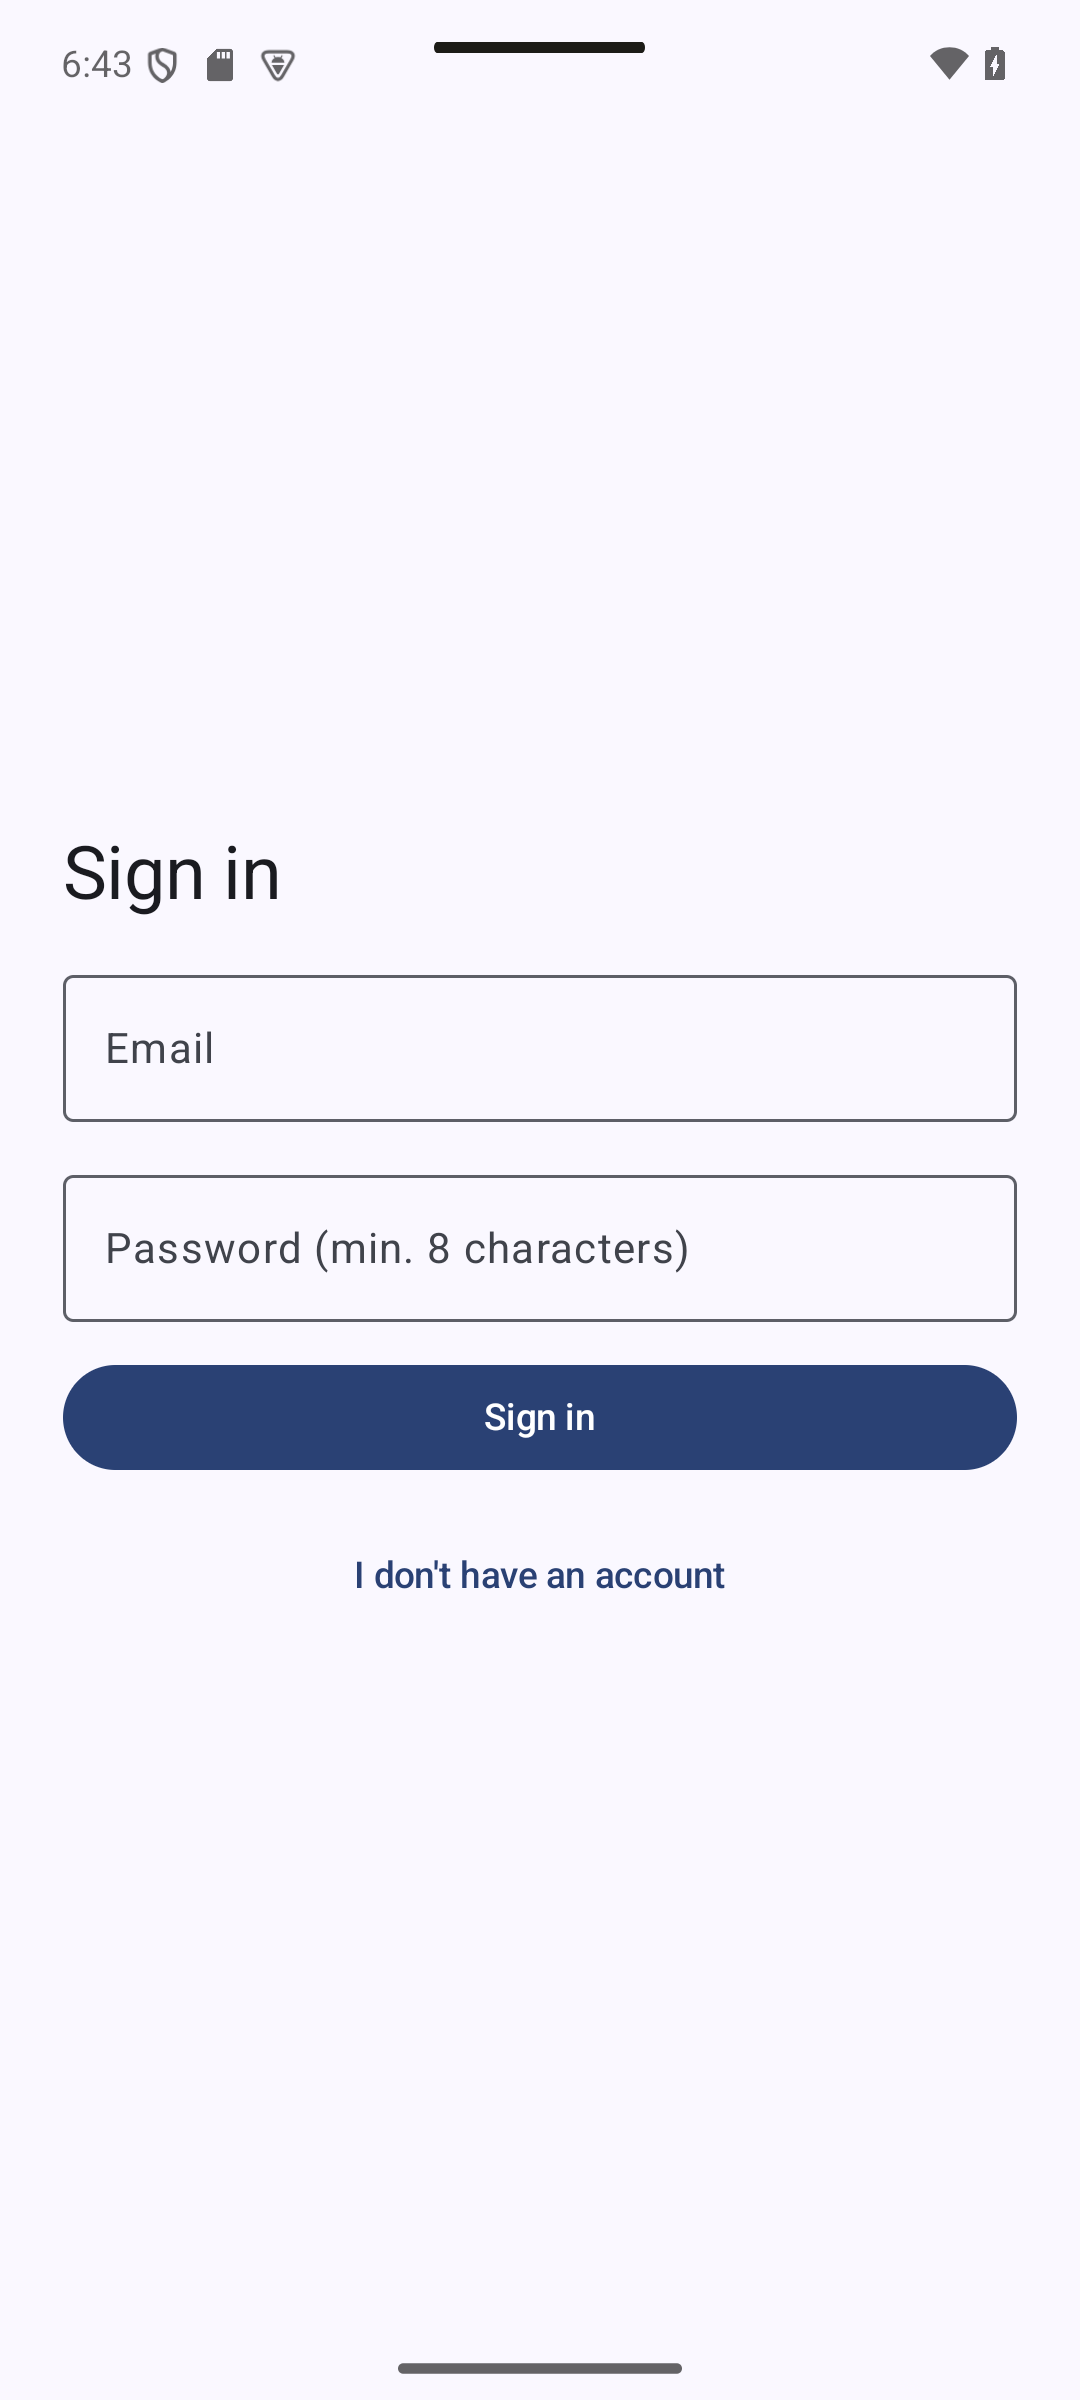
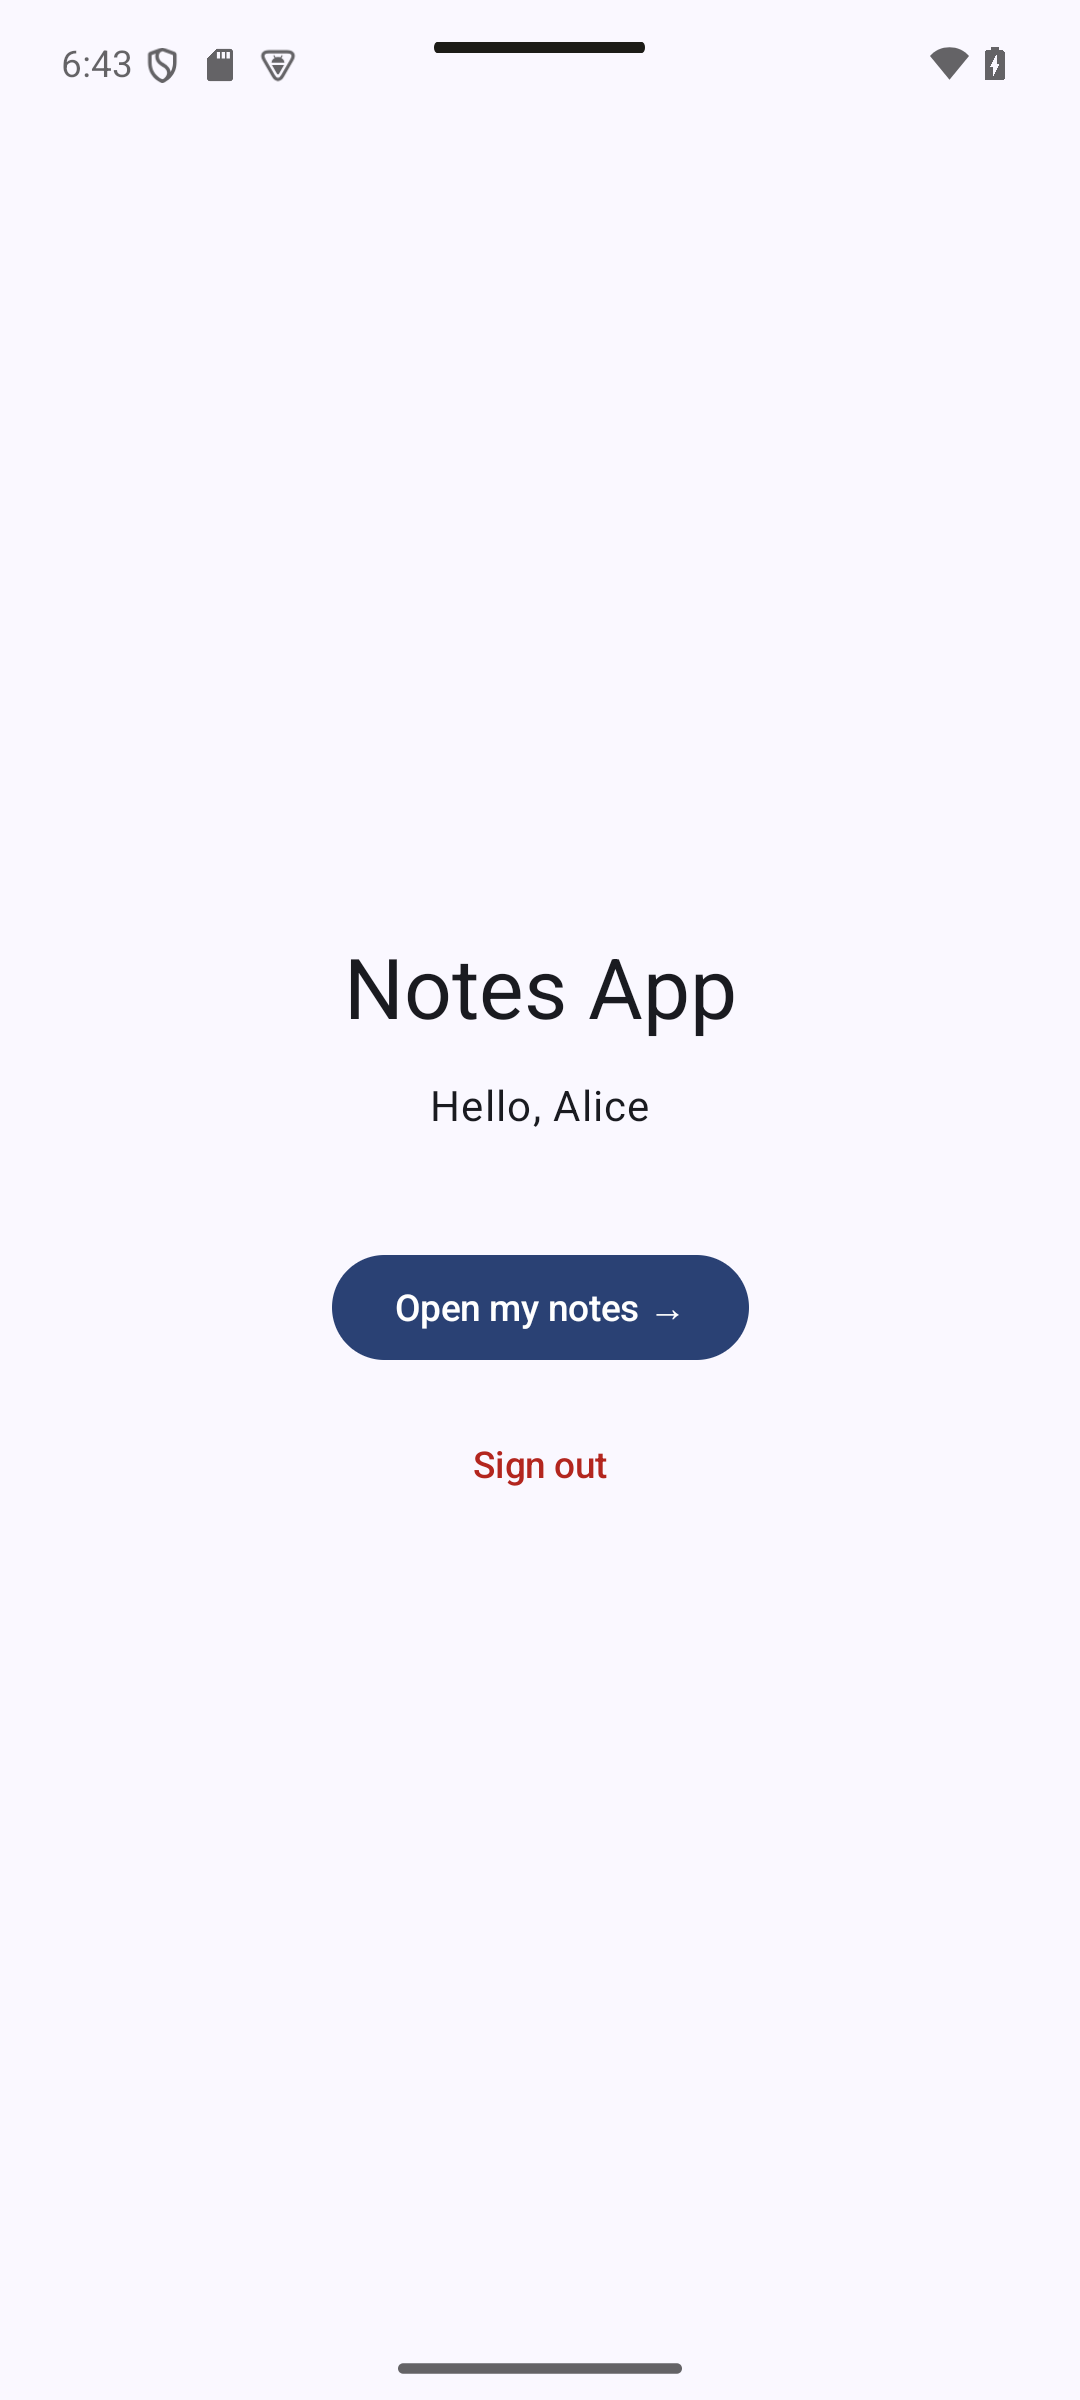
Expected result — native UI preview. Target UI before and after authentication. These are local preview states; no Appwrite session was created for these captures.
7.1 Enable Email/Password Authentication
Expected result — native UI preview. After the login screen in 7.4 is added, the user sees Email and Password. Enable Email/Password in Appwrite separately.
Concepts in this section:
- Authentication answers “who are you?” (account + password → session). Authorization answers “what may you do?” (permissions). We need both.
- A session is created by the server after a successful login. The SDK stores it (in cookies saved on the device) and sends it with every request.
- A user id (
$id) uniquely identifies the account: it is what permissions refer to.
Visual guide. Keep two questions separate: authentication identifies the current user; the permissions diagram in section 8 explains what that user may access.
In the Appwrite console, open Auth → Settings and check that Email/Password is enabled (it is by default). Auth → Users will list the accounts created from your app.
7.2 Authentication Repository
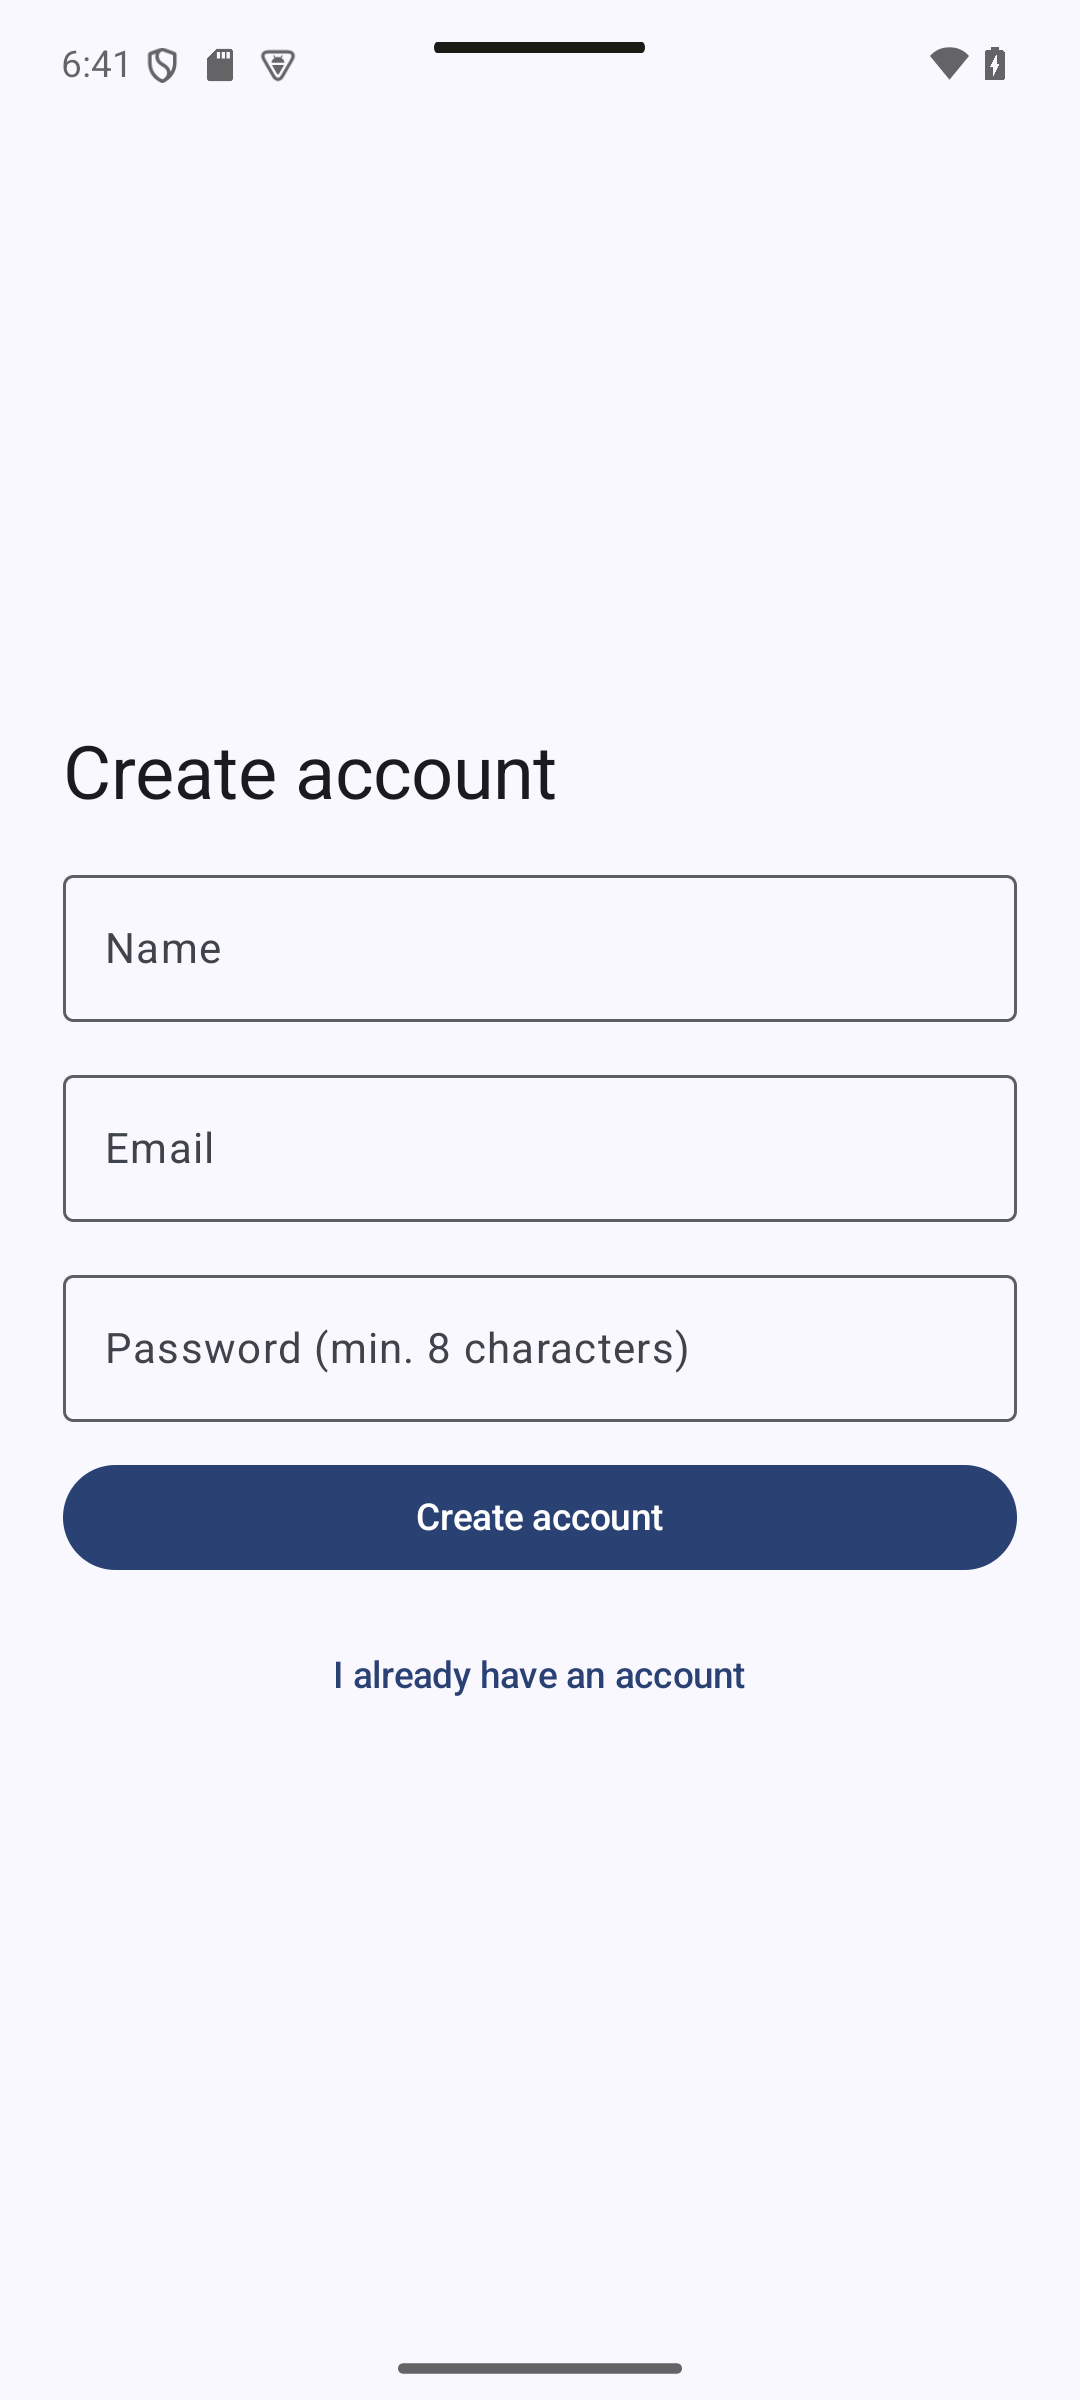
Expected result — native UI preview. The repository has no UI of its own. These previews show its intended outcomes: account creation and an authenticated home. They do not validate network calls.
Concepts in this section:
- The same four operations as in the other tutorials: get the current user, sign up, sign in, sign out
- Creating an account does not open a session: you must sign in afterwards
createEmailPasswordSessionis the current method name- Our own small
UserInfotype keeps the Appwrite model out of the UI
Visual guide. Follow the new-user path: creating an account is followed by signing in and reading the current user.
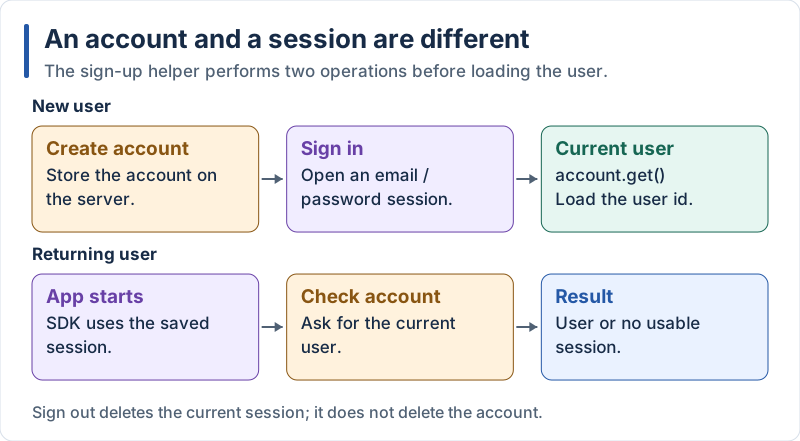
The SDK manages the session; deleting that session signs out the current device.
// app/src/main/java/com/example/notes/model/UserInfo.kt
package com.example.notes.model

data class UserInfo(
    val id: String,
    val name: String,
    val email: String,
)
// app/src/main/java/com/example/notes/data/AuthRepository.kt
package com.example.notes.data
import com.example.notes.model.UserInfo
import io.appwrite.ID
import io.appwrite.exceptions.AppwriteException
import io.appwrite.models.User
import io.appwrite.services.Account
class AuthRepository(private val account: Account) {
/** Returns the logged-in user, or null when there is no valid session. */
suspend fun currentUser(): UserInfo? =
try {
account.get().toUserInfo()
} catch (e: AppwriteException) {
null // 401: nobody is logged in
}
suspend fun signIn(email: String, password: String): UserInfo {
account.createEmailPasswordSession(email = email, password = password)
return account.get().toUserInfo()
}
suspend fun signUp(name: String, email: String, password: String): UserInfo {
account.create(userId = ID.unique(), email = email, password = password, name = name)
// Creating an account does not open a session: sign in right after
return signIn(email, password)
}
suspend fun signOut() {
account.deleteSession(sessionId = "current")
}
}
private fun User<Map<String, Any>>.toUserInfo() = UserInfo(id = id, name = name, email = email)Expose it from the container:
// app/src/main/java/com/example/notes/AppContainer.kt (excerpt)
import com.example.notes.data.AuthRepository

class AppContainer(context: Context) {
    // ...client, tablesDB, account and notesRepository as before...

    val authRepository = AuthRepository(account)
}
Explanation:
account.get()fails with anAppwriteExceptionwhen nobody is logged in: we turn that failure intonull, which is easier to usedeleteSession(sessionId = "current")ends the session of this device- The app never stores the password: only the session managed by the SDK
- The repository returns
UserInfo, not the SDK’sUserclass, so nothing above this layer depends on Appwrite (the same idea asNote)
7.3 Authentication State in a ViewModel
Expected result — native UI preview. The session state selects the visible screen. Also test session restoration after restarting your connected app; this preview does not test restoration.
Concepts in this section:
- Several screens need to know who is logged in: this is app-wide state, held in a ViewModel owned by the Activity (it lives as long as the app screen)
- The state has three phases, modeled as a sealed interface: loading (do we have a session?), signed out, signed in
- Kotlin’s
sealedtypes let the compiler check that you handled every case in awhen
Visual guide. Start in Initializing; do not choose Login or Home until the account check finishes.
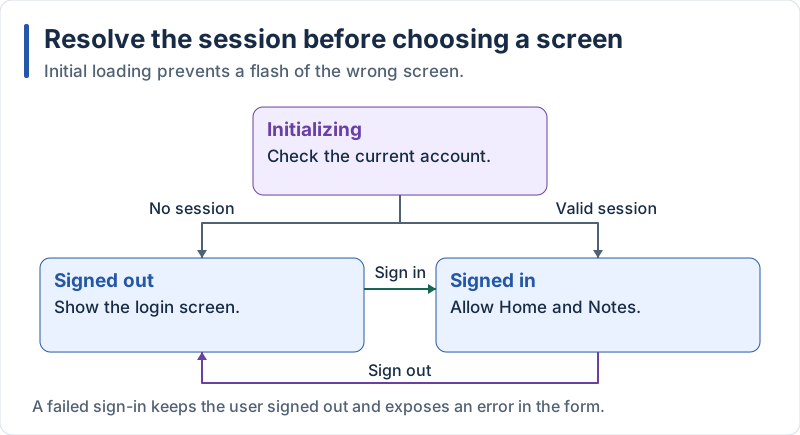
The session has three phases even though only two represent a known login status.
// app/src/main/java/com/example/notes/ui/AuthViewModel.kt
package com.example.notes.ui

import androidx.lifecycle.ViewModel
import androidx.lifecycle.ViewModelProvider.AndroidViewModelFactory.Companion.APPLICATION_KEY
import androidx.lifecycle.viewModelScope
import androidx.lifecycle.viewmodel.initializer
import androidx.lifecycle.viewmodel.viewModelFactory
import com.example.notes.NotesApplication
import com.example.notes.data.AuthRepository
import com.example.notes.model.UserInfo
import kotlin.coroutines.cancellation.CancellationException
import kotlinx.coroutines.flow.MutableStateFlow
import kotlinx.coroutines.flow.StateFlow
import kotlinx.coroutines.flow.asStateFlow
import kotlinx.coroutines.flow.update
import kotlinx.coroutines.launch

sealed interface Session {
    data object Loading : Session // do we have a session? (app start)
    data object SignedOut : Session
    data class SignedIn(val user: UserInfo) : Session
}

data class AuthUiState(
    val session: Session = Session.Loading,
    val busy: Boolean = false, // a sign-in / sign-up request is running
    val error: String? = null,
)

class AuthViewModel(private val repository: AuthRepository) : ViewModel() {

    private val _state = MutableStateFlow(AuthUiState())
    val state: StateFlow<AuthUiState> = _state.asStateFlow()

    init {
        // Restore the session stored by the SDK
        viewModelScope.launch {
            val user = try {
                repository.currentUser()
            } catch (e: CancellationException) {
                throw e
            } catch (e: Exception) {
                null // e.g. no network: ask the user to sign in
            }
            _state.update {
                it.copy(session = if (user != null) Session.SignedIn(user) else Session.SignedOut)
            }
        }
    }

    fun signIn(email: String, password: String) = authenticate {
        repository.signIn(email.trim(), password)
    }

    fun signUp(name: String, email: String, password: String) = authenticate {
        repository.signUp(name.trim(), email.trim(), password)
    }

    fun signOut() {
        viewModelScope.launch {
            try {
                repository.signOut()
            } catch (e: CancellationException) {
                throw e
            } catch (e: Exception) {
                // Even if the server cannot be reached, leave the signed-in screens
            }
            _state.value = AuthUiState(session = Session.SignedOut)
        }
    }

    private fun authenticate(request: suspend () -> UserInfo) {
        viewModelScope.launch {
            _state.update { it.copy(busy = true, error = null) }
            try {
                val user = request()
                _state.value = AuthUiState(session = Session.SignedIn(user))
            } catch (e: CancellationException) {
                throw e
            } catch (e: Exception) {
                _state.update { it.copy(busy = false, error = e.message ?: "Something went wrong") }
            }
        }
    }

    companion object {
        val Factory = viewModelFactory {
            initializer {
                val app = this[APPLICATION_KEY] as NotesApplication
                AuthViewModel(app.container.authRepository)
            }
        }
    }
}
Explanation:
sealed interface Sessionhas exactly three possible values. Awhenover it must handle all three, or the code does not compile: impossible states are impossibledata objectis a singleton with a readabletoString;data class SignedIn(val user)carries the usersignInandsignUpshareauthenticate { ... }, which takes asuspendlambda: it factors out the “busy → request → error / success” pattern (the role of_runin the Flutter provider)- On success the whole state is replaced (
busyanderrorreset), which is simpler than resetting fields one by one - Compare: in React Native this state lives in a Context, in Flutter in a
ChangeNotifier. In Android it is a ViewModel with aStateFlow, the same tool as for notes
7.4 Login and Registration Screen
Expected result — native UI preview. The form switches between sign in and registration; a supplied error is shown beneath the fields. The error in this preview is simulated, not an Appwrite response.
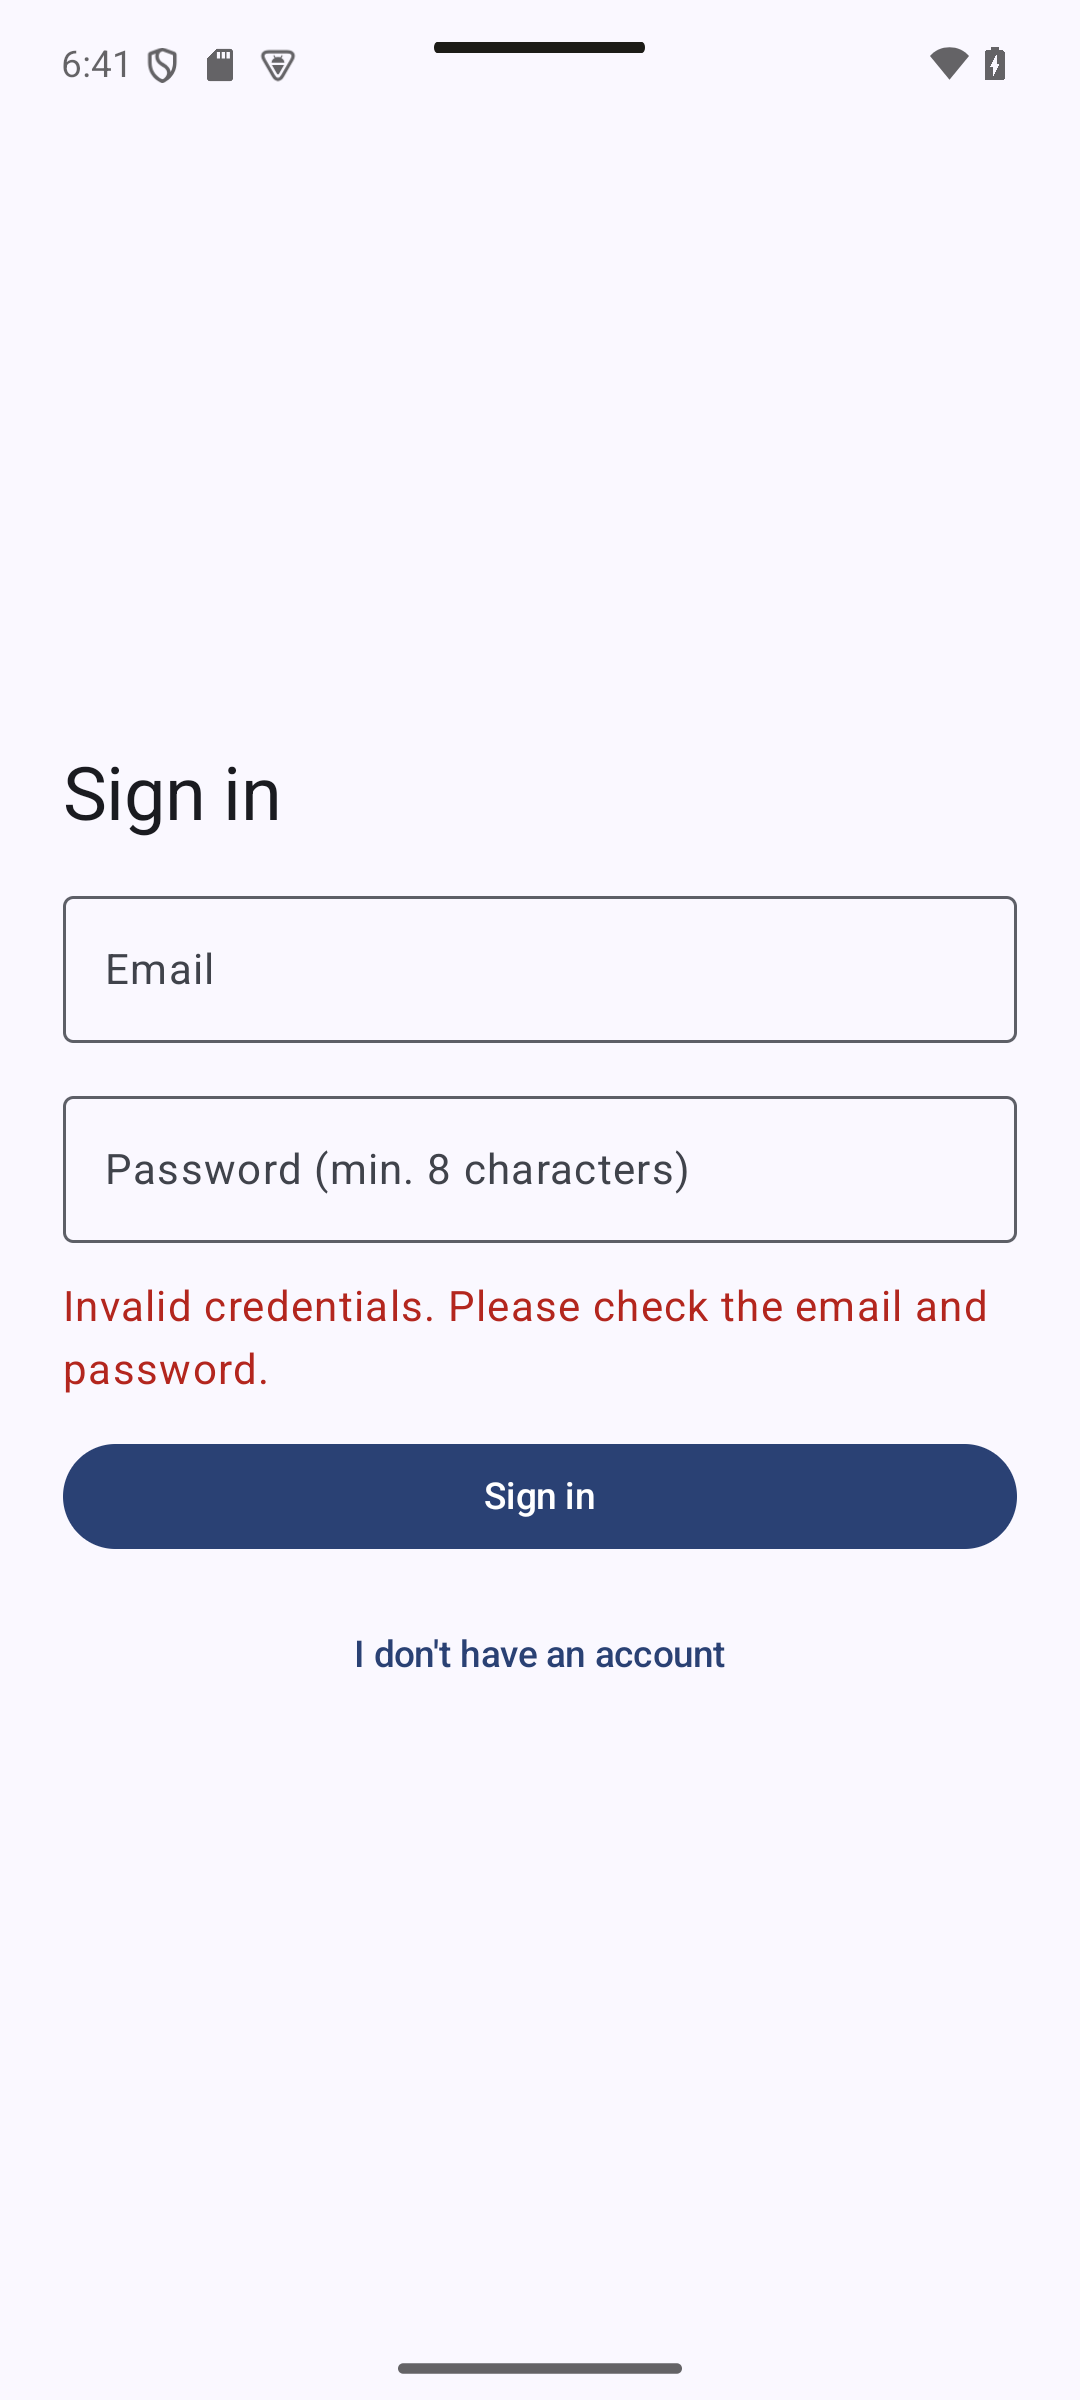
Concepts in this section: one form for two modes (sign in / create account), disabling the button while a request runs, showing server errors, keyboard types and password masking.
Visual guide. Track the submit button from ready to busy, then inspect the success and error feedback.
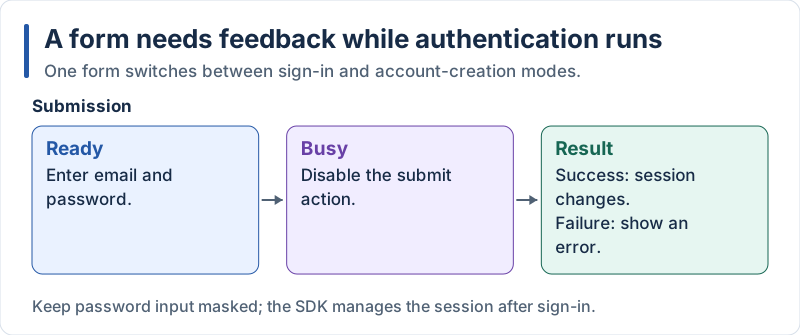
Successful authentication changes the shared session; a failure remains visible in the form.
// app/src/main/java/com/example/notes/ui/LoginScreen.kt
package com.example.notes.ui

import androidx.compose.foundation.layout.Arrangement
import androidx.compose.foundation.layout.Column
import androidx.compose.foundation.layout.fillMaxSize
import androidx.compose.foundation.layout.fillMaxWidth
import androidx.compose.foundation.layout.imePadding
import androidx.compose.foundation.layout.padding
import androidx.compose.foundation.layout.size
import androidx.compose.foundation.rememberScrollState
import androidx.compose.foundation.text.KeyboardOptions
import androidx.compose.foundation.verticalScroll
import androidx.compose.material3.Button
import androidx.compose.material3.CircularProgressIndicator
import androidx.compose.material3.MaterialTheme
import androidx.compose.material3.OutlinedTextField
import androidx.compose.material3.Scaffold
import androidx.compose.material3.Text
import androidx.compose.material3.TextButton
import androidx.compose.runtime.Composable
import androidx.compose.runtime.getValue
import androidx.compose.runtime.mutableStateOf
import androidx.compose.runtime.saveable.rememberSaveable
import androidx.compose.runtime.setValue
import androidx.compose.ui.Alignment
import androidx.compose.ui.Modifier
import androidx.compose.ui.text.input.KeyboardType
import androidx.compose.ui.text.input.PasswordVisualTransformation
import androidx.compose.ui.unit.dp

@Composable
fun LoginScreen(
    busy: Boolean,
    error: String?,
    onSignIn: (email: String, password: String) -> Unit,
    onSignUp: (name: String, email: String, password: String) -> Unit,
) {
    var registering by rememberSaveable { mutableStateOf(false) }
    var name by rememberSaveable { mutableStateOf("") }
    var email by rememberSaveable { mutableStateOf("") }
    var password by rememberSaveable { mutableStateOf("") }

    Scaffold { innerPadding ->
        Column(
            modifier = Modifier
                .fillMaxSize()
                .padding(innerPadding)
                .imePadding() // keep the form visible above the keyboard
                .verticalScroll(rememberScrollState())
                .padding(24.dp),
            verticalArrangement = Arrangement.spacedBy(12.dp, Alignment.CenterVertically),
        ) {
            Text(
                text = if (registering) "Create account" else "Sign in",
                style = MaterialTheme.typography.headlineMedium,
            )

            if (registering) {
                OutlinedTextField(
                    value = name,
                    onValueChange = { name = it },
                    label = { Text("Name") },
                    singleLine = true,
                    modifier = Modifier.fillMaxWidth(),
                )
            }
            OutlinedTextField(
                value = email,
                onValueChange = { email = it },
                label = { Text("Email") },
                singleLine = true,
                keyboardOptions = KeyboardOptions(keyboardType = KeyboardType.Email),
                modifier = Modifier.fillMaxWidth(),
            )
            OutlinedTextField(
                value = password,
                onValueChange = { password = it },
                label = { Text("Password (min. 8 characters)") },
                singleLine = true,
                visualTransformation = PasswordVisualTransformation(),
                keyboardOptions = KeyboardOptions(keyboardType = KeyboardType.Password),
                modifier = Modifier.fillMaxWidth(),
            )

            if (error != null) {
                Text(error, color = MaterialTheme.colorScheme.error)
            }

            Button(
                onClick = {
                    if (registering) onSignUp(name, email, password) else onSignIn(email, password)
                },
                enabled = !busy,
                modifier = Modifier.fillMaxWidth(),
            ) {
                if (busy) {
                    CircularProgressIndicator(modifier = Modifier.size(20.dp), strokeWidth = 2.dp)
                } else {
                    Text(if (registering) "Create account" else "Sign in")
                }
            }

            TextButton(
                onClick = { registering = !registering },
                modifier = Modifier.fillMaxWidth(),
            ) {
                Text(if (registering) "I already have an account" else "I don't have an account")
            }
        }
    }
}
Explanation:
LoginScreenis stateless about the business logic: it receivesbusyanderrorand reports events withonSignIn/onSignUp. It keeps only the text being typed (UI state,rememberSaveableso it survives rotation)- Named parameters in a function type,
(email: String, password: String) -> Unit, document what the callback receives PasswordVisualTransformation()masks the password;KeyboardType.Email/Passwordchoose the right keyboardModifier.imePadding()adds padding equal to the keyboard height, andverticalScrolllets the form scroll in landscape or on small screensenabled = !busydisables the button during the request, to avoid duplicate submissions- After a successful sign-in we do not navigate: the app root reacts to the new session (next section)
7.5 Protecting Screens and Logging Out
Expected result — native UI preview. The home shows the user name and Sign out. Pressing Sign out returns to the login form in this preview; verify real session deletion and protected navigation separately.
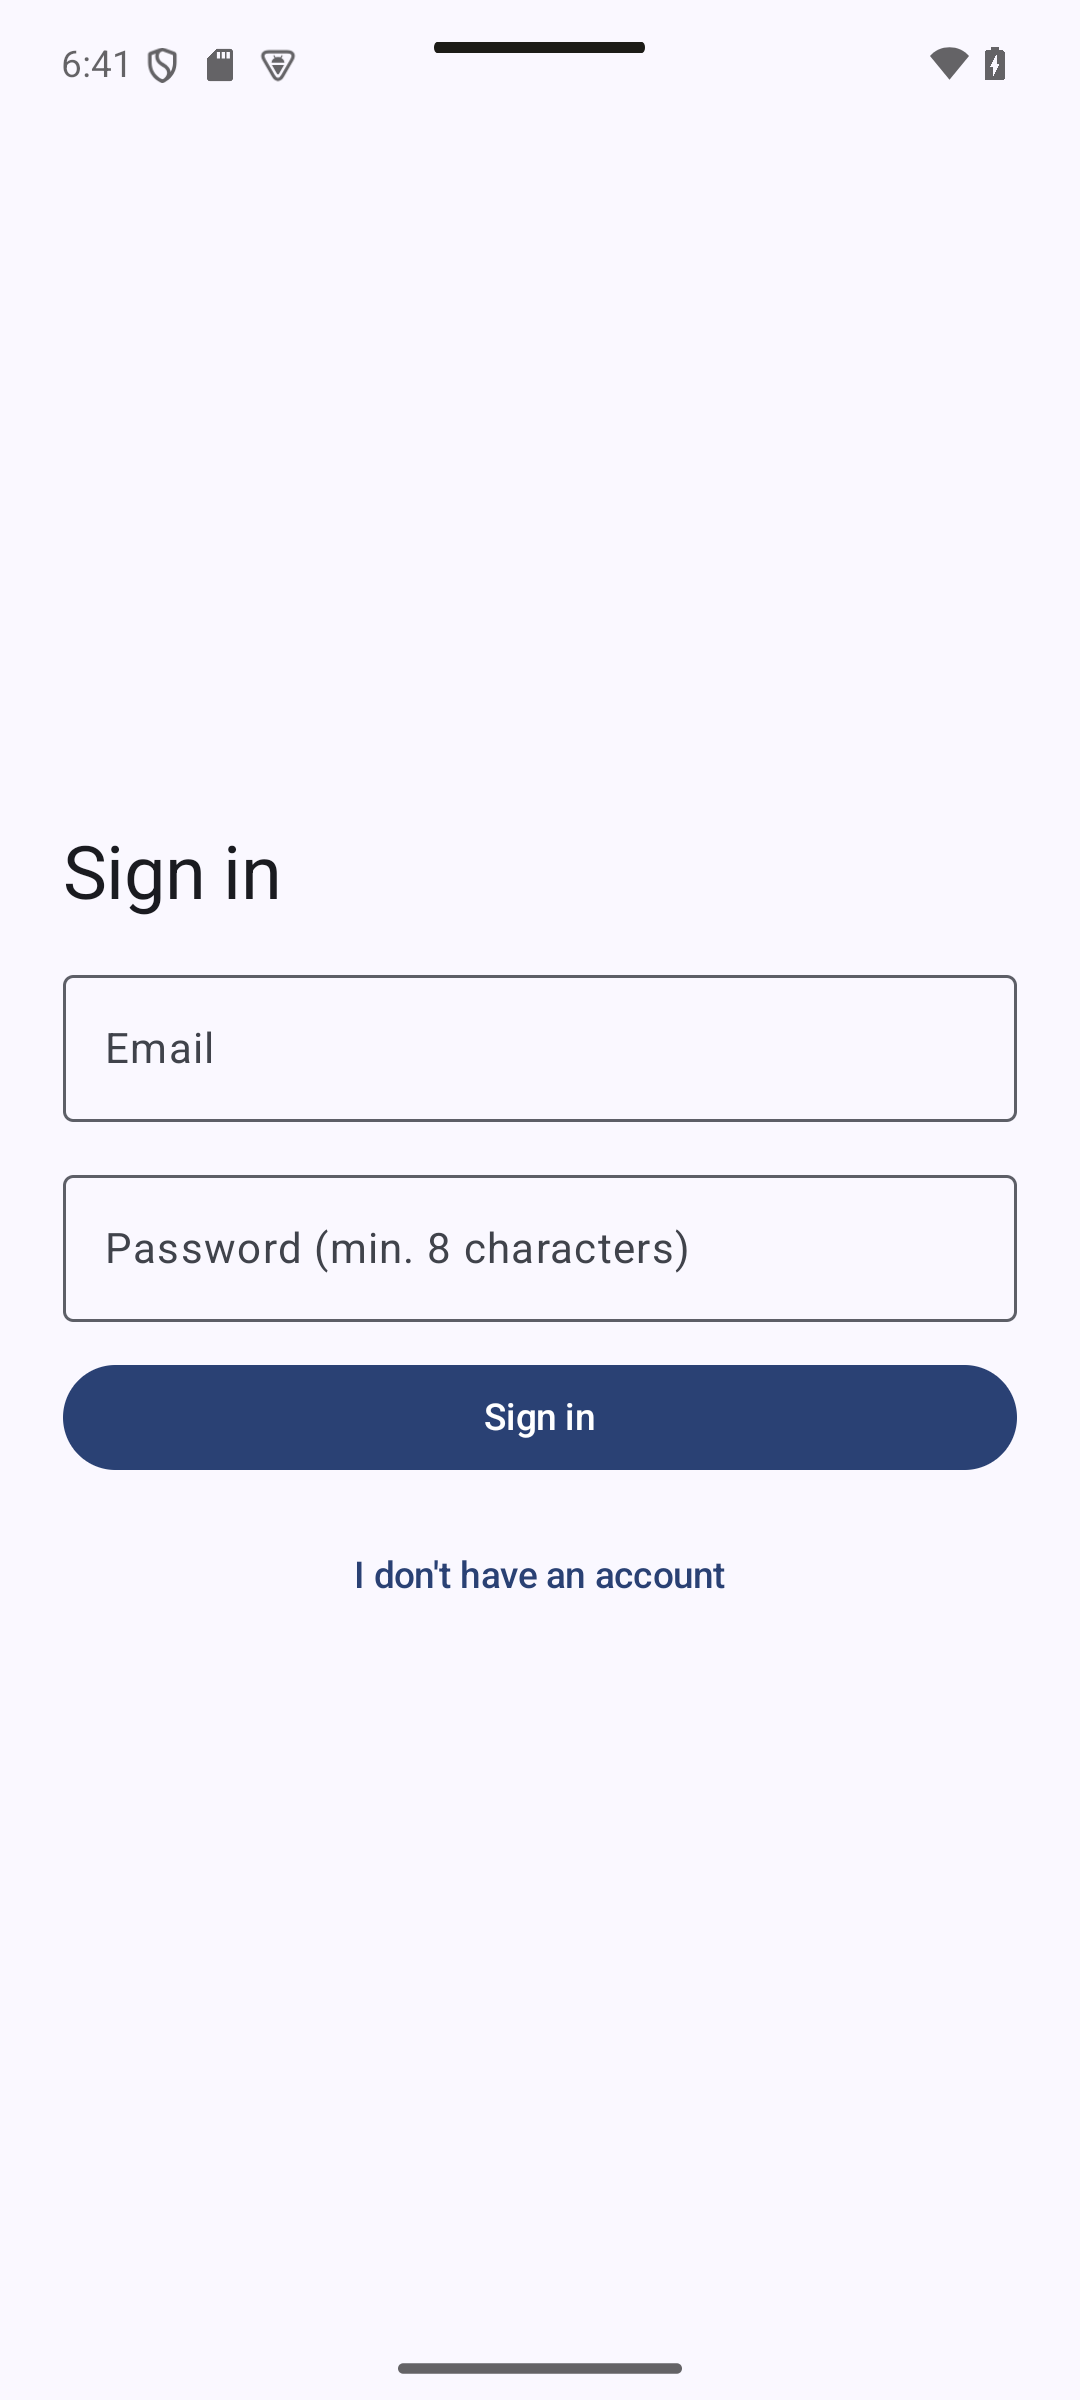
Concepts in this section:
- Guards: the root of the app, not each screen, decides which screens a logged-out user may see
- Waiting for the initial session check before showing anything (otherwise the login screen flashes for a logged-in user)
- With Navigation 3 the back stack is plain state, so the guard is just a
whenon the session - Important: hiding screens is a user-experience feature. Real protection is done by the server permissions in section 8.
Visual guide. Match each session state to its navigation branch.
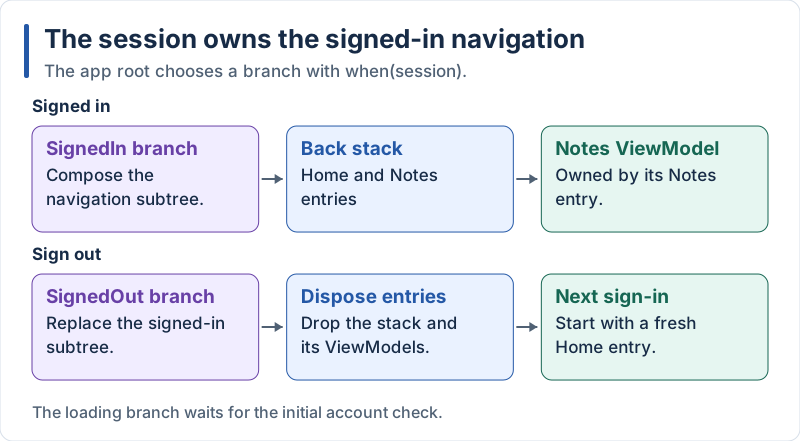
The router controls screen access; server permissions remain responsible for data access.
Rewrite NotesApp so that it chooses what to display from the session. The navigation code of Part 1 moves into a private composable that exists only while the user is signed in:
// app/src/main/java/com/example/notes/NotesApp.kt
package com.example.notes

import androidx.compose.foundation.layout.Box
import androidx.compose.foundation.layout.fillMaxSize
import androidx.compose.material3.CircularProgressIndicator
import androidx.compose.runtime.Composable
import androidx.compose.runtime.getValue
import androidx.compose.ui.Alignment
import androidx.compose.ui.Modifier
import androidx.lifecycle.compose.collectAsStateWithLifecycle
import androidx.lifecycle.viewmodel.compose.viewModel
import androidx.lifecycle.viewmodel.navigation3.rememberViewModelStoreNavEntryDecorator
import androidx.navigation3.runtime.entryProvider
import androidx.navigation3.runtime.rememberNavBackStack
import androidx.navigation3.runtime.rememberSaveableStateHolderNavEntryDecorator
import androidx.navigation3.ui.NavDisplay
import com.example.notes.model.UserInfo
import com.example.notes.ui.AuthViewModel
import com.example.notes.ui.HomeScreen
import com.example.notes.ui.LoginScreen
import com.example.notes.ui.NotesScreen
import com.example.notes.ui.Session

@Composable
fun NotesApp(authViewModel: AuthViewModel = viewModel(factory = AuthViewModel.Factory)) {
    val auth by authViewModel.state.collectAsStateWithLifecycle()

    // The guard: exactly one of these three is displayed
    when (val session = auth.session) {
        Session.Loading -> {
            Box(Modifier.fillMaxSize(), contentAlignment = Alignment.Center) {
                CircularProgressIndicator()
            }
        }

        Session.SignedOut -> LoginScreen(
            busy = auth.busy,
            error = auth.error,
            onSignIn = authViewModel::signIn,
            onSignUp = authViewModel::signUp,
        )

        is Session.SignedIn -> SignedInNavigation(
            user = session.user,
            onSignOut = authViewModel::signOut,
        )
    }
}

@Composable
private fun SignedInNavigation(user: UserInfo, onSignOut: () -> Unit) {
    val backStack = rememberNavBackStack(Home)

    NavDisplay(
        backStack = backStack,
        onBack = { backStack.removeLastOrNull() },
        entryDecorators = listOf(
            rememberSaveableStateHolderNavEntryDecorator(),
            rememberViewModelStoreNavEntryDecorator(),
        ),
        entryProvider = entryProvider {
            entry<Home> {
                HomeScreen(
                    user = user,
                    onOpenNotes = { backStack.add(Notes) },
                    onSignOut = onSignOut,
                )
            }
            entry<Notes> {
                NotesScreen(
                    userId = user.id,
                    onBack = { backStack.removeLastOrNull() },
                )
            }
        },
    )
}
Add the user name and a Sign out button to the home screen:
// app/src/main/java/com/example/notes/ui/HomeScreen.kt
package com.example.notes.ui

import androidx.compose.foundation.layout.Arrangement
import androidx.compose.foundation.layout.Column
import androidx.compose.foundation.layout.Spacer
import androidx.compose.foundation.layout.fillMaxSize
import androidx.compose.foundation.layout.height
import androidx.compose.foundation.layout.padding
import androidx.compose.material3.Button
import androidx.compose.material3.MaterialTheme
import androidx.compose.material3.Scaffold
import androidx.compose.material3.Text
import androidx.compose.material3.TextButton
import androidx.compose.runtime.Composable
import androidx.compose.ui.Alignment
import androidx.compose.ui.Modifier
import androidx.compose.ui.tooling.preview.Preview
import androidx.compose.ui.unit.dp
import com.example.notes.model.UserInfo
import com.example.notes.ui.theme.NotesTheme

@Composable
fun HomeScreen(
    user: UserInfo,
    onOpenNotes: () -> Unit,
    onSignOut: () -> Unit,
    modifier: Modifier = Modifier,
) {
    Scaffold(modifier = modifier) { innerPadding ->
        Column(
            modifier = Modifier
                .fillMaxSize()
                .padding(innerPadding),
            verticalArrangement = Arrangement.spacedBy(12.dp, Alignment.CenterVertically),
            horizontalAlignment = Alignment.CenterHorizontally,
        ) {
            Text("Notes App", style = MaterialTheme.typography.headlineLarge)
            Text("Hello, ${user.name.ifBlank { user.email }}", style = MaterialTheme.typography.bodyLarge)
            Spacer(Modifier.height(16.dp))
            Button(onClick = onOpenNotes) {
                Text("Open my notes →")
            }
            TextButton(onClick = onSignOut) {
                Text("Sign out", color = MaterialTheme.colorScheme.error)
            }
        }
    }
}

@Preview(showBackground = true)
@Composable
private fun HomeScreenPreview() {
    NotesTheme {
        HomeScreen(UserInfo("1", "Ada", "[email protected]"), onOpenNotes = {}, onSignOut = {})
    }
}
Explanation:
when (val session = auth.session)over asealed interfaceis exhaustive: add a fourth case toSessionand this code stops compiling until you handle it- While the session is
Loadingthe app shows a spinner. (Android also offers a SplashScreen API to keep the launch screen visible; a spinner is enough here) SignedInNavigationonly exists while signed in. When the user signs out, it leaves the composition: its back stack and its screens’ ViewModels are discarded. After the next sign-in the app starts atHomewith a clean state, and the previous user’s notes are never visible to the next user- This is the third way of writing the same guard: Expo Router has
Stack.Protected,go_routerhasredirect, and Compose just useswhen, because the navigation state is plain data you own user.name.ifBlank { user.email }falls back to the e-mail when the account has no name- Run the app: create an account, check you land on Home, sign out, sign in again. Kill the app and reopen it: you are still signed in, because the SDK stored the session
8. Filtering User Notes
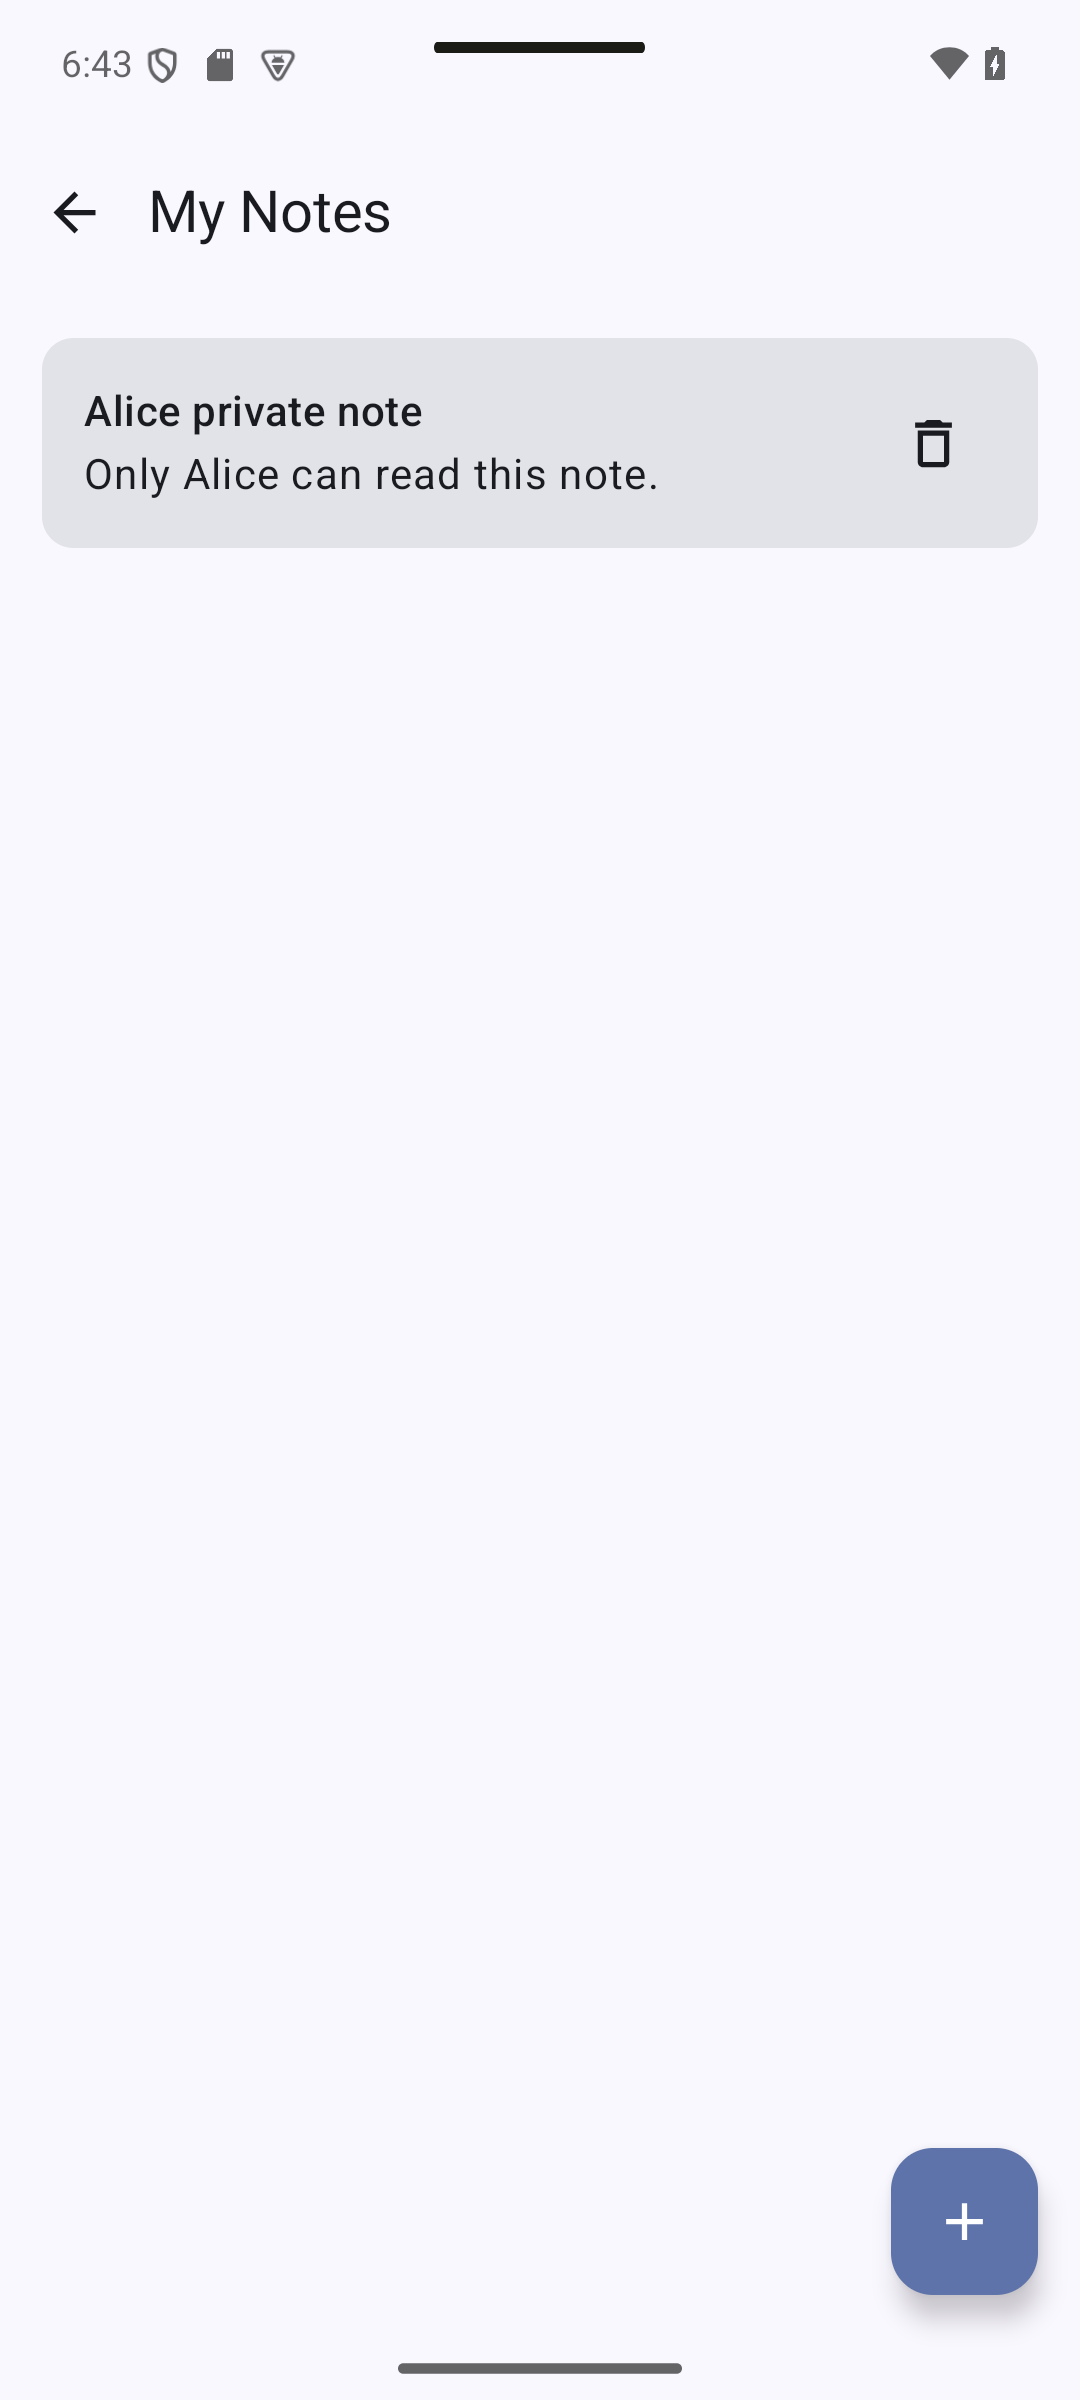
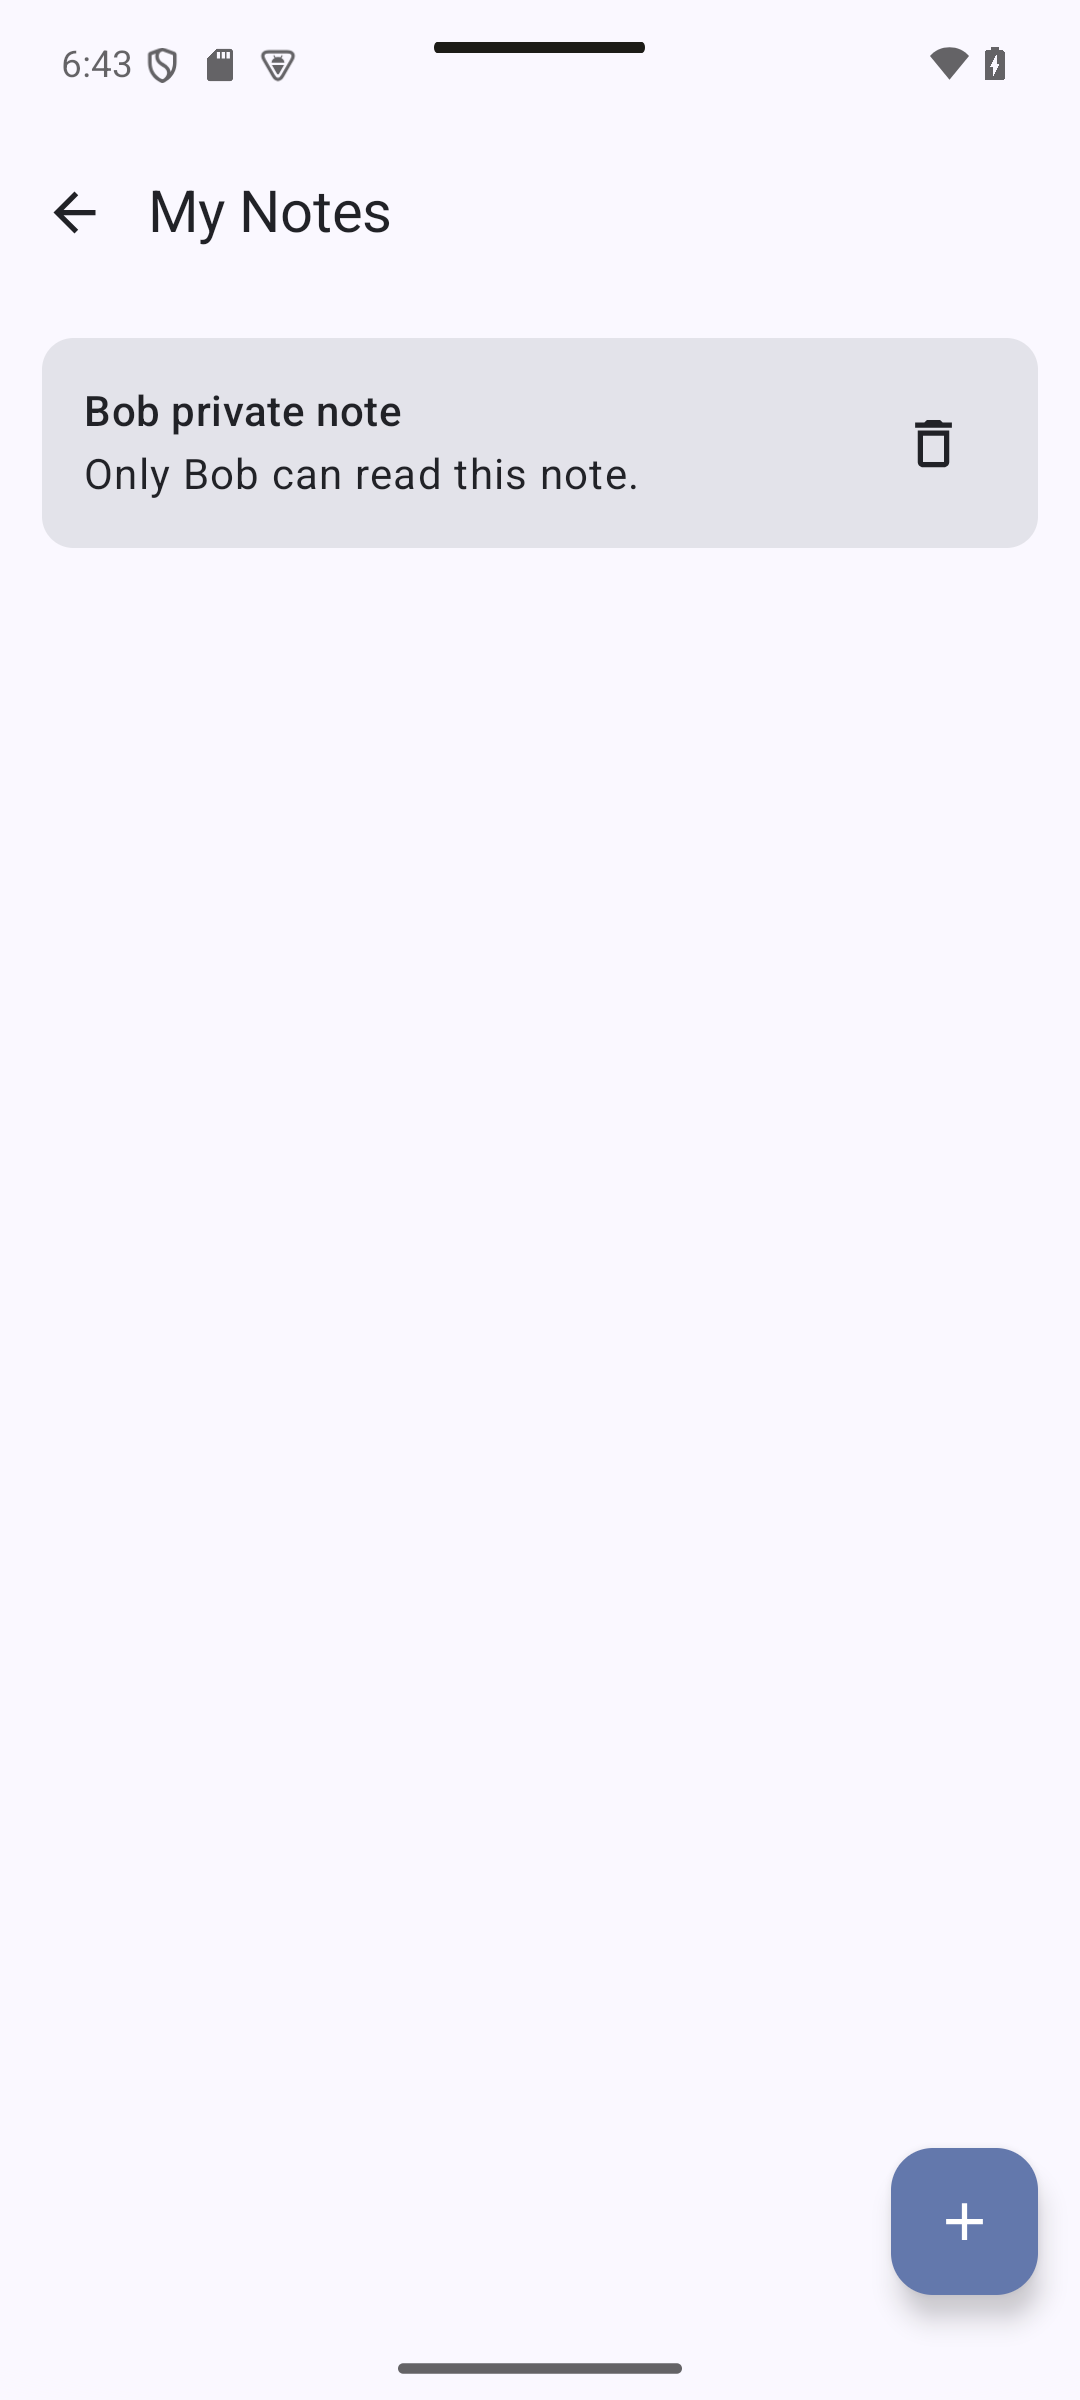
Expected result — native UI preview. Intended result: Alice and Bob see different lists. These two captures use separate sample datasets and are not evidence of server-side isolation.
8.1 Understanding Row Permissions
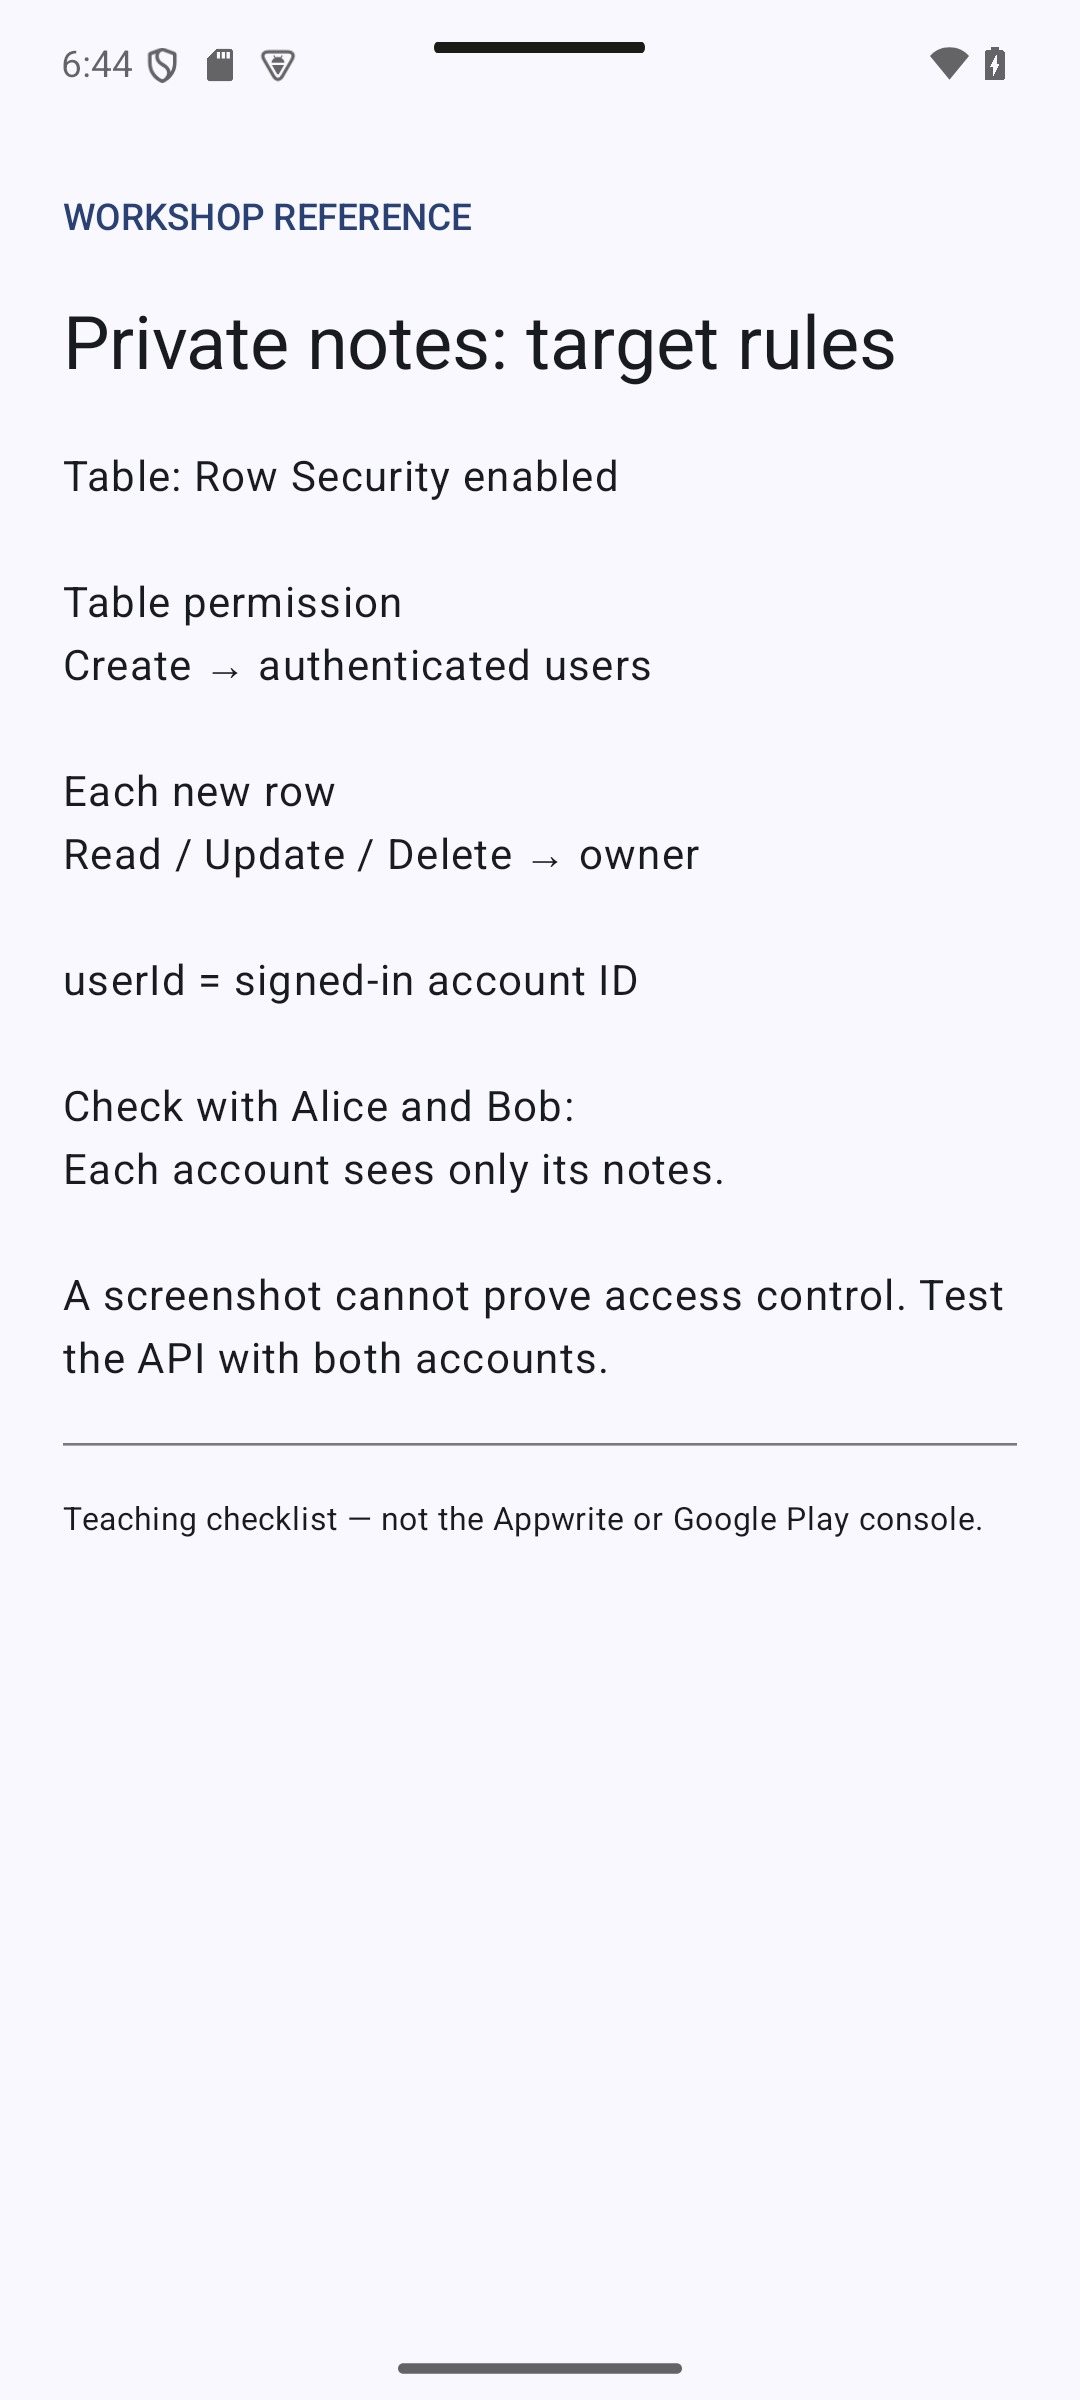
Reference checkpoint. Reference checklist for the target permissions. Confirm them in Appwrite and test access with two real accounts.
Concepts in this section:
- Filtering in the app is not security. Anyone can call the API without your app and ask for every note. Only server-side permissions are reliable.
- Appwrite permissions are strings made of an action and a role:
read("user:123"),update("user:123"),delete("user:123"),create("users") - Table-level permissions apply to all rows. Row security, when enabled, lets each row carry its own permissions.
- Combining both gives the model we want: any logged-in user can create a row, but only its owner can read, update or delete it.
Visual guide. Read this matrix as Alice, then as Bob. Remove broad table read/update/delete grants before applying this model.
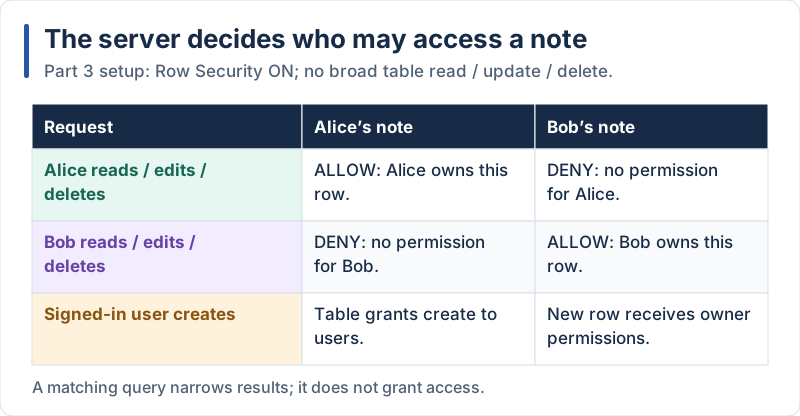
With Row Security enabled, grant create to signed-in users at table level and owner access on each row.
Change the table configuration in the Appwrite console (Databases → NotesDB → notes → Settings). If you already did it for the React Native or Flutter app, the table is ready and you can skip it: all three apps share the same rules.
- Remove the “Any” role you added in Part 2.
- Add the role Users with Create only.
- Turn Row security ON.
- Delete the test rows created in Part 2 (they have no owner).
8.2 Update the Notes Repository
Expected result — native UI preview. Expected owner-specific lists. Filtering sample data is only a visual demonstration; permissions must actually be enforced by Appwrite.
Concepts in this section: attaching permissions when creating a row, filtering with Query.equal.
Visual guide. Follow userId from the authenticated user to the query and the permissions on a newly created row.
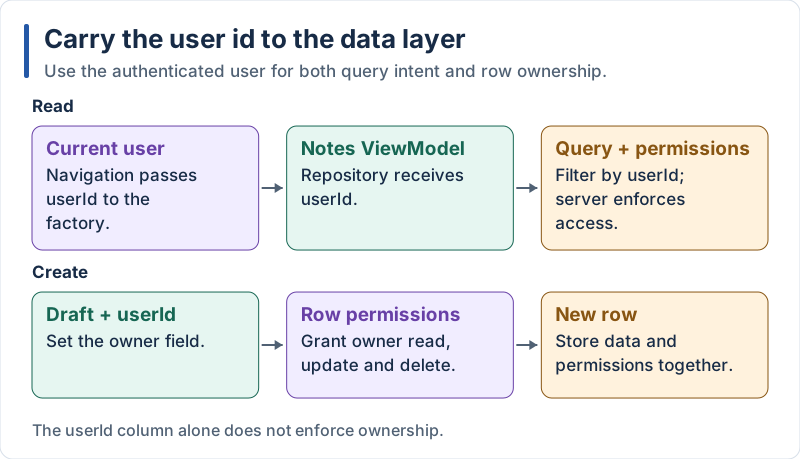
The owner column supports filtering; row permissions enforce access.
// app/src/main/java/com/example/notes/data/NotesRepository.kt
package com.example.notes.data

import com.example.notes.BuildConfig
import com.example.notes.model.Note
import com.example.notes.model.NoteDraft
import io.appwrite.ID
import io.appwrite.Permission
import io.appwrite.Query
import io.appwrite.Role
import io.appwrite.models.Row
import io.appwrite.services.TablesDB

class NotesRepository(private val tablesDB: TablesDB) {

    private val databaseId = BuildConfig.APPWRITE_DATABASE_ID
    private val tableId = BuildConfig.APPWRITE_TABLE_ID

    suspend fun list(userId: String): List<Note> =
        tablesDB.listRows(
            databaseId = databaseId,
            tableId = tableId,
            queries = listOf(Query.equal("userId", userId), Query.orderDesc("\$createdAt")),
        ).rows.map { it.toNote() }

    suspend fun create(userId: String, draft: NoteDraft): Note =
        tablesDB.createRow(
            databaseId = databaseId,
            tableId = tableId,
            rowId = ID.unique(),
            data = mapOf("title" to draft.title, "content" to draft.content, "userId" to userId),
            // Only the owner can read, update or delete this row
            permissions = listOf(
                Permission.read(Role.user(userId)),
                Permission.update(Role.user(userId)),
                Permission.delete(Role.user(userId)),
            ),
        ).toNote()

    suspend fun update(id: String, draft: NoteDraft): Note =
        tablesDB.updateRow(
            databaseId = databaseId,
            tableId = tableId,
            rowId = id,
            data = mapOf("title" to draft.title, "content" to draft.content),
        ).toNote()

    suspend fun delete(id: String) {
        tablesDB.deleteRow(databaseId = databaseId, tableId = tableId, rowId = id)
    }
}

private fun Row<Map<String, Any>>.toNote() = Note(
    id = id,
    title = data["title"] as String,
    content = data["content"] as? String ?: "",
)
Explanation:
Permission.read(Role.user(userId))builds the stringread("user:<id>")- When
permissionsis given, only those permissions are set: the creator gets nothing else automatically, so we list every action the owner needs updateanddeletedid not change: the server refuses them (error 401) if the row belongs to somebody elseQuery.equal("userId", userId)makes the intent explicit. Even without it, the server would only return the rows the user may read: the permission is the protection, the query is a convenience
8.3 Update the ViewModel and the Screen
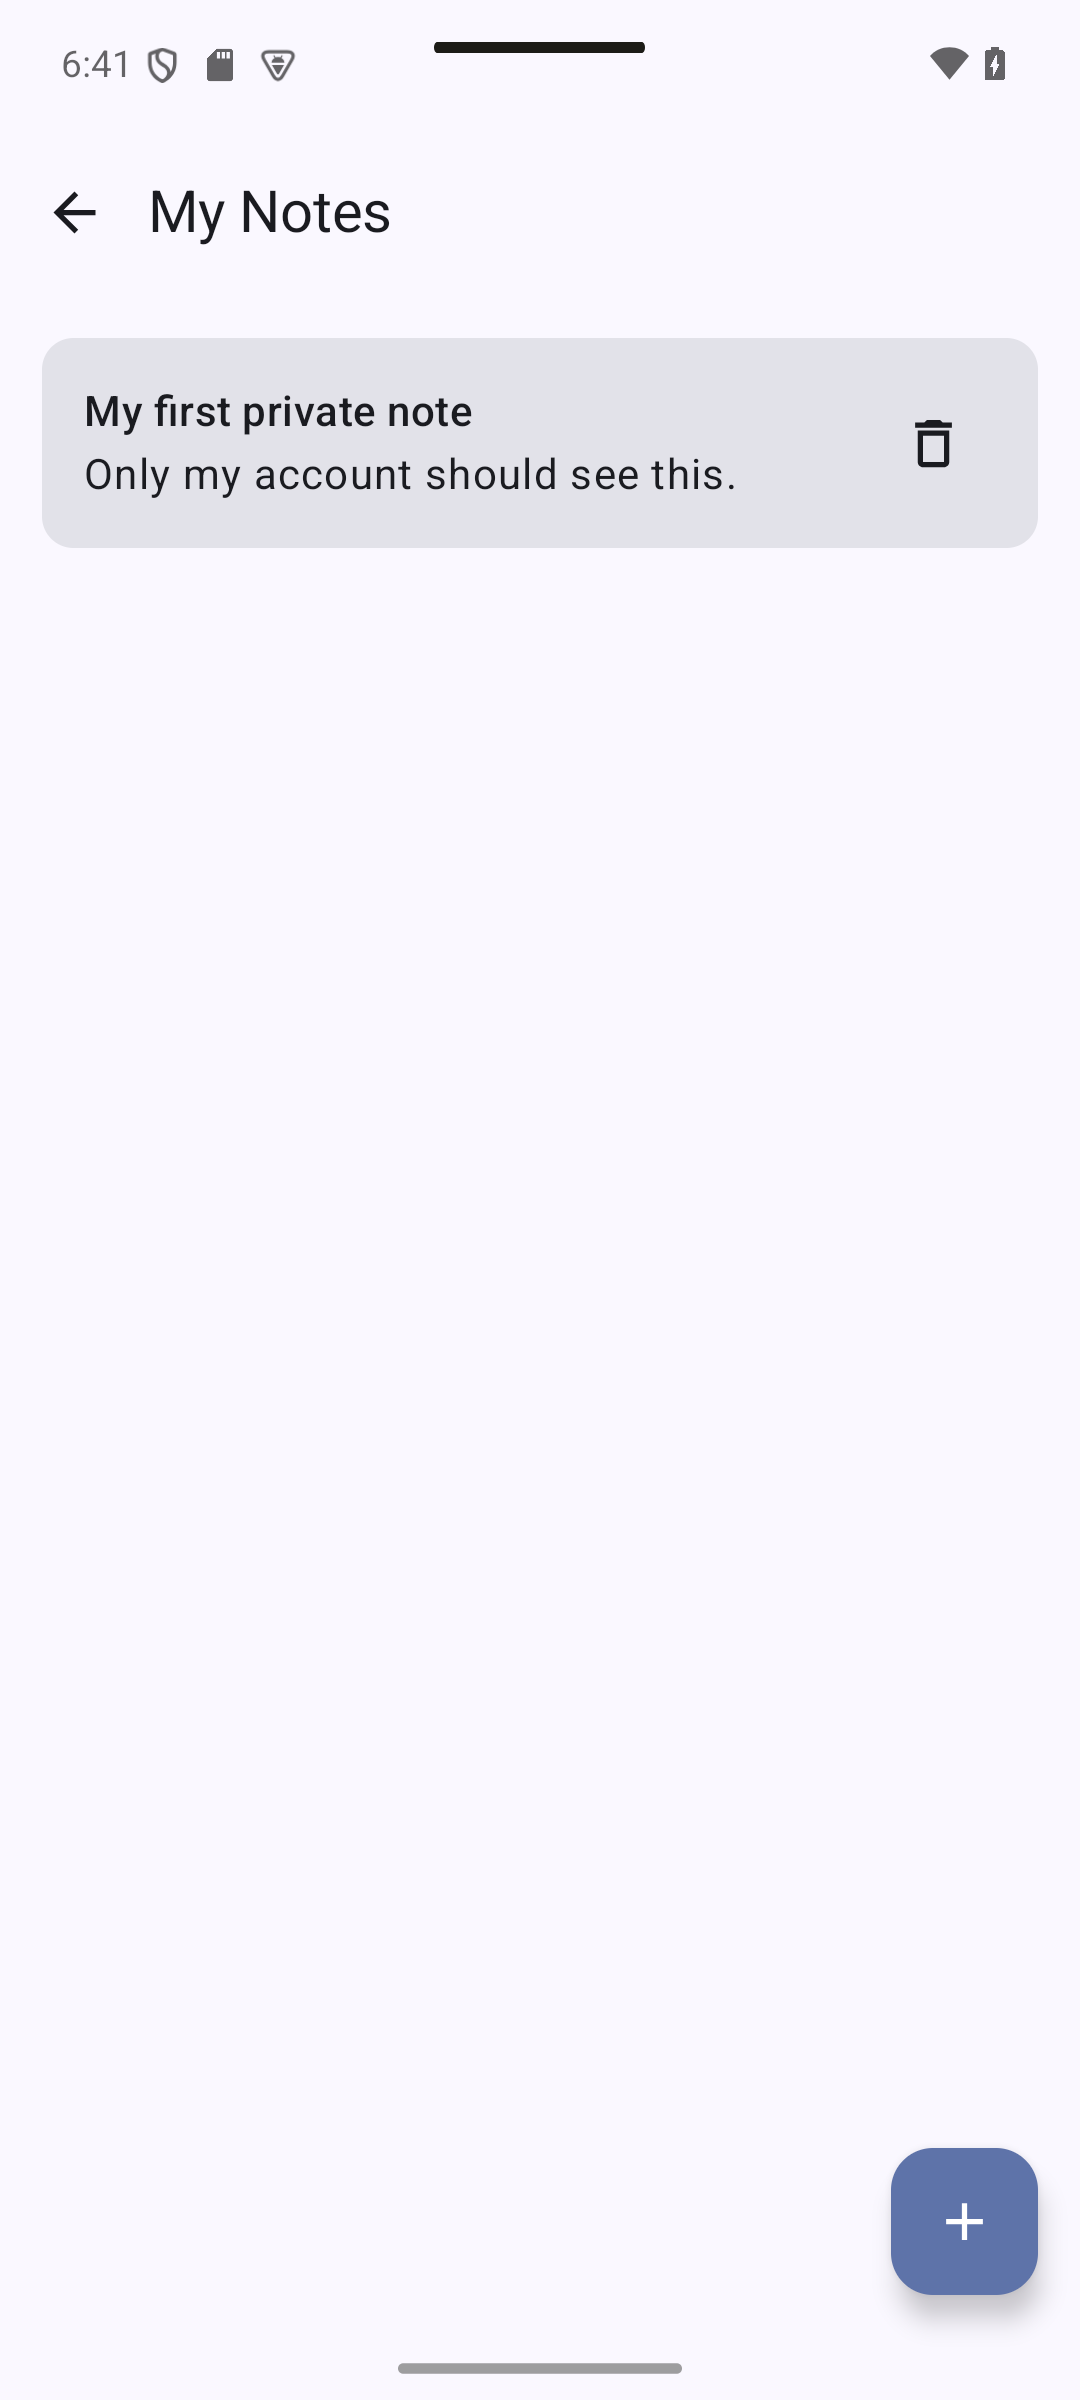
Expected result — native UI preview. The current user supplies the owner ID when creating a note. The resulting card is shown here using local preview data.
Concepts in this section: passing the current user’s id down to the ViewModel through its factory.
Visual guide. Apply the user-id flow above when wiring the screen. Check with two accounts: each should see only its own notes.
NotesViewModel now needs the user id. Change three places:
// app/src/main/java/com/example/notes/ui/NotesViewModel.kt (excerpt)

// 1. the constructor
class NotesViewModel(
    private val repository: NotesRepository,
    private val userId: String,
) : ViewModel() {

    // 2. in load(): the list of this user only
    val notes = repository.list(userId)

    // 2. in add(): the owner of the new note
    val created = repository.create(userId, draft)

    // 3. the factory becomes a function that receives the user id
    companion object {
        fun factory(userId: String) = viewModelFactory {
            initializer {
                val app = this[APPLICATION_KEY] as NotesApplication
                NotesViewModel(app.container.notesRepository, userId)
            }
        }
    }
}
// app/src/main/java/com/example/notes/ui/NotesScreen.kt (excerpt)
@OptIn(ExperimentalMaterial3Api::class)
@Composable
fun NotesScreen(
userId: String,
onBack: () -> Unit,
viewModel: NotesViewModel = viewModel(factory = NotesViewModel.factory(userId)),
) {
// ...the rest is unchanged
}Explanation:
- The screen receives
userIdfrom the navigation code (section 7.5), where the session is known. The ViewModel never reads the session itself, which keeps it easy to test - The factory is now a function because each ViewModel is built for one user
- The “Retry” button and pull-to-refresh call
load()again: they also use the user id, with no other change
Test it with two accounts: create two users, add notes with each one, and check that each user only sees their own notes. In the Appwrite console (Databases → NotesDB → notes), open a row and look at its Permissions tab: only the owner appears. Notes created from the React Native or Flutter app with the same account show up here too.
9. Empty State
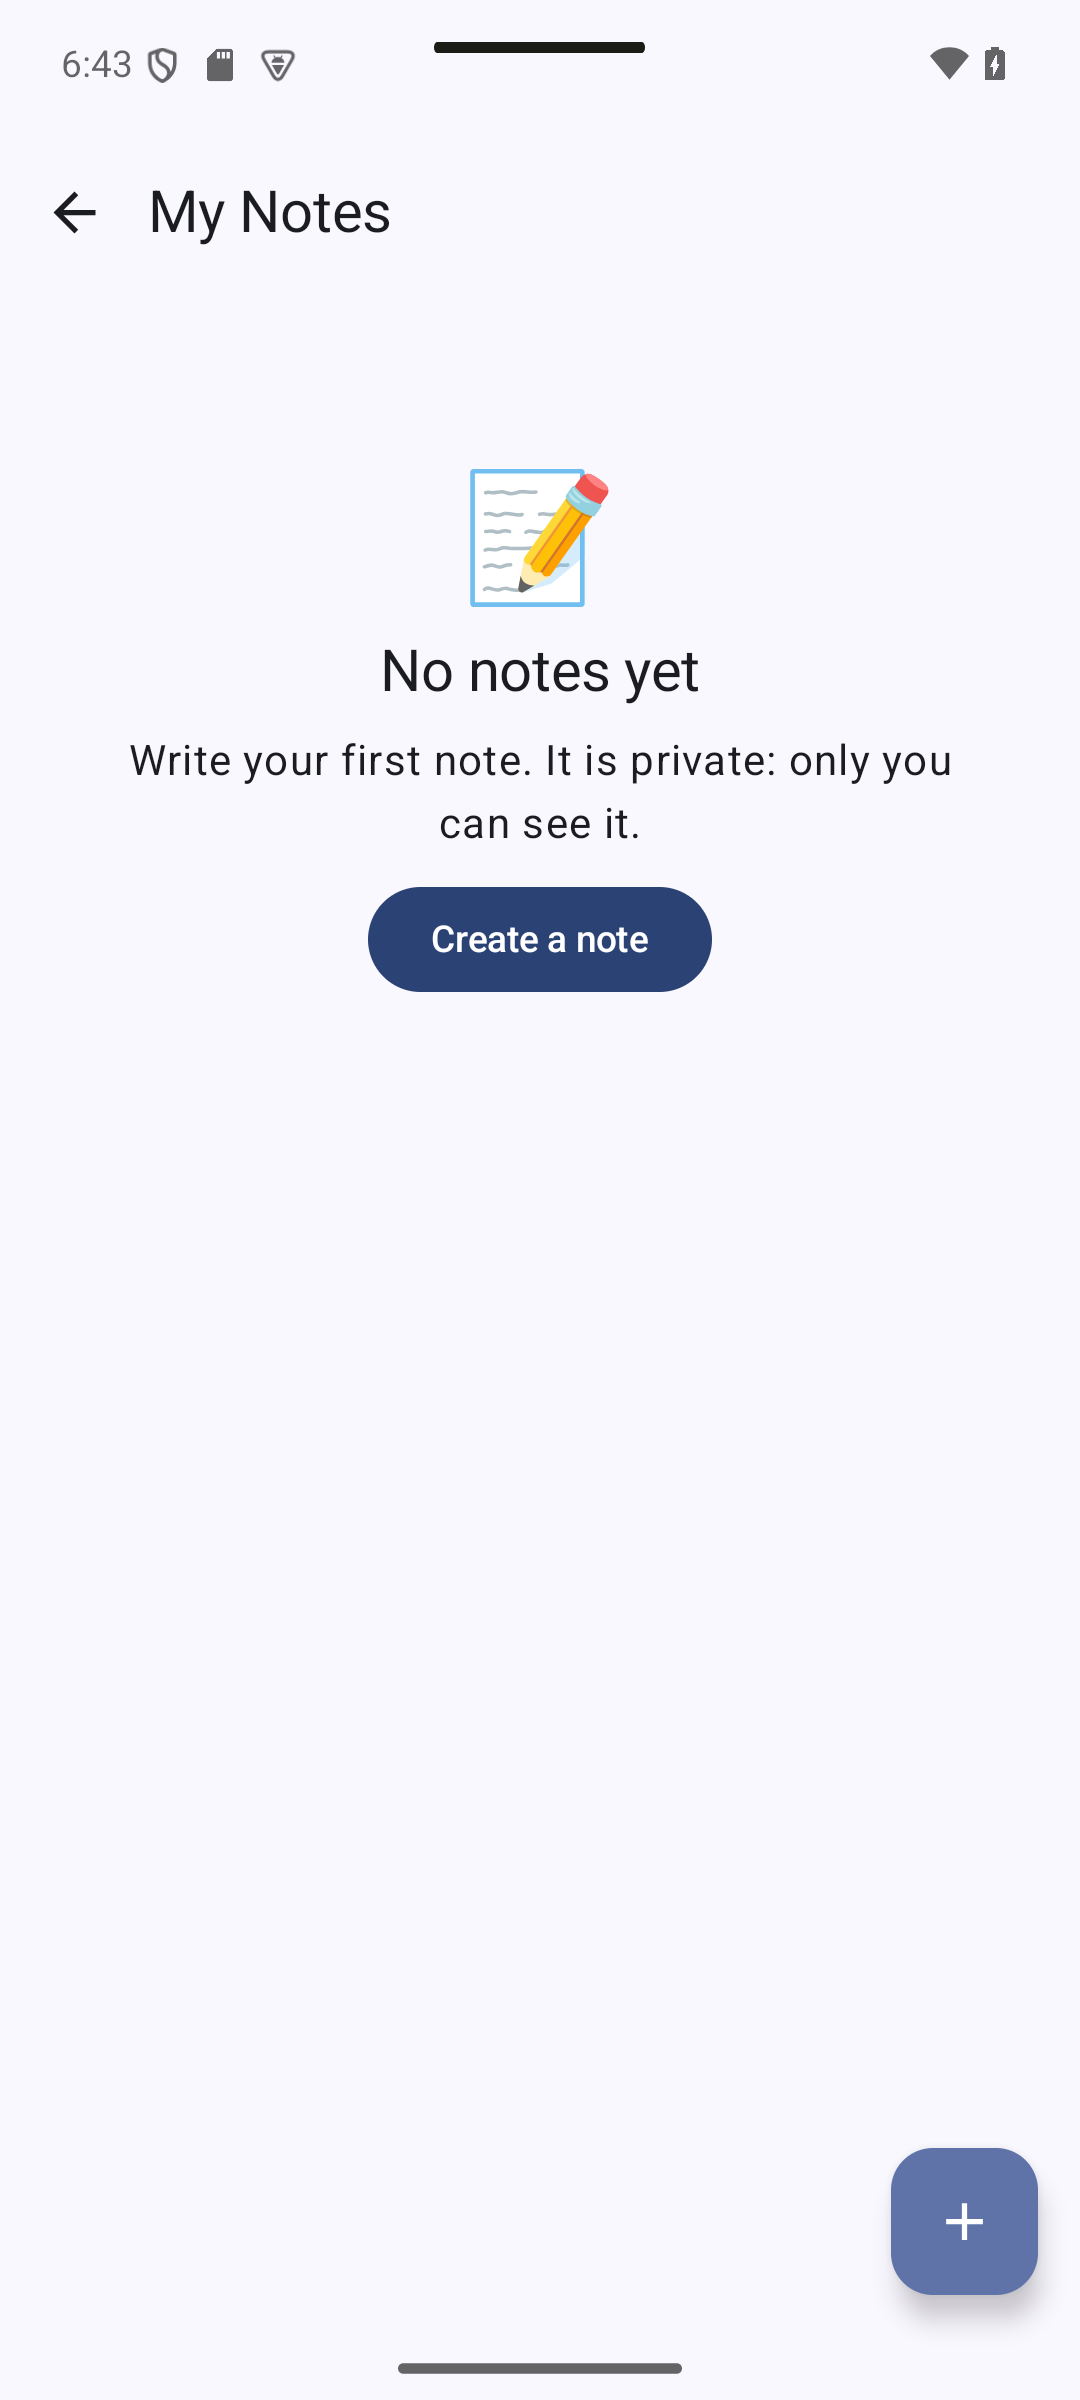
Expected result — native UI preview. A user without notes sees the explanatory text and Create a note. That button opens the same creation dialog as +.
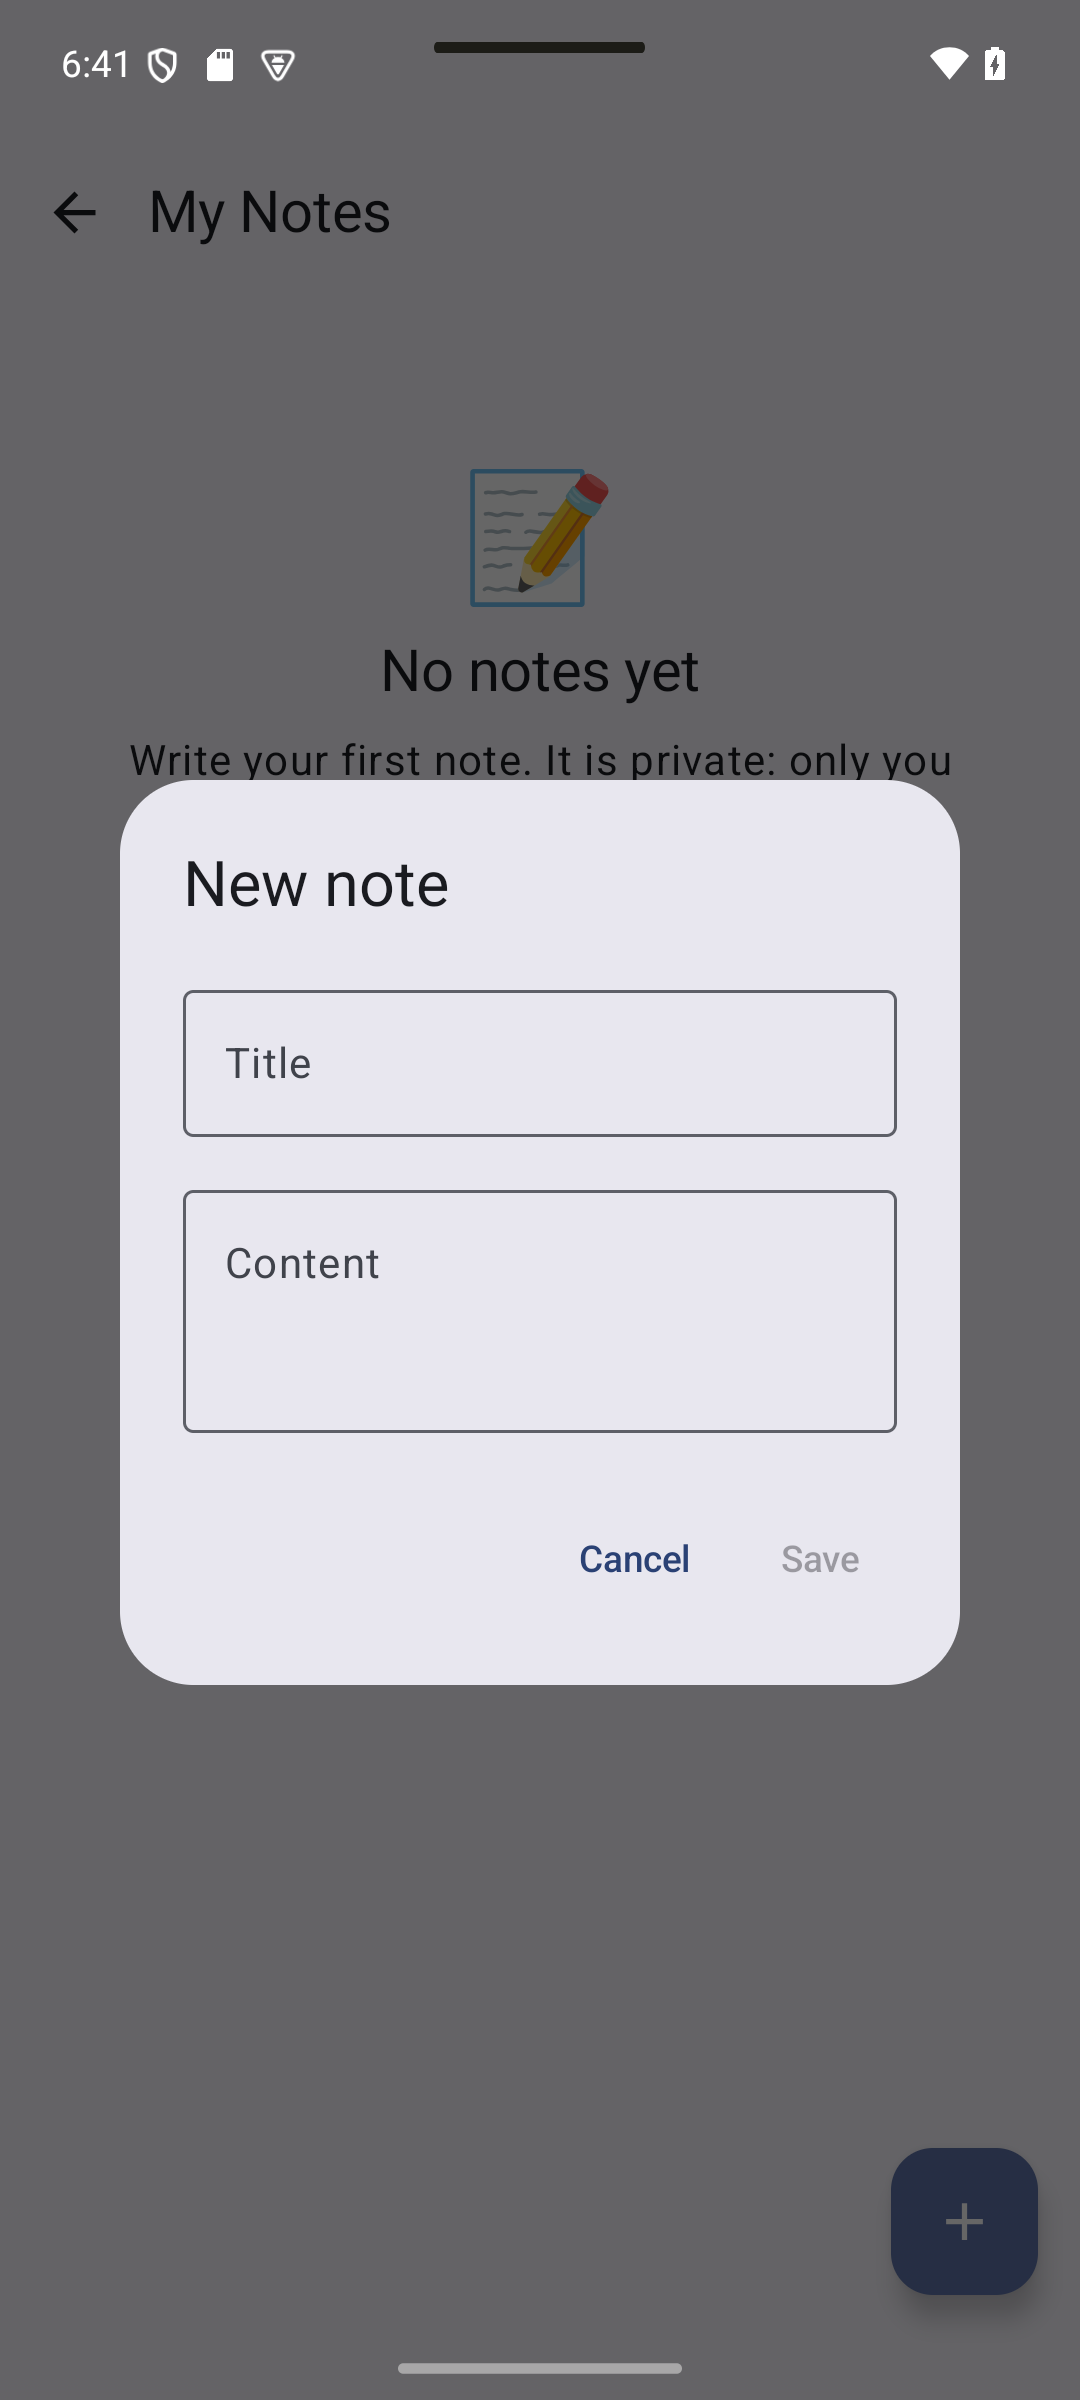
Concepts in this section:
- An empty state is the screen a new user sees before having any data. Showing a blank list is confusing; a message and a call to action guide the user.
- Empty is not an error: it is a normal state, designed on purpose.
Visual guide. Compare the message and next action in each state, especially Empty and Error.
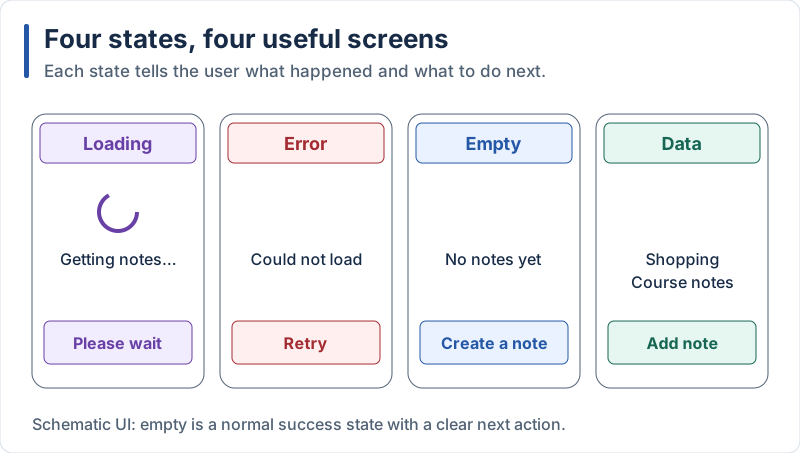
These wireframes explain behavior; styling remains framework-specific.
// app/src/main/java/com/example/notes/ui/EmptyState.kt
package com.example.notes.ui

import androidx.compose.foundation.layout.Arrangement
import androidx.compose.foundation.layout.Column
import androidx.compose.foundation.layout.fillMaxWidth
import androidx.compose.foundation.layout.padding
import androidx.compose.material3.Button
import androidx.compose.material3.MaterialTheme
import androidx.compose.material3.Text
import androidx.compose.runtime.Composable
import androidx.compose.ui.Alignment
import androidx.compose.ui.Modifier
import androidx.compose.ui.text.style.TextAlign
import androidx.compose.ui.tooling.preview.Preview
import androidx.compose.ui.unit.dp
import androidx.compose.ui.unit.sp
import com.example.notes.ui.theme.NotesTheme

@Composable
fun EmptyState(onCreate: () -> Unit, modifier: Modifier = Modifier) {
    Column(
        modifier = modifier
            .fillMaxWidth()
            .padding(vertical = 48.dp, horizontal = 24.dp),
        verticalArrangement = Arrangement.spacedBy(8.dp),
        horizontalAlignment = Alignment.CenterHorizontally,
    ) {
        Text("📝", fontSize = 48.sp)
        Text("No notes yet", style = MaterialTheme.typography.titleLarge)
        Text(
            "Write your first note. It is private: only you can see it.",
            textAlign = TextAlign.Center,
        )
        Button(onClick = onCreate) { Text("Create a note") }
    }
}

@Preview(showBackground = true)
@Composable
private fun EmptyStatePreview() {
    NotesTheme { EmptyState(onCreate = {}) }
}
Use it in the list of NotesScreen, in place of the item { Text("No notes yet.") } line:
// app/src/main/java/com/example/notes/ui/NotesScreen.kt (excerpt)
if (state.notes.isEmpty()) {
    item {
        EmptyState(
            onCreate = {
                editingId = null
                dialogOpen = true
            },
        )
    }
}
Explanation:
- The component receives a callback (
onCreate): it does not know how to create a note, which keeps it reusable and previewable - It is an
itemof theLazyColumn, so pull-to-refresh still works when the list is empty - The same pattern (loading / error / empty / data) applies to every list in every app, native or not
10. Building and Publishing
Reference checkpoint. Reference checklist for release preparation. The screenshots were made with a debug preview APK; no production release or publication is claimed.
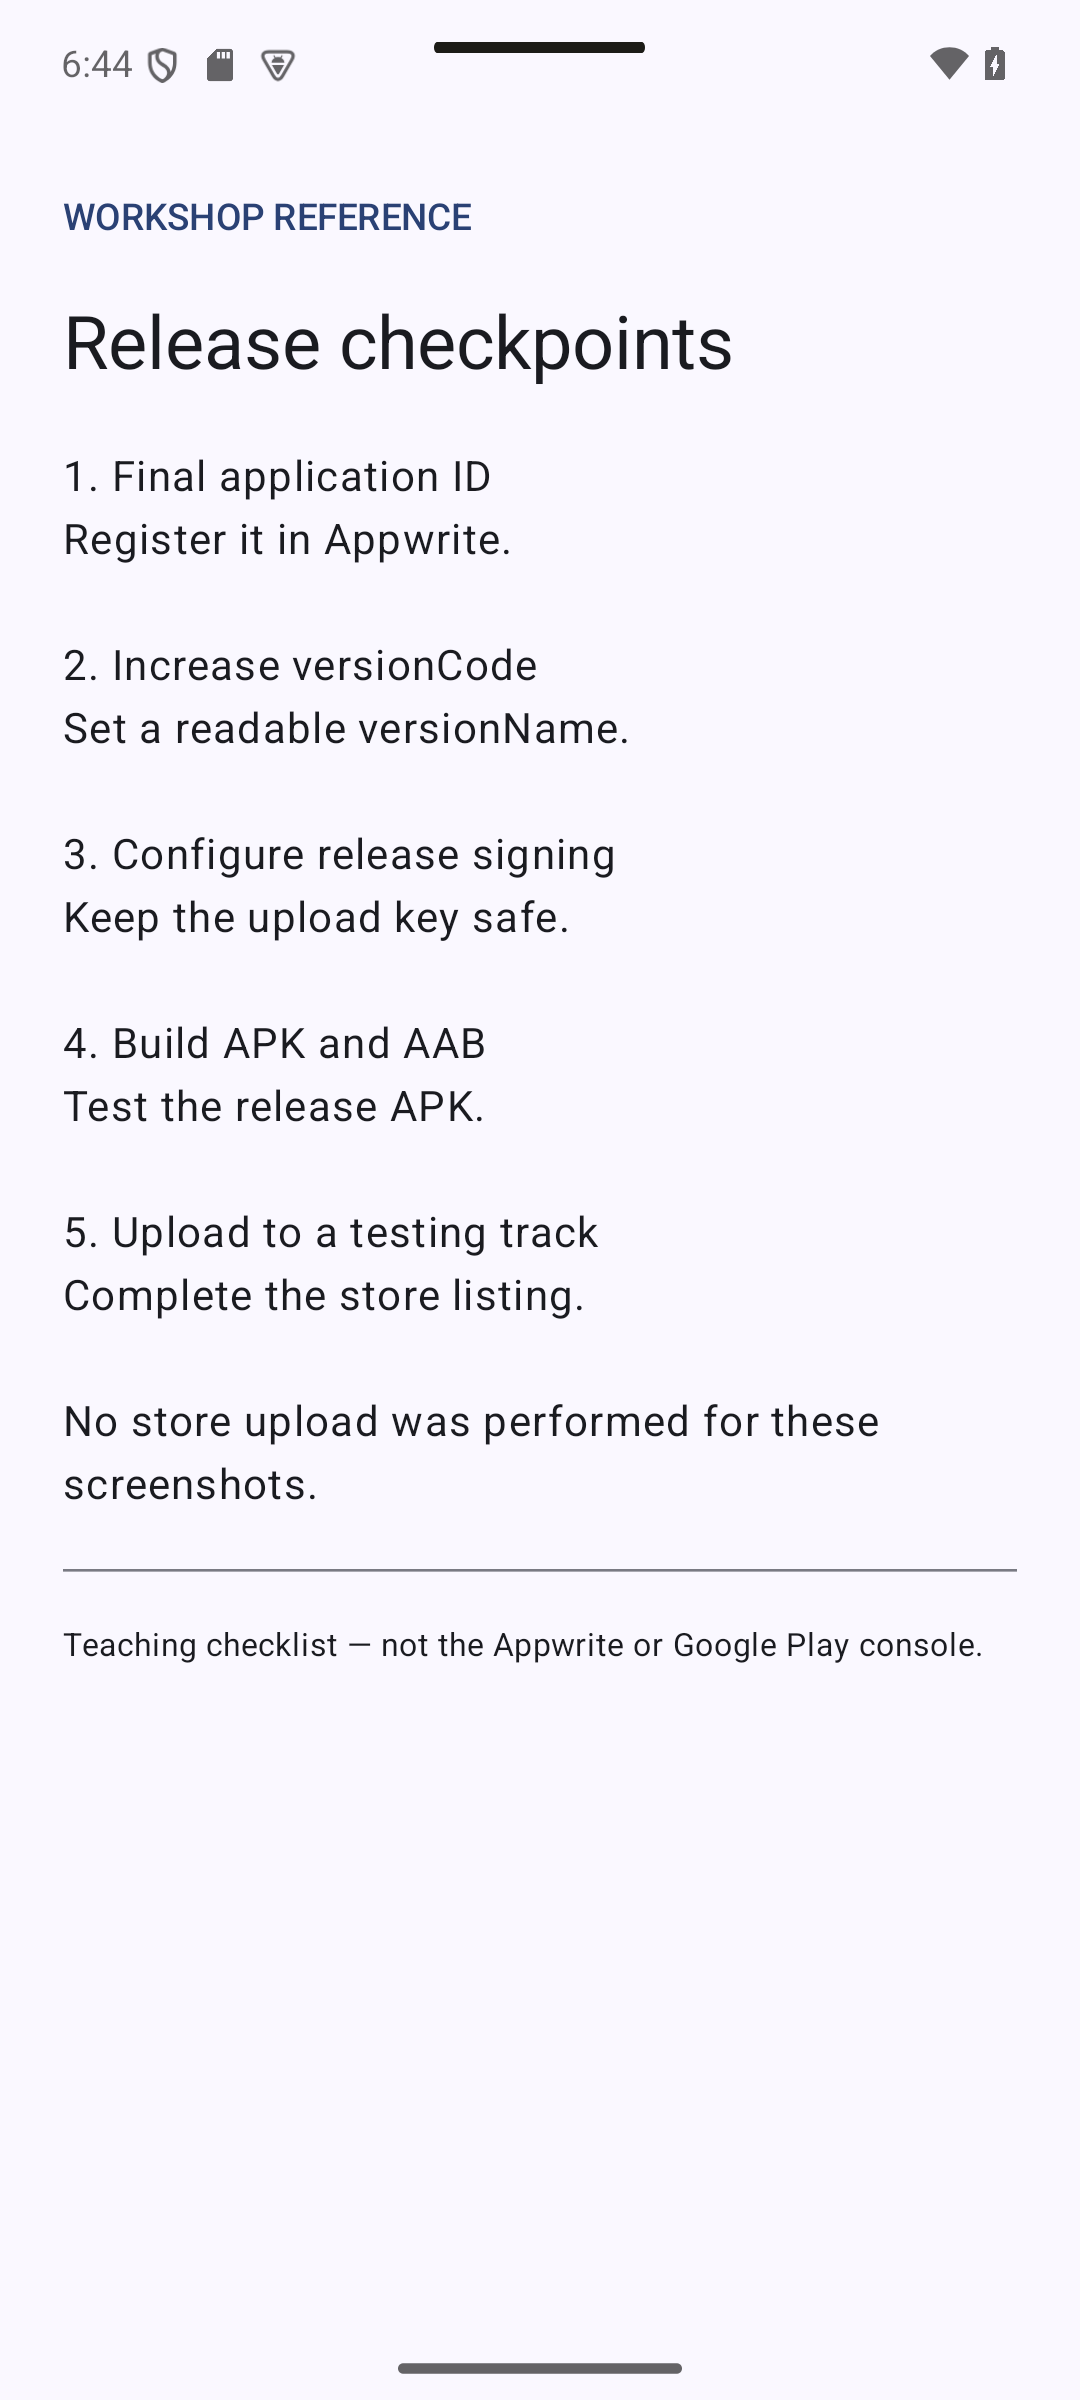
10.1 Understanding App Releases
Reference checkpoint. The release changes packaging, signing and distribution; it should preserve the application UI.
Concepts in this section:
- Debug vs release build: a release build is optimized and signed with your private key. You cannot publish a debug build
- Signing: proves the app comes from you. Every update must be signed with the same identity
- Android formats: APK (an installable file, good for testing) and AAB (Android App Bundle), the format Google Play requires: Play generates optimized APKs for each device from it
- Play App Signing: you sign the upload with an upload key, and Google keeps the real app signing key. If you lose the upload key, Google can reset it; if you lose a self-managed key, the app can never be updated
- Version numbers:
versionName(human text,1.0) andversionCode(an integer that must increase with every upload) - R8 / minification: shrinks and obfuscates the code for release. It can break libraries that use reflection, so it must be tested
Visual guide. Follow the Android bundle from upload signing to the package installed on a device.
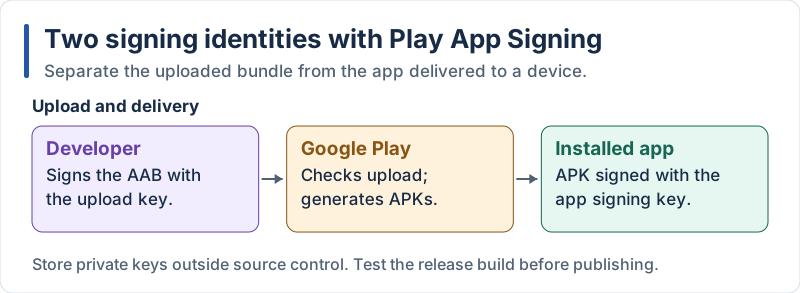
This figure describes Play App Signing; upload and app-signing keys have different roles.
10.2 Application Id and Version
Reference checkpoint. Reference settings: a stable application ID, a versionCode that increases and a readable versionName.
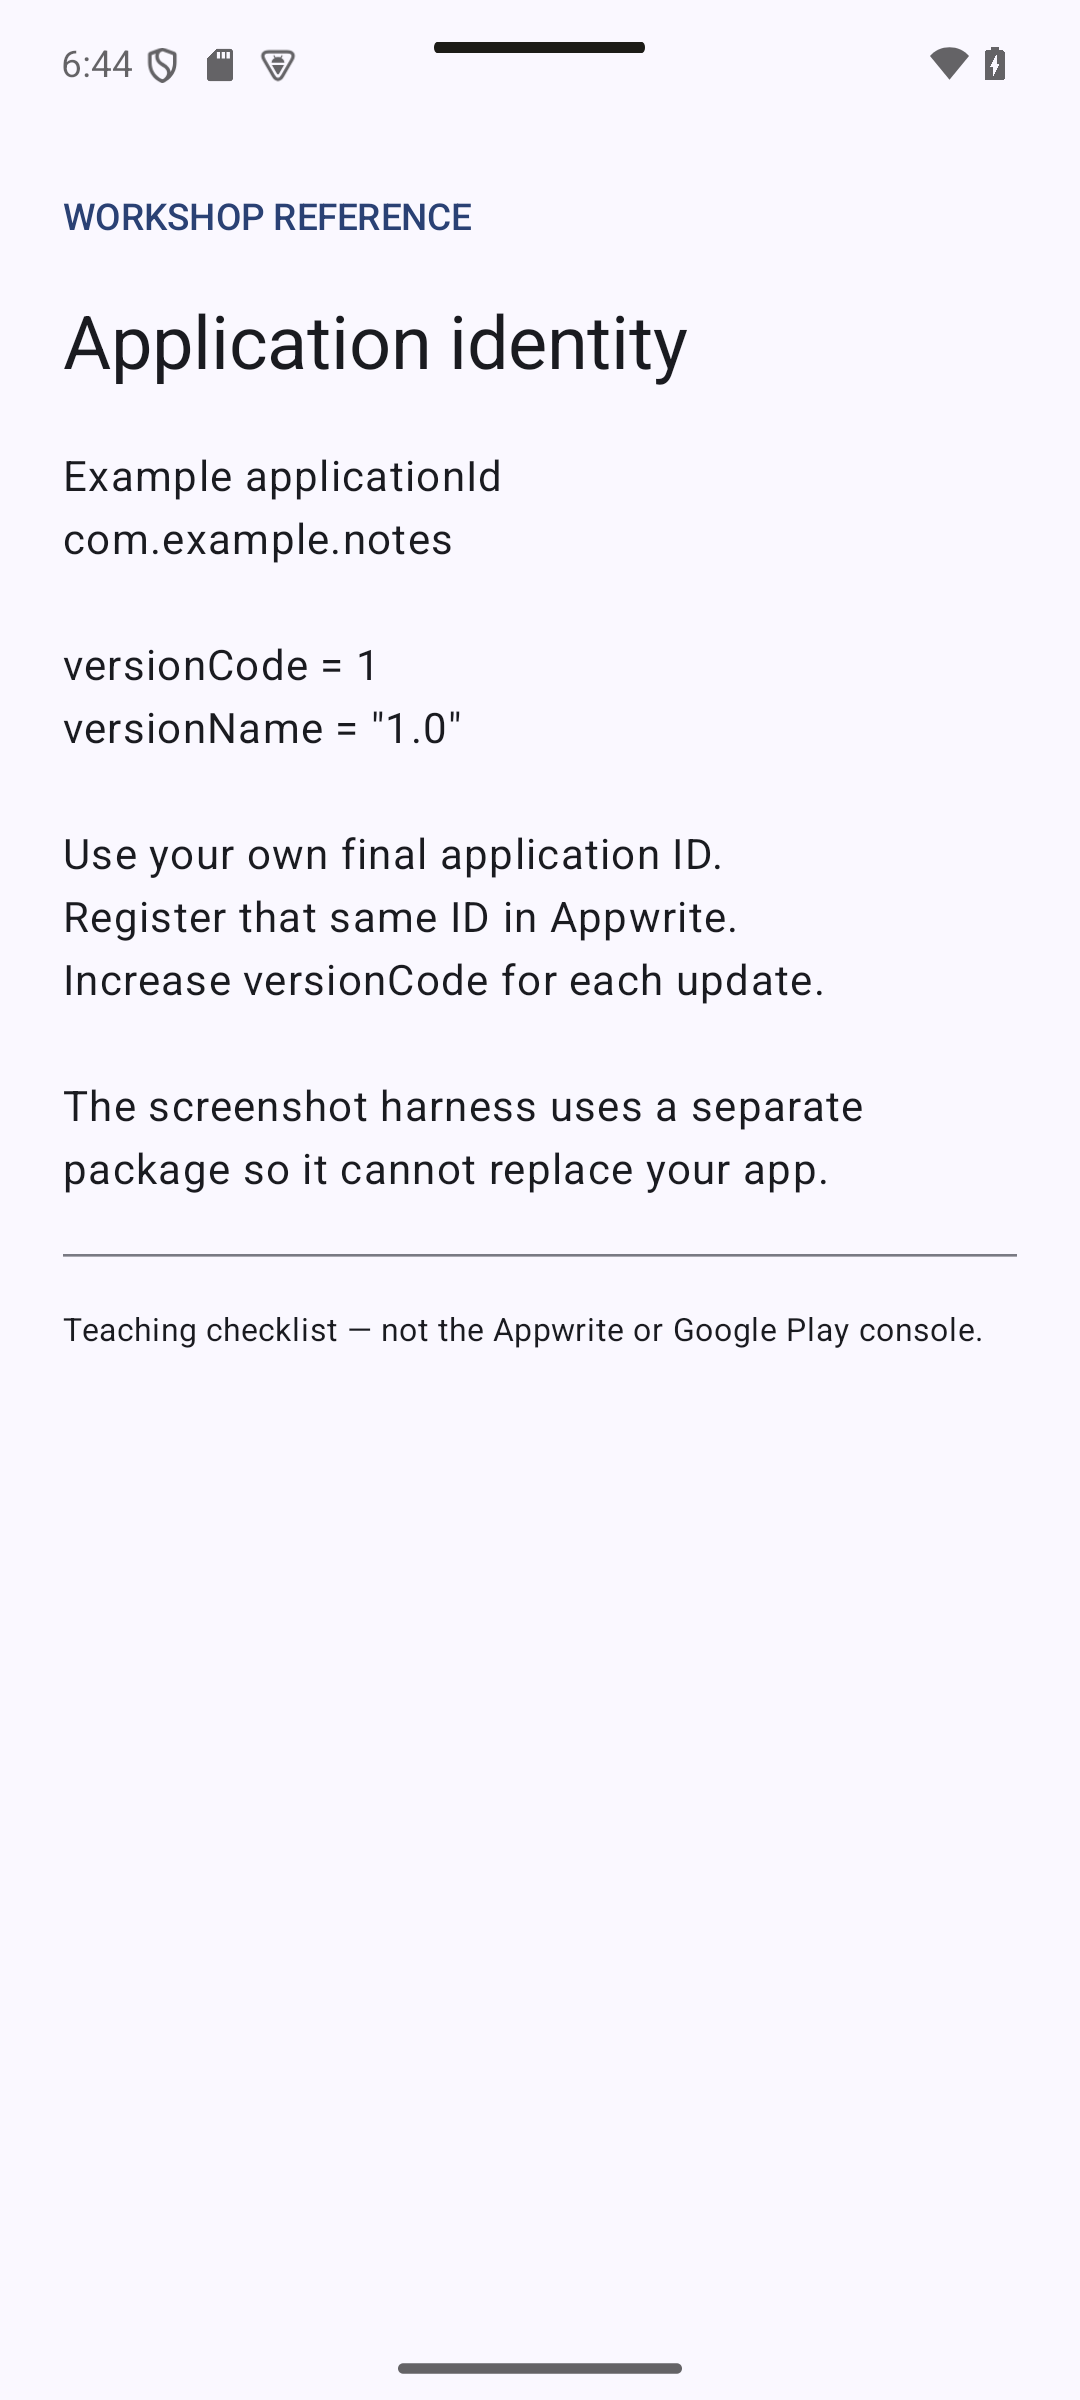
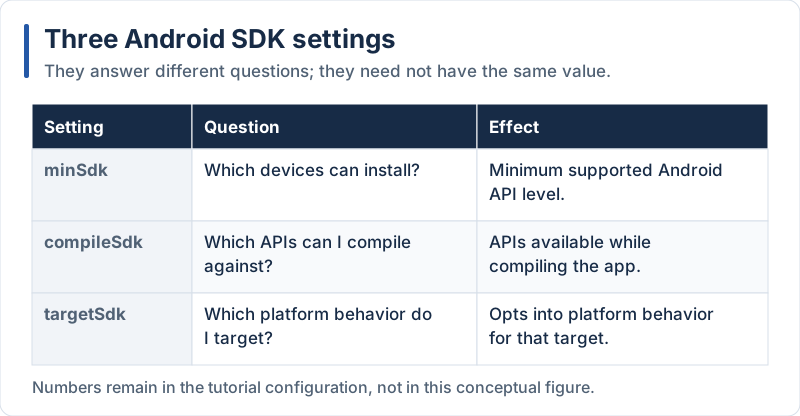
Visual guide. Use the SDK roles from Part 1 when reading build settings. Keep the application id stable; increase versionCode for each store upload.
The applicationId identifies your app on the device and on Google Play, and it can never change after publication. com.example.notes is an example domain: use your own reverse domain for a real app (for example com.yourname.notes).
If you change it:
- Change
applicationId = "com.yourname.notes"inapp/build.gradle.kts. Leavenamespaceand the Kotlin packages as they are: they are internal names, independent from the published id - Register the new id as an Android platform in Appwrite (Overview → Add platform), or the release app will be rejected by the backend
Raise the version for every upload to the store:
// app/build.gradle.kts (excerpt)
defaultConfig {
    versionCode = 1      // integer, must increase for every upload
    versionName = "1.0"  // text shown to the users
}
10.3 Signing the Release
Reference checkpoint. Reference checklist for the signing configuration. No keystore, password or production signing operation is shown.
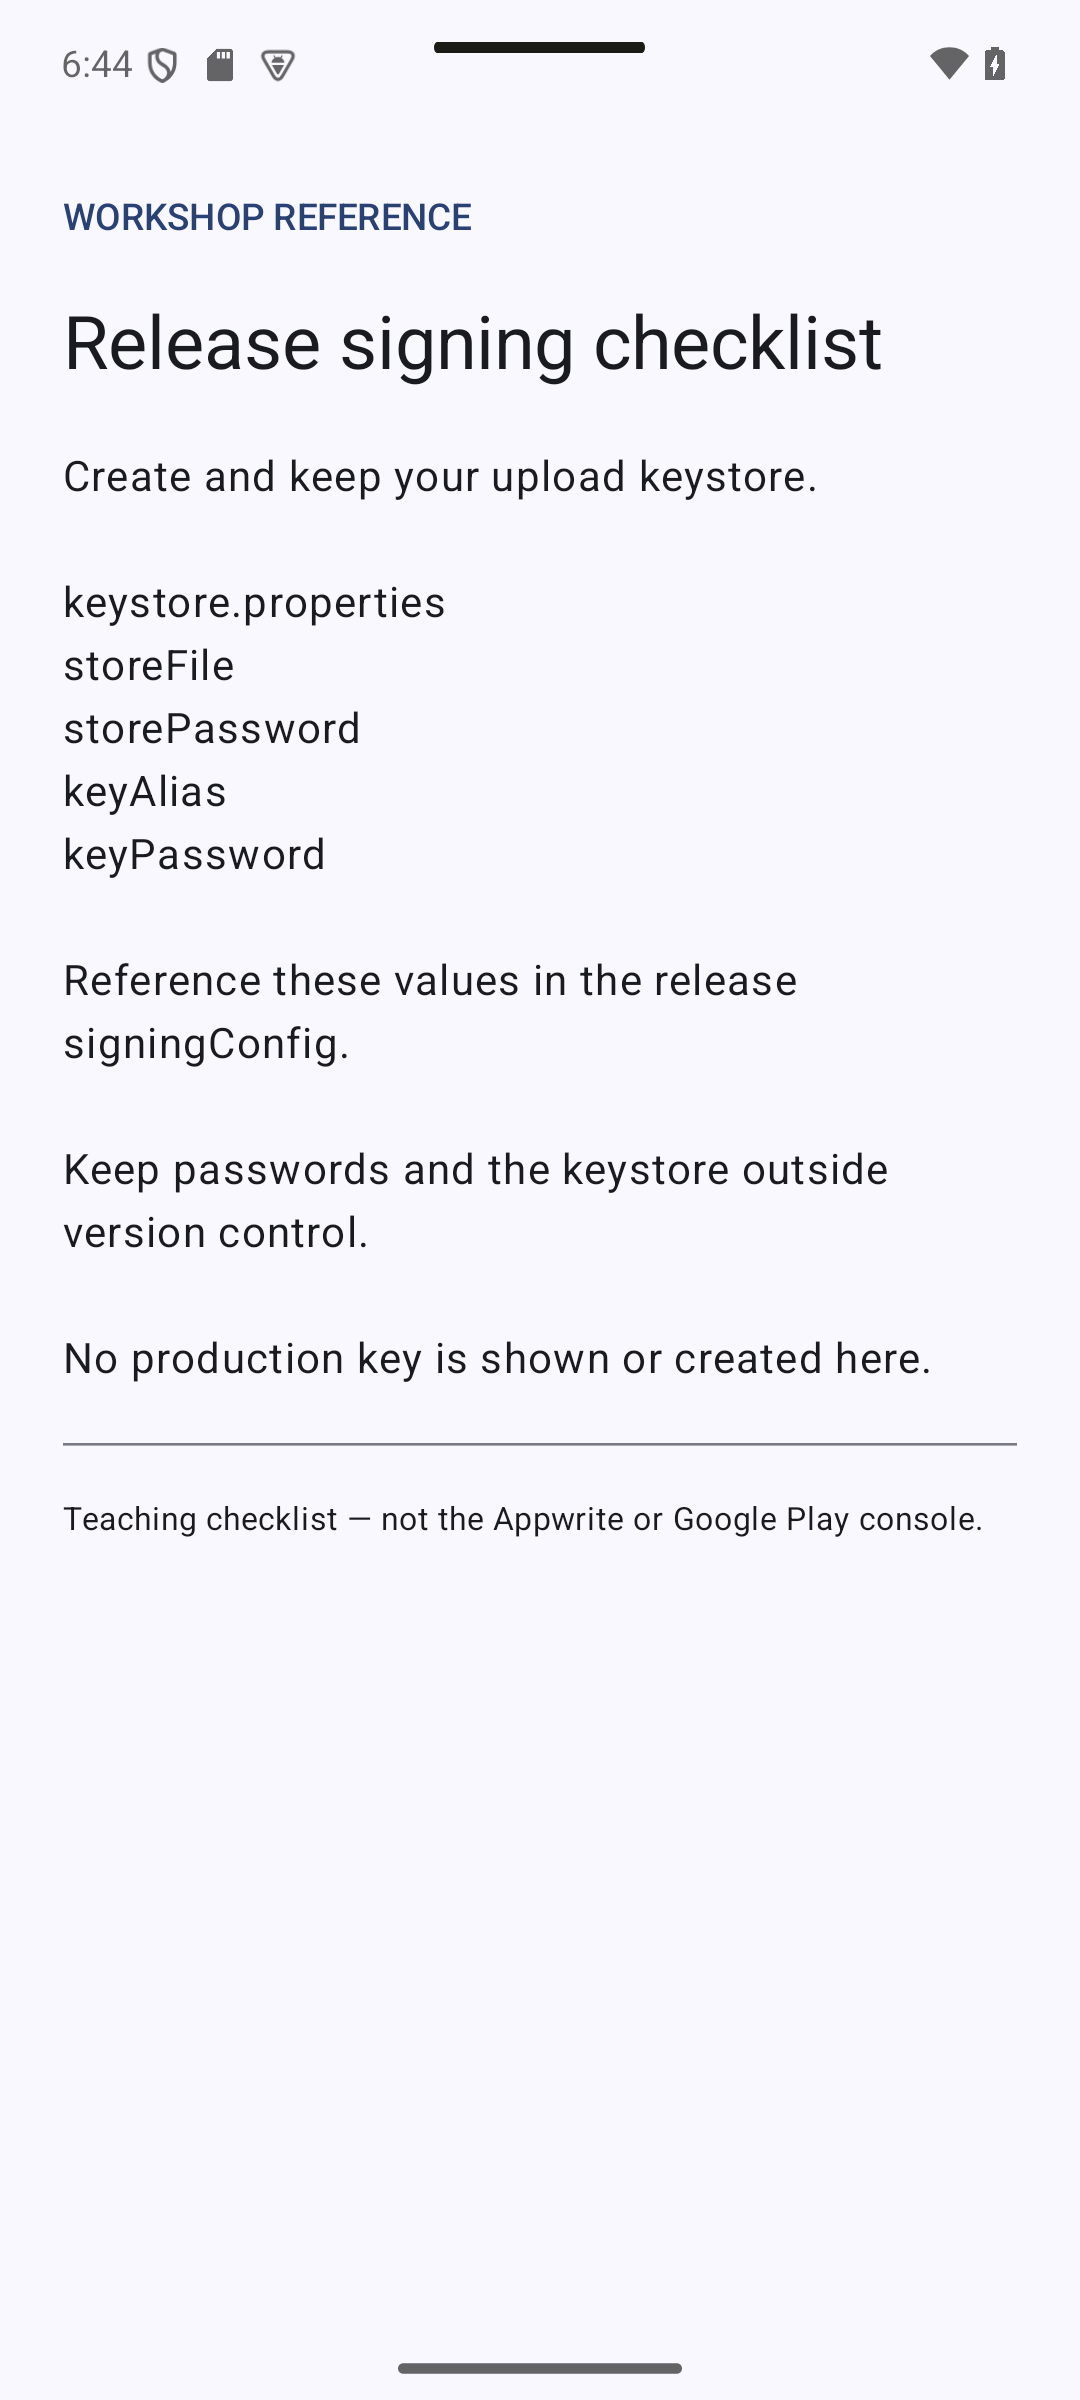
Visual guide. Refer to the signing diagram in section 10.1 to distinguish the upload key from the app signing key.
Create an upload keystore with the JDK’s keytool (it is included with Android Studio, in its jbr/bin folder). Run it outside the project folder, or add the file to .gitignore:
keytool -genkeypair -v -keystore upload-keystore.jks -keyalg RSA -keysize 2048 -validity 10000 -alias uploadIt asks for passwords and your name. Back up the file and the passwords somewhere safe (a password manager): never commit them.
Alternative: in Android Studio, Build → Generate Signed App Bundle / APK creates the keystore and builds the bundle with a wizard. The steps below do the same thing in a way that can be repeated from the command line.
Reference the keystore from a keystore.properties file at the root of the project (add keystore.properties and *.jks to .gitignore):
# keystore.properties
storeFile=upload-keystore.jks
storePassword=your_store_password
keyAlias=upload
keyPassword=your_key_password
Then use it in app/build.gradle.kts:
// app/build.gradle.kts (excerpt)
val keystoreProperties = Properties().apply {
    val file = rootProject.file("keystore.properties")
    if (file.exists()) file.inputStream().use { load(it) }
}

android {
    // ...existing configuration...

    signingConfigs {
        create("release") {
            if (keystoreProperties.isNotEmpty()) {
                storeFile = rootProject.file(keystoreProperties.getProperty("storeFile"))
                storePassword = keystoreProperties.getProperty("storePassword")
                keyAlias = keystoreProperties.getProperty("keyAlias")
                keyPassword = keystoreProperties.getProperty("keyPassword")
            }
        }
    }

    buildTypes {
        release {
            isMinifyEnabled = false
            signingConfig = signingConfigs.getByName("release")
        }
    }
}
Explanation:
- The Gradle script reads
keystore.propertiesthe same way it readlocal.propertiesin Part 2: secrets stay outside the source code and the repository if (keystoreProperties.isNotEmpty())lets the project still build for a teammate who has no keystore (the release build then fails with a clear signing error, the debug build is unaffected)- We keep
isMinifyEnabled = falsefor this first release. Turning on R8 (isMinifyEnabled = trueplusisShrinkResources = true) reduces the size, but you must then test the release build carefully on a device: libraries using reflection (including JSON mapping) may need keep rules - This is the Android equivalent of
key.propertiesin Flutter. In Expo, EAS manages the credentials for you
10.4 Building the Bundle
Reference checkpoint. Reference commands and expected output paths. These are target release artifacts, not a successful APK/AAB release build report.
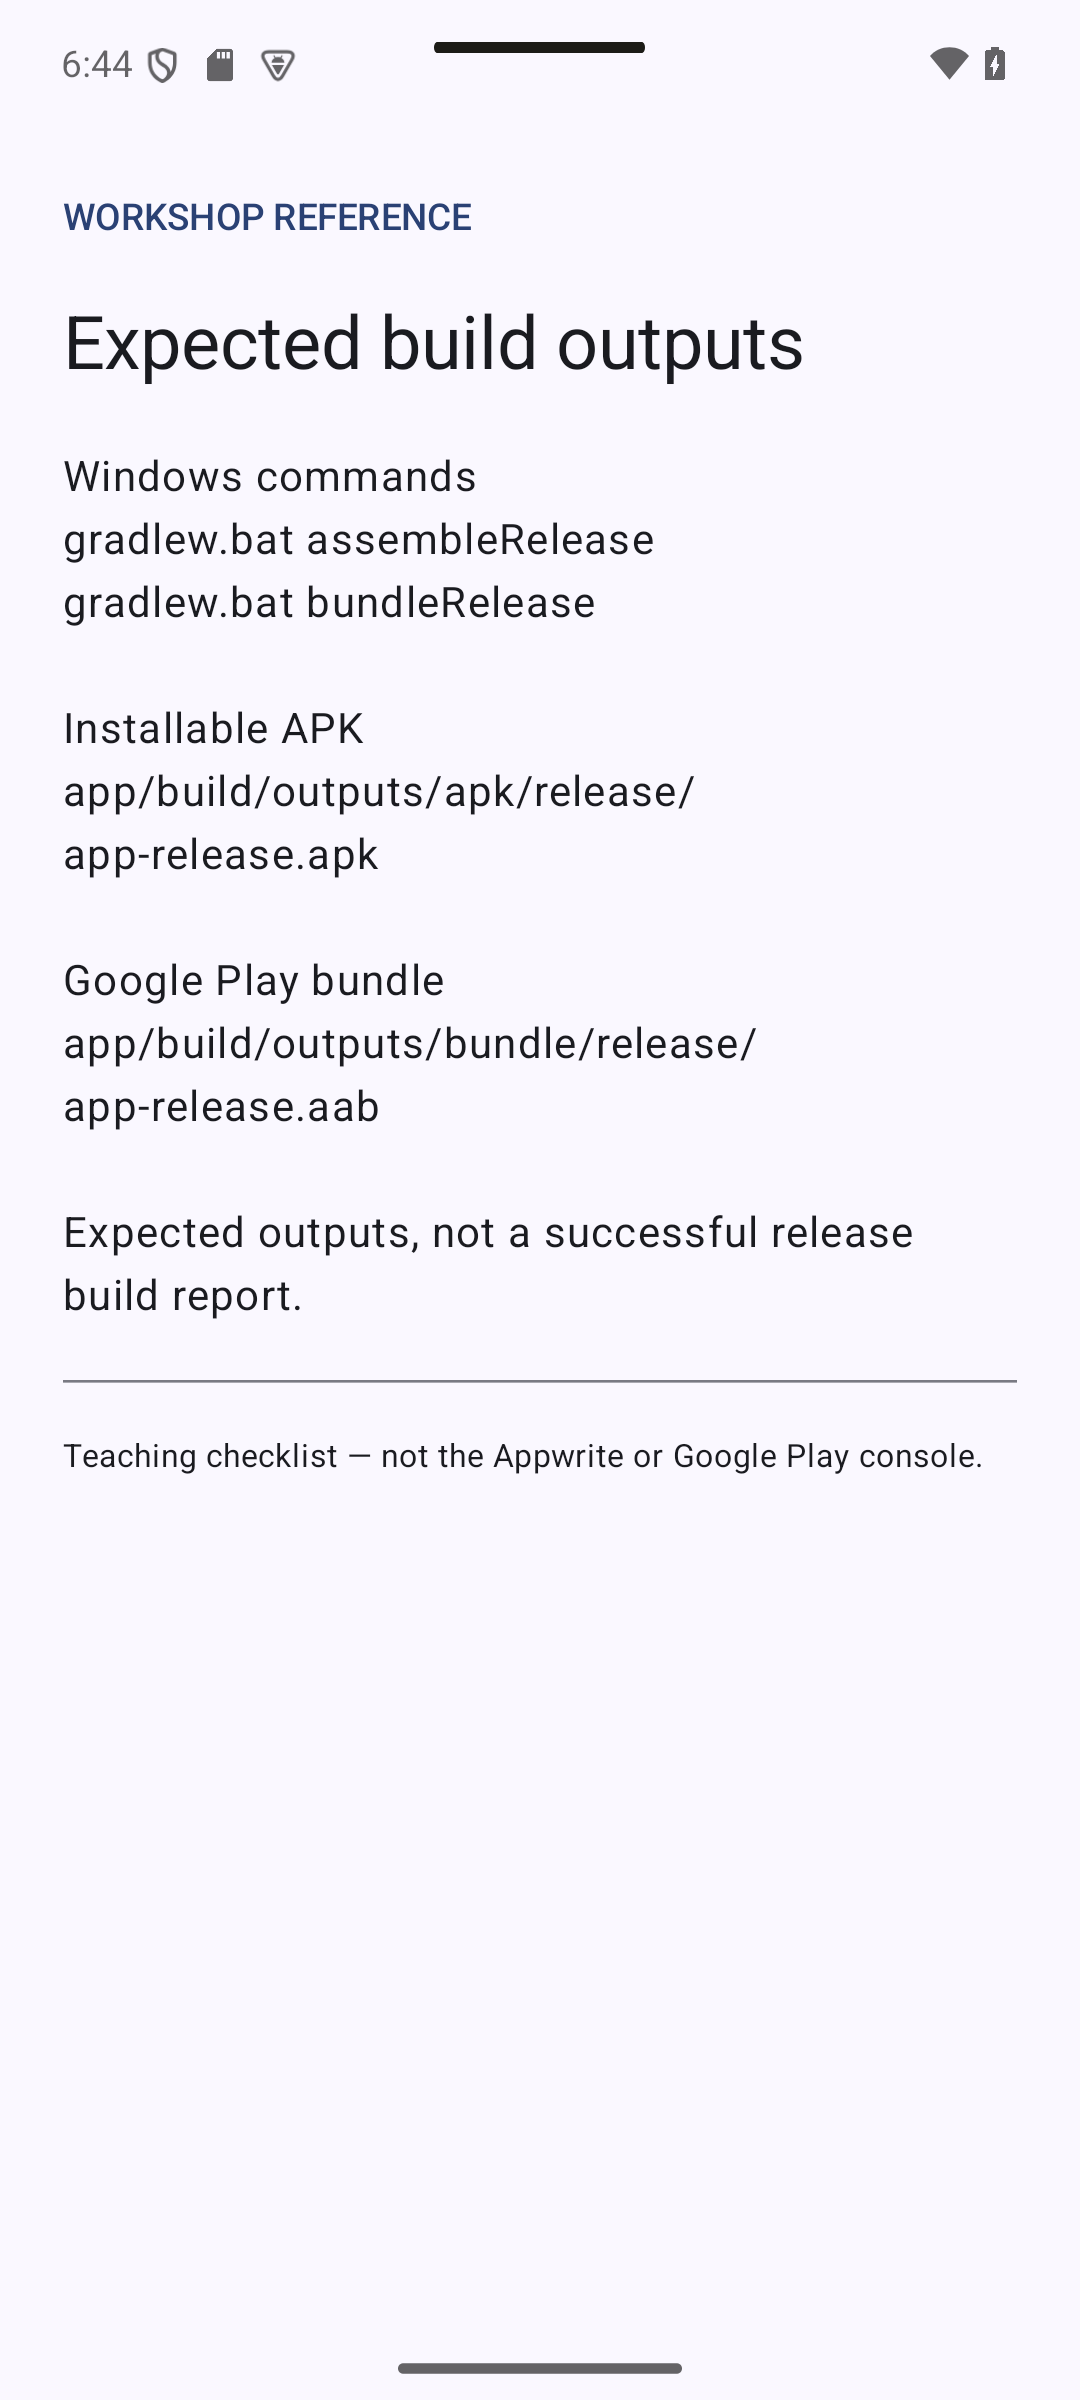
Visual guide. Match each Gradle task to its output, then follow the testing and upload steps.
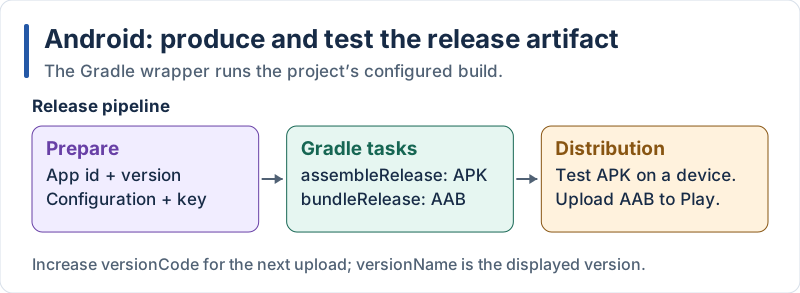
Build an installable release APK for device checks and an AAB for Google Play.
The Appwrite settings are compiled into the app from local.properties (section 6.3), so the release build uses the same project as development. Build from a terminal at the root of the project (on Windows use gradlew.bat):
# Bundle for Google Play
./gradlew bundleRelease

# Installable APK for testing on a device
./gradlew assembleRelease
Results:
app/build/outputs/bundle/release/app-release.aab(upload this to Google Play)app/build/outputs/apk/release/app-release.apk(install withadb install app-release.apk)
Explanation:
./gradlewis the Gradle wrapper: a script, committed with the project, that downloads the Gradle version the project needs. Everyone builds with the same version- Always install and test the release APK before uploading: debug and release builds can behave differently (minification, signing,
BuildConfigvalues) - In CI (GitHub Actions…),
local.propertiesandkeystore.propertiesdo not exist: write them from the CI secrets, or read environment variables withSystem.getenv("...")in the Gradle script
10.5 Publishing on Google Play
Reference checkpoint. Reference checklist for a testing track and store submission. No Play Console upload or publication was performed.
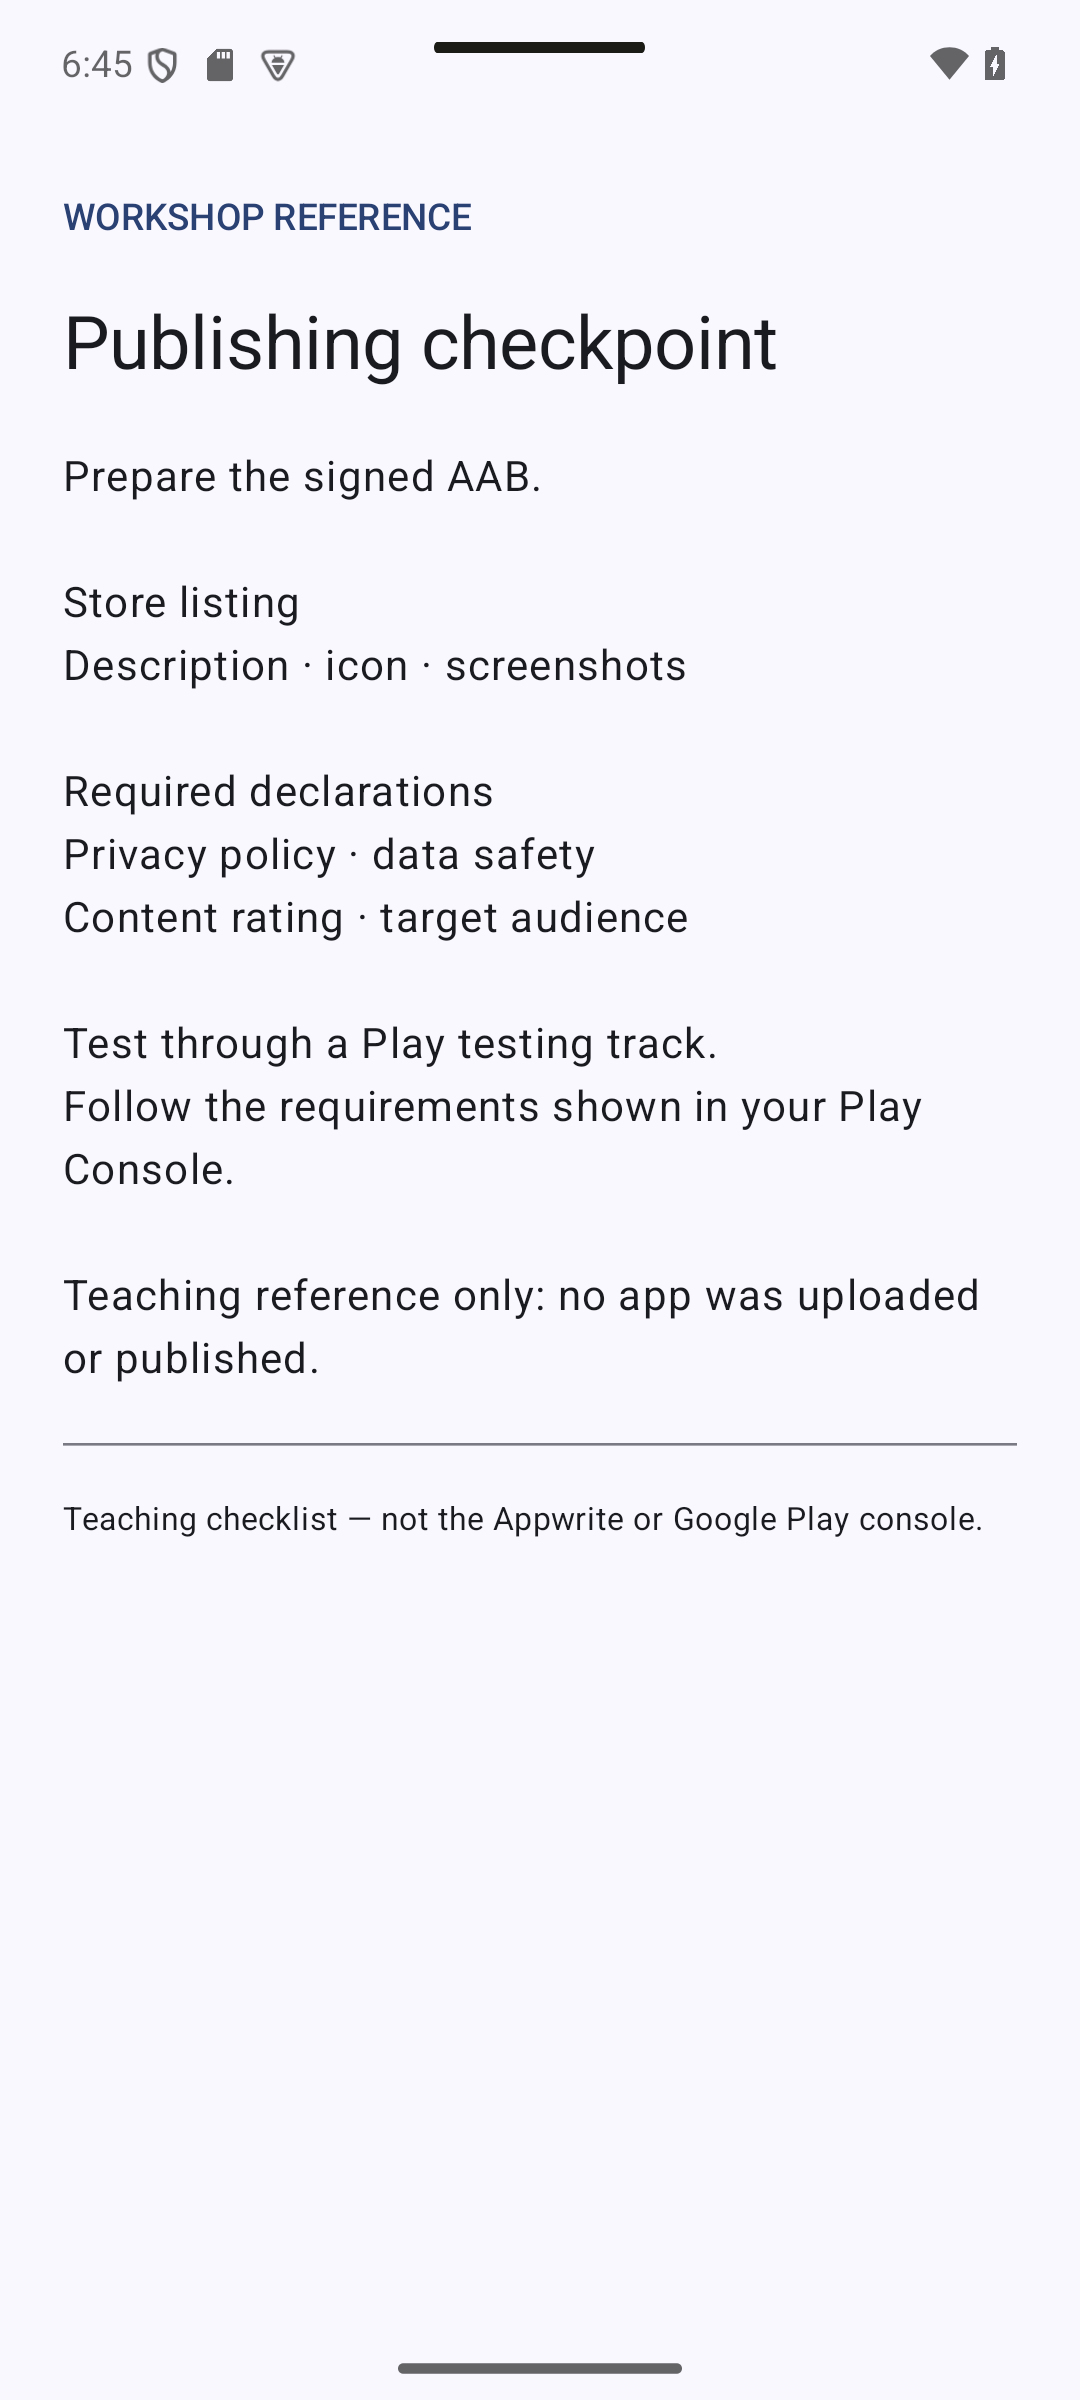
Visual guide. Continue from the release pipeline: upload the bundle, test through a track, complete the listing, and request review.
- Create a Google Play Developer account (one-time registration fee) at https://play.google.com/console.
- Create the app in the Play Console: name, language, free or paid.
- Prepare the store listing: description, screenshots, icon, feature graphic. Complete the mandatory forms: privacy policy, content rating, data safety (this app collects an e-mail address and notes, linked to the user), and target audience.
- Start with a testing track: Testing → Internal testing → Create release, upload the
.aab, and add the e-mail addresses of your testers. Internal testing is available within minutes and needs no review. (Personal accounts created recently must also run a closed test with a minimum number of testers for a minimum period before they can publish to production: check the current requirement in the console.) - Accept Play App Signing when the console proposes it: your keystore becomes the upload key.
- Promote to production when ready: Production → Create new release, upload the bundle (or promote the tested one), write the release notes and send for review. Google reviews the app before it goes live.
- Ship updates by raising
versionCode, building a new bundle and uploading it to the track.
Explanation:
- Google Play requires apps to target a recent Android version (
targetSdk). The console warns you when yours is too old: this is why updatingtargetSdkonce a year is part of maintaining an Android app - The data safety form must match what your app really does (Appwrite stores the e-mail and the notes)
- Unlike Expo (
eas submit), publishing from Android Studio or Gradle is manual, but it can be automated with Gradle plugins or CI tools
11. Summary and Comparison
Expected result — native UI preview. Final target: authentication, a per-user list and note creation. The screenshots illustrate the UI; complete the backend and release checks in the exercises.
Visual guide. Read across a responsibility to compare names; read down a framework to reconstruct its architecture.
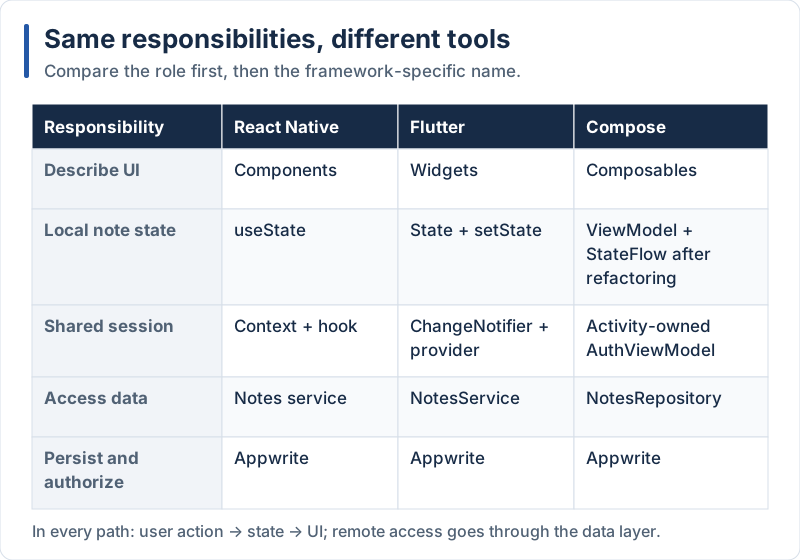
The note state and authentication state have different owners and scopes.
In three parts we built the same app natively:
- Part 1: Compose UI, layouts, navigation, state, ViewModel, reusable composables
- Part 2: remote data with Appwrite: repository, configuration, loading/error states, CRUD, coroutines
- Part 3: authentication, app-wide state, guards, row permissions, empty state, signed release builds
Compose vs React Native vs Flutter Comparison
Expected result — native UI preview. The same Notes workflow now uses native Compose components and Kotlin state.
| Concept | React Native (Expo) | Flutter | Kotlin + Compose |
|---|---|---|---|
| Language | TypeScript | Dart | Kotlin |
| UI model | Components rendered with native views | Widgets drawn by Impeller | @Composable functions drawn by Compose |
| Navigation | Expo Router (files) | go_router (routes) |
Navigation 3 (back stack = list of keys) |
| Local state | useState, useReducer |
StatefulWidget + setState |
remember + mutableStateOf |
| App-wide state | Context + custom hook (useAuth) |
ChangeNotifier + provider |
ViewModel + StateFlow |
| Async | Promise, async await |
Future, async await |
Coroutines, suspend, Flow |
| Backend SDK | react-native-appwrite |
appwrite (Dart) |
io.appwrite:sdk-for-android |
| Configuration | EXPO_PUBLIC_* in .env |
--dart-define-from-file=env.json |
local.properties → BuildConfig |
| Route protection | Stack.Protected (guard per group) |
redirect + refreshListenable |
when on the session |
| Impossible states | Discriminated unions (TypeScript) | Sealed classes (Dart 3) | Sealed interfaces |
| Build and sign | eas build (cloud, managed credentials) |
flutter build appbundle + keystore |
./gradlew bundleRelease + keystore |
| iOS | Same code (eas build) |
Same code (Mac for ipa) |
Not covered: separate app (Swift/SwiftUI) or Kotlin Multiplatform |
| Quick updates | Over-the-air JS updates | New store release | New store release (Play in-app updates API) |
| Testing in development | Expo Go, Fast Refresh | Hot Reload | Previews, Live Edit, emulator |
What you should remember
Expected result — native UI preview. Use the finished UI as a checkpoint, then verify persistence, permissions and session behavior independently.
- Separate concerns: UI → state holder → repository → backend. The same layering worked in the three technologies; only the names change (reducer,
ChangeNotifier,ViewModel) - State flows down, events flow up: stateless composables / widgets / components are easy to reuse, preview and test
- Treat every remote call as fallible: loading, error, empty and success states
- Security lives on the server. Hiding screens or filtering in the app is a convenience; permissions are the protection
- Never ship secrets in a mobile app. Everything inside the app can be read
- Releases are a process: application id, signing, version codes, store accounts and review
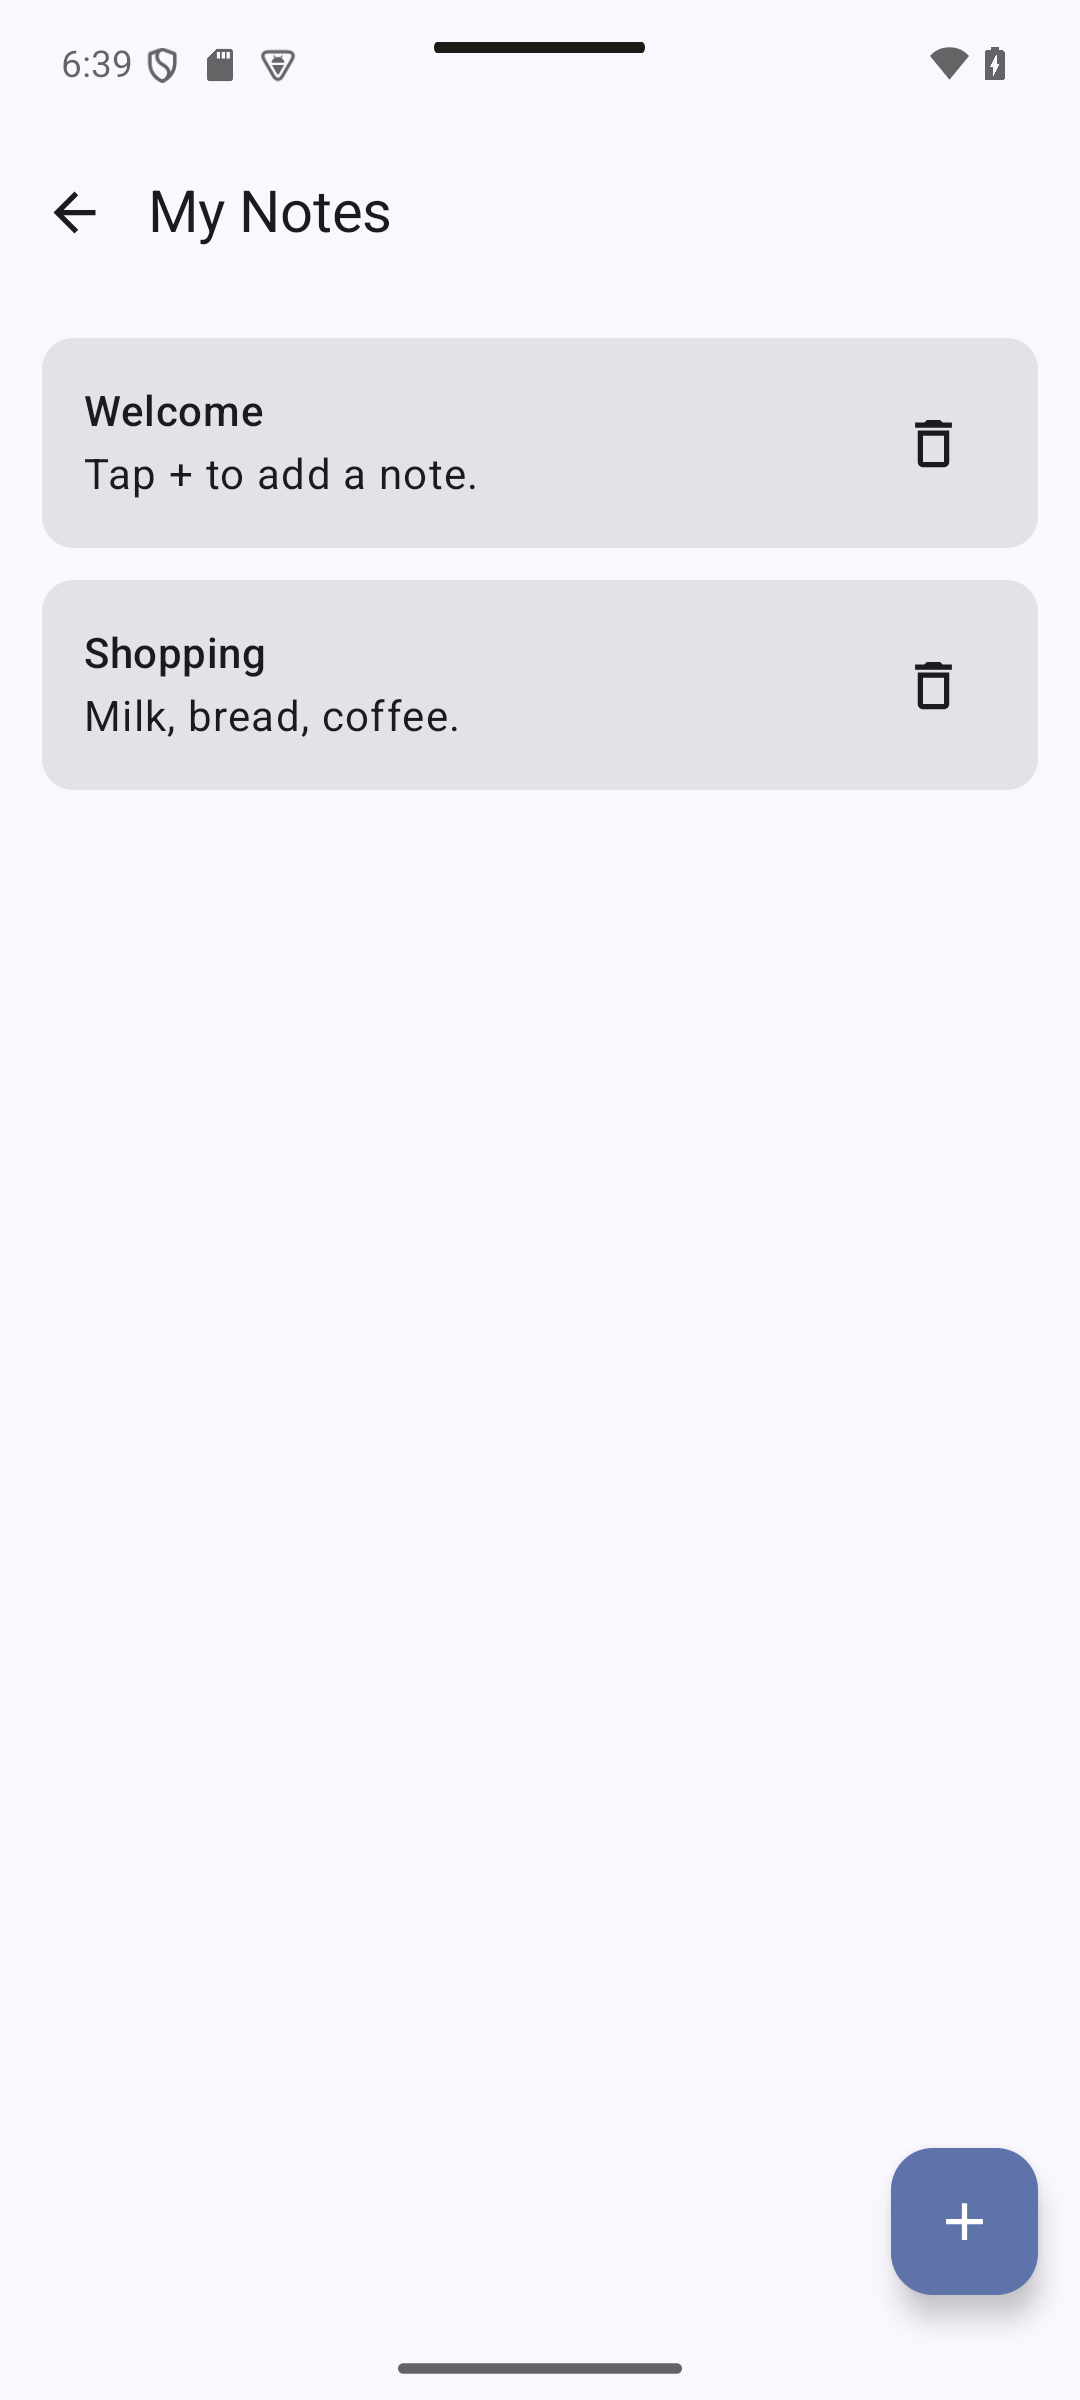
Choosing between cross-platform and native
Expected result — native UI preview. This is the native Compose rendition of the shared Notes exercise; compare its implementation with the React Native and Flutter tracks.
| Choose… | When… |
|---|---|
| React Native / Expo | Your team knows JavaScript / React, you need iOS and Android quickly, and maybe the web |
| Flutter | You want a pixel-identical custom UI on every platform and one code base for mobile and desktop |
| Kotlin + Compose (native) | Android is the priority, you need the latest platform APIs, deep OS integration or maximum performance and polish |
| Kotlin Multiplatform + Compose Multiplatform | You like Kotlin and want to share business logic (and optionally UI) with iOS while keeping native strengths |
There is no universal winner: the best choice depends on the team, the product and the platforms. Having built the same app three times, you now have the experience to decide.
By Wahid Hamdi