Angular & Next.js - Full Stack Development - Part I
Next: Part II - Express, PostgreSQL & Prisma · Part III - Angular, Express & MongoDB
Learning objectives
By the end of this lab you will be able to:
- create and run an Angular and a Next.js project, and explain their folder structure
- build pages, a shared layout and navigation (declarative and programmatic) in both frameworks
- read route parameters and share data between components (parent → child, child → parent)
- call a REST API and display loading / error states
- build and validate a form
- compare the two frameworks (rendering model, state, HTTP, forms)
- containerize both applications with Docker
Prerequisites: HTML, CSS, JavaScript/TypeScript basics, a terminal, Git, Docker Desktop installed.
Versions used
Versions were the latest stable ones when this lab was written:
| Tool | Version |
|---|---|
| Node.js | 24 LTS (node -v) |
| Angular CLI | 22 (ng version) |
| Next.js | 16 (React 19) |
| TypeScript | as installed by each project (keep strict enabled) |
Expected final layout
Both projects live side by side in one folder (this will become the monorepo of Part II):
fullstack-tp/
├── ngapp/     # Angular   -> http://localhost:4200
└── nxapp/     # Next.js   -> http://localhost:3000
Two different ports: you can run both at the same time.
Project Setup
- Install Node.js (LTS) and verify:
node -v
npm -v- Create the working folder:
mkdir fullstack-tp
cd fullstack-tp- Angular project setup (see Angular web site). Answer the CLI questions with the default choices (CSS, no SSR for now):
npx @angular/cli@latest new ngapp- Start the Angular project (port 4200):
cd ngapp
ng serve- Next.js project setup (see Next.js web site) in the same parent folder (project name
nxapp). Accept the defaults: TypeScript, ESLint, Tailwind CSS,src/directory, App Router:
cd ..
npx create-next-app@latest nxapp- Start the Next.js project (port 3000):
cd nxapp
npm run dev
Expected result: the Angular welcome page on localhost:4200 and the Next.js welcome page on localhost:3000.
Understanding project structure
Open the 2 projects in Visual Studio Code, each in its own window.
| Item | Angular | Next.js | Role |
|---|---|---|---|
| Scripts & dependencies | package.json |
package.json |
npm run X runs the scripts section |
| Locked versions | package-lock.json |
package-lock.json |
reproducible installs, commit it |
| Compiler options | tsconfig.json |
tsconfig.json |
TypeScript target, the strict option |
| Static files | public/ |
public/ |
images, favicon, served as is |
| Build cache | .angular/cache |
.next/ |
generated, never commit, safe to delete |
| Dependencies | node_modules/ |
node_modules/ |
downloaded by npm install, never commit |
| Your code | src/ |
src/ |
where you work |
| Global CSS | src/styles.css |
src/app/globals.css |
applied to all pages |
| Config | angular.json, src/app/app.config.ts |
next.config.ts |
framework configuration |
The default page rendered:
- Next.js:
src/app/page.tsx(inside the layoutsrc/app/layout.tsx) - Angular:
src/app/app.html(the root componentApp, inapp.ts)
Components in both frameworks:
- In Angular a component is made of 3 files:
app.ts(logic),app.html(template) andapp.css(styles) - In Next.js (React) a component is one function in a
.tsxfile that returns JSX (HTML + JavaScript expressions). Styling is done with Tailwind classes or a CSS file.
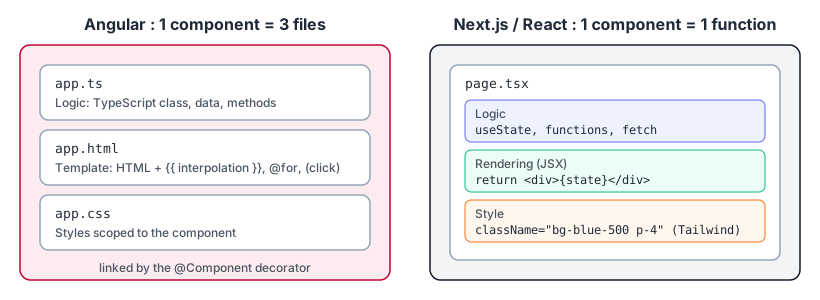
Figure 1 - Anatomy of a component: Angular vs Next.js
Start from a clean page
- Angular: in
src/app/app.html, keep only:
<router-outlet />- Next.js: in
src/app/page.tsx, keep only:
export default function Home() {
  return <></>;
}- Global CSS (applied to all pages):
src/styles.cssin Angular,src/app/globals.cssin Next.js.
Common mistakes: a port already in use (stop the other server, or use
ng serve --port 4300/npm run dev -- -p 3001); forgetting to save a file; editing the wrong project.
Exercise 1: change the page title (<title>): in src/index.html for Angular, in the metadata object of src/app/layout.tsx for Next.js.
Page Routing - Routing from Html file
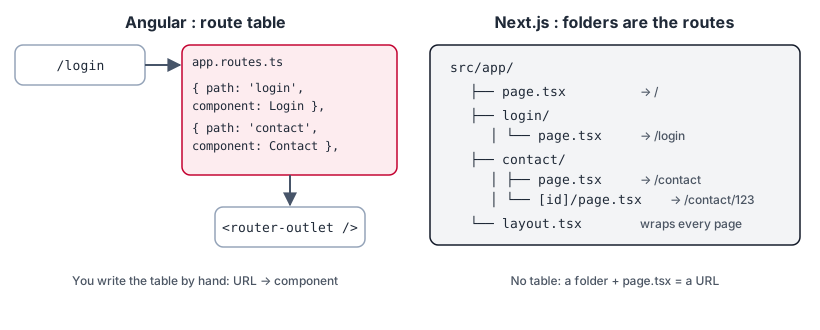
Figure 2 - Two ways to map a URL to a page
Angular Routing
- Add a component named header using the command line:
ng g component headerThis creates src/app/header/header.ts, header.html, header.css (class Header).
- To use it, import the class in the
importsarray ofsrc/app/app.tsand add the tag inapp.htmlbefore<router-outlet />:
// src/app/app.ts
import { Component } from '@angular/core';
import { RouterOutlet } from '@angular/router';
import { Header } from './header/header';

@Component({
  selector: 'app-root',
  imports: [RouterOutlet, Header],
  templateUrl: './app.html',
  styleUrl: './app.css',
})
export class App {}
<!-- src/app/app.html -->
<app-header />
<router-outlet />- Change the content of
header.htmlto add a navigation bar:
<nav>
  <a>Home</a>
  <a>Login</a>
  <a>Contact</a>
</nav>- Add a CSS style in
header.css:
nav {
  display: flex;
  gap: 1rem;
  justify-content: center;
}- To navigate from one page to another without reloading the page, use the
routerLinkdirective (importRouterLinkinheader.ts):
// src/app/header/header.ts
import { Component } from '@angular/core';
import { RouterLink } from '@angular/router';

@Component({
  selector: 'app-header',
  imports: [RouterLink],
  templateUrl: './header.html',
  styleUrl: './header.css',
})
export class Header {}
<!-- src/app/header/header.html -->
<nav>
<a routerLink="/">Home</a>
<a routerLink="/login">Login</a>
<a routerLink="/contact">Contact</a>
</nav>- Generate the 2 components login and contact:
ng g component login
ng g component contact- To activate the routing, modify the
routesarray insrc/app/app.routes.ts:
import { Routes } from '@angular/router';
import { Login } from './login/login';
import { Contact } from './contact/contact';

export const routes: Routes = [
  { path: 'login', component: Login },
  { path: 'contact', component: Contact },
];
The routes are registered in
app.config.tsthroughprovideRouter(routes)(already done by the CLI).
Next.js Routing
In Next.js the folder structure is the router: each folder under src/app containing a page.tsx becomes a URL. No route table to write.
- The layout (
src/app/layout.tsx) wraps every page. It is the equivalent of Angular’sapp.html+<router-outlet />({children}is where the current page is displayed). This is where a shared header belongs.
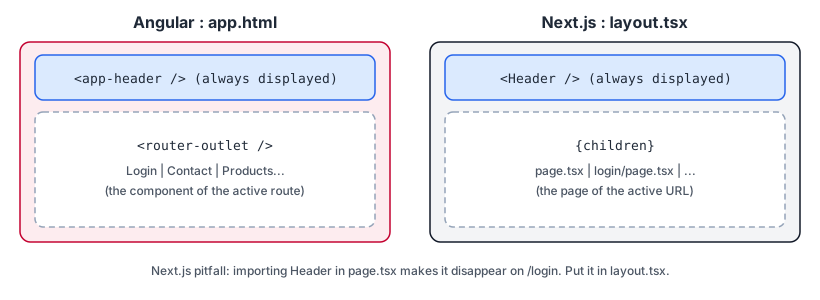
Figure 3 - The layout stays, the page changes
- Create a header component. Put reusable components in
src/components(not insrc/app, to avoid creating routes by mistake). Createsrc/components/Header.tsx:
import Link from "next/link";

export default function Header() {
  return (
    <nav className="flex justify-center gap-4 p-4">
      <Link href="/">Home</Link>
      <Link href="/login">Login</Link>
      <Link href="/contact">Contact</Link>
    </nav>
  );
}
Link (like routerLink) navigates without a full page reload.
- Use it in the layout
src/app/layout.tsx, so the header appears on every page (keep the fonts / metadata the generator created, only add the marked lines):
import Header from "@/components/Header"; // added

// ...

export default function RootLayout({
  children,
}: Readonly<{ children: React.ReactNode }>) {
  return (
    <html lang="en">
      <body>
        <Header /> {/* added */}
        {children}
      </body>
    </html>
  );
}
@/is an alias forsrc/(configured intsconfig.json).
- Add the login and contact pages: create the folders
loginandcontactundersrc/app, each with apage.tsx:
src/app/login/page.tsx:
export default function Login() {
  return <div>Login page</div>;
}src/app/contact/page.tsx:
export default function Contact() {
  return <div>Contact page</div>;
}
Expected result: on both apps, clicking the menu changes the page and the header stays visible.
Exercise 2: add an About page (/about) and a menu entry in both projects. Then type an unknown URL (/xyz): what do you see in each framework? (Angular: nothing / Next.js: 404 page). Add a wildcard route { path: '**', component: NotFound } in Angular, and a not-found.tsx file in Next.js.
Page Routing - Routing from Typescript file
Angular Routing
- In
app.html, add the 2 buttons:
<app-header />

<button (click)="gotoLogin()">Login Page</button>
<button (click)="gotoContact()">Contact Page</button>

<router-outlet />- In
app.ts, add the following code in the App class (injectgets the router service, this is dependency injection):
import { Component, inject } from '@angular/core';
import { Router, RouterOutlet } from '@angular/router';

export class App {
  private router = inject(Router);

  gotoLogin() {
    this.router.navigate(['/login']);
  }

  gotoContact() {
    this.router.navigate(['/contact']);
  }
}- Validate the result in the browser.
Next.js Routing
- In
src/app/page.tsx, add adivwith 2 buttons. A component that uses hooks (useRouter) or event handlers must be a Client Component: add"use client"at the very top of the file.
"use client"; // client rendering and interactivity
import { useRouter } from "next/navigation";

export default function Home() {
  const router = useRouter();

  function gotoLogin() {
    router.push("/login");
  }

  function gotoContact() {
    router.push("/contact");
  }

  return (
    <div className="flex gap-2 p-4">
      {/* Tailwind CSS classes style the buttons */}
      <button
        className="rounded bg-blue-500 px-4 py-2 font-bold text-white hover:bg-blue-700"
        onClick={gotoLogin}
      >
        Login Page
      </button>
      <button
        className="rounded bg-green-500 px-4 py-2 font-bold text-white hover:bg-green-700"
        onClick={gotoContact}
      >
        Contact Page
      </button>
    </div>
  );
}
Note: the header comes from the layout, so it is not imported here anymore.
Exercise 3: add a “Back” button that goes to the previous page (Location.back() in Angular, router.back() in Next.js).
Page Routing - Accessing Route params
Angular - Accessing Route params
- To get parameters from the url, ex:
http://localhost:4200/contact/123, add a route with anidparameter inapp.routes.ts. Keep the route without parameter as well, so the/contactlink keeps working:
{ path: 'contact', component: Contact },
{ path: 'contact/:id', component: Contact },- In
header.htmladd a link with an id value:
<a routerLink="/contact/123">Contact 123</a>- To show the id in the contact page, use the ActivatedRoute service. In
contact.ts:
import { Component, inject } from '@angular/core';
import { ActivatedRoute } from '@angular/router';

export class Contact {
  id: string | null = null;
  private route = inject(ActivatedRoute);

  constructor() {
    // 'id' is the same name used in the route definition
    this.route.paramMap.subscribe((params) => {
      this.id = params.get('id');
    });
  }
}- Display the id with string interpolation in
contact.html:
<p>contact works!</p>
Contact Page Id: {{ id }}
Why
subscribe? If you navigate from/contact/1to/contact/2, Angular reuses the component:paramMapis an Observable that emits every time the parameter changes.
Next.js - Accessing Route params
-
A folder whose name is between brackets is a dynamic segment:
src/app/contact/[id]/page.tsxhandles/contact/123,/contact/abc… -
Keep
src/app/contact/page.tsxfor/contactand createsrc/app/contact/[id]/page.tsx:
"use client";
import { useParams } from "next/navigation";

export default function ContactDetail() {
  const params = useParams<{ id: string }>();

  return (
    <>
      <div>Contact Page</div>
      <h2>Contact ID: {params.id}</h2>
    </>
  );
}- In
src/app/page.tsxchangegotoContact()to add an id value:
function gotoContact() {
  router.push("/contact/123");
}
Server-side alternative (no
"use client"needed): in a Server Component the params arrive as a Promise and must be awaited:export default async function ContactDetail({ params, }: { params: Promise<{ id: string }>; }) { const { id } = await params; return <h2>Contact ID: {id}</h2>; }
Exercise 4: read a query parameter (/contact?ref=home) in both frameworks (ActivatedRoute.queryParamMap / useSearchParams).
Sharing Data - From Parent to Child
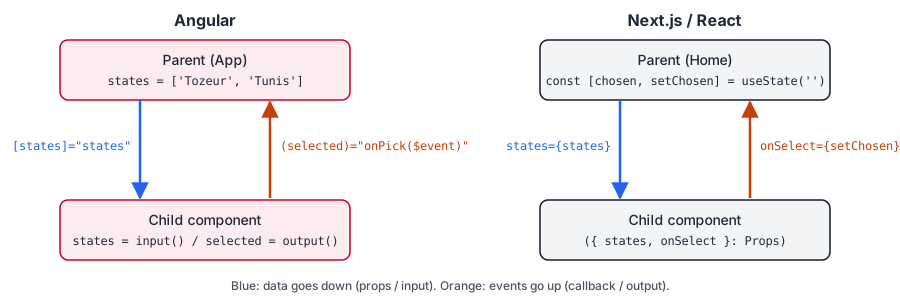
Figure 4 - Parent/child communication (this section and the next ones)
Angular - Sharing Data from Parent to Child
- Create a component named
child:
ng g component child- Import it in
app.ts(imports: [..., Child]), then inapp.htmladd it just before<router-outlet />:
<app-child />
<router-outlet />- In
app.ts, add a variable in theAppclass:
export class App {
  content = 'Content from Parent';
}- To pass the data to the
childcomponent, use a property binding (square brackets) inapp.html:
<app-child [content]="content" />- In
child.ts, receive it with theinput()function (signal-based inputs, the modern way):
import { Component, input } from '@angular/core';

export class Child {
  content = input<string>('');
}- A signal is read by calling it. In
child.html:
<p>Content from parent: {{ content() }}</p>- Now pass a list of values. In
app.tsadd:
export class App {
  states = ['Tozeur', 'Tunis', 'Nabeul'];
}- In
app.html:<app-child [states]="states" /> - In
child.ts:states = input<string[]>([]); - Iterate with the
@forcontrol flow inchild.html(trackhelps Angular update only what changed):
@for (state of states(); track state) {
  <div>Name: {{ state }}</div>
} @empty {
  <div>States are empty</div>
}
Angular - Sharing Data from Child to Parent
- The child sends an event with
output(). Inchild.ts:
import { Component, input, output } from '@angular/core';

export class Child {
  states = input<string[]>([]);
  selected = output<string>();

  select(state: string) {
    this.selected.emit(state);
  }
}- In
child.html, add a button in the loop:
<button (click)="select(state)">{{ state }}</button>- In
app.html, listen to the event:
<app-child [states]="states" (selected)="onSelected($event)" />
<p>Selected: {{ chosen }}</p>- In
app.ts:
chosen = '';
onSelected(state: string) {
  this.chosen = state;
}
Next.js - Sharing Data from Parent to Child
In React data flows down through props. Create src/components/Child.tsx (not in src/app, a page.tsx there would create a route). Note the typing of the props:
type ChildProps = {
  states: string[];
  onSelect: (state: string) => void; // used in the next section
};

export default function Child({ states, onSelect }: ChildProps) {
  return (
    <ul>
      {states.map((state) => (
        <li key={state}>
          <button onClick={() => onSelect(state)}>{state}</button>
        </li>
      ))}
    </ul>
  );
}- Use it in the parent
src/app/page.tsx. The parent owns the state (useState):
"use client";
import { useState } from "react";
import Child from "@/components/Child";

export default function Home() {
  const [states] = useState(["Tozeur", "Gafsa", "Tunis"]);
  const [chosen, setChosen] = useState("");

  return (
    <>
      {/* ...buttons from the previous section... */}
      <Child states={states} onSelect={setChosen} />
      <p>Selected: {chosen}</p>
    </>
  );
}
Next.js - Sharing Data from Child to Parent
There is no @Output in React: the parent passes a callback function as a prop (onSelect), and the child calls it. That is exactly what the code above does (onSelect={setChosen}).
| Angular | Next.js / React | |
|---|---|---|
| Parent → child | [prop]="value" + input() |
<Child prop={value} /> |
| Child → parent | (event)="handler($event)" + output() |
callback prop onEvent={fn} |
| Local state | class property / signal() |
useState |
Exercise 5: add a text input in the parent to add a new state to the list.
API Calls
The public API https://dummyjson.com/products (documentation: dummyjson.com) returns product objects. First define their type: it gives auto-completion and catches typos.
export interface Product {
  id: number;
  title: string;
  description: string;
  price: number;
  thumbnail: string;
  category: string;
}
Put it in src/app/models/product.ts (Angular) and src/types/product.ts (Next.js).
API Calling (Angular)
- Add a component named
products. - Enable the HTTP client in
src/app/app.config.tsby addingprovideHttpClient()in the providers list:
import { provideHttpClient, withFetch } from '@angular/common/http';

export const appConfig: ApplicationConfig = {
  providers: [
    // ...existing providers
    provideHttpClient(withFetch()),
  ],
};- Good practice: put the HTTP call in a service (a class injectable everywhere), not in the component. Generate it with
ng g service productand writesrc/app/product.ts(orproduct.service.ts, depending on the generator):
import { Injectable, inject } from '@angular/core';
import { HttpClient } from '@angular/common/http';
import { Observable } from 'rxjs';
import { Product } from './models/product';

@Injectable({ providedIn: 'root' })
export class ProductService {
  private http = inject(HttpClient);

  getProduct(id: number): Observable<Product> {
    return this.http.get<Product>(`https://dummyjson.com/products/${id}`);
  }
}- In
products.ts, use the service (importProductServicefrom the generated file):
import { Component, inject, signal } from '@angular/core';

export class Products {
  private service = inject(ProductService);

  product = signal<Product | null>(null);
  error = signal('');

  constructor() {
    this.service.getProduct(1).subscribe({
      next: (data) => this.product.set(data),
      error: () => this.error.set('Unable to load the product'),
    });
  }
}- In
products.html, handle the three states (loading, error, data). Readingproduct().titlebefore the response arrives would crash, hence the@if:
@if (error()) {
  <p>{{ error() }}</p>
} @else if (product(); as p) {
  <p>{{ p.title }} - {{ p.description }}</p>
} @else {
  <p>Loading product...</p>
}- Add
<app-products />toapp.html(and to theimportsofApp) to show it.
API Calling (Next.js)
Next.js offers two ways. Compare them.
1. Client Component (like Angular: fetch in the browser after the page loads). Create src/app/products/page.tsx:
"use client";
import { useEffect, useState } from "react";
import type { Product } from "@/types/product";

export default function Products() {
  const [product, setProduct] = useState<Product | null>(null);
  const [error, setError] = useState("");

  useEffect(() => {
    async function fetchProduct() {
      try {
        const response = await fetch("https://dummyjson.com/products/1");
        if (!response.ok) throw new Error("HTTP " + response.status);
        setProduct(await response.json());
      } catch {
        setError("Unable to load the product");
      }
    }
    fetchProduct();
  }, []); // [] = run once, after the first render

  if (error) return <p>{error}</p>;
  if (!product) return <p>Loading product...</p>;
  return (
    <p>
      {product.title} - {product.description}
    </p>
  );
}
2. Server Component (the default in the App Router: the fetch runs on the server, the browser receives ready-made HTML, no useEffect, no loading state to write). Replace the file above by:
import type { Product } from "@/types/product";

export default async function Products() {
  const response = await fetch("https://dummyjson.com/products/1");
  const product: Product = await response.json();

  return (
    <p>
      {product.title} - {product.description}
    </p>
  );
}
Add a loading.tsx file next to page.tsx (displayed automatically while the server component loads) and an error.tsx file ("use client" required, receives error and reset).
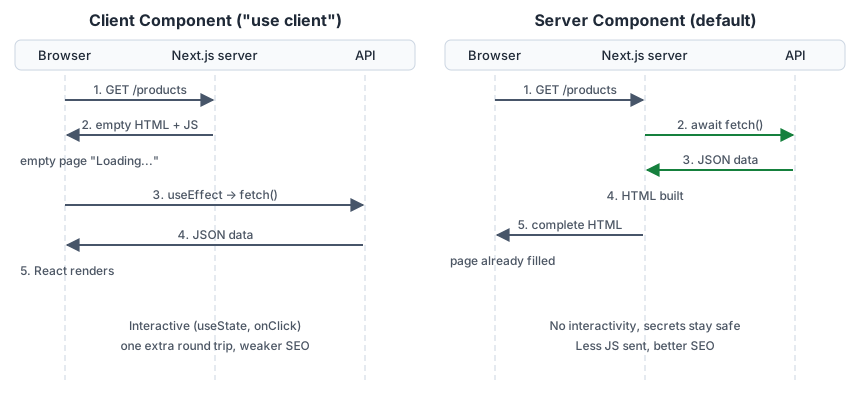
Figure 5 - Where the data is fetched: browser or server
| Client Component | Server Component | |
|---|---|---|
| Runs in | browser | server (then HTML is sent) |
| Directive | "use client" |
none (default) |
Hooks / events (useState, onClick) |
yes | no |
async/await directly in component |
no | yes |
| Secrets (API keys, database) | never | safe |
| SEO / first paint | worse | better |
Rule of thumb: stay server by default, switch to client only for interactivity.
- Add a link to
/productsin the header to reach the page.
Exercise 6: display the product whose id comes from the URL (/products/[id] in Next.js, /products/:id in Angular). This is the base of the challenge.
Forms
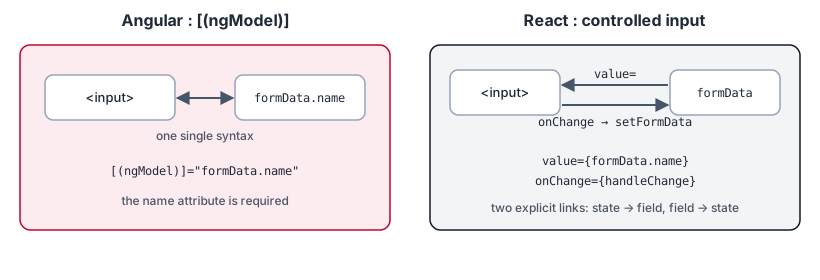
Figure 6 - Form binding in Angular and React
Angular - Forms
- Import FormsModule in the component that uses it (here
contact.ts):
import { Component } from '@angular/core';
import { FormsModule } from '@angular/forms';

@Component({
  selector: 'app-contact',
  imports: [FormsModule],
  templateUrl: './contact.html',
  styleUrl: './contact.css',
})
export class Contact { /* ... */ }- In
contact.html, build the form using ngModel (two-way data binding). EachngModelfield must have anameattribute:
<form #contactForm="ngForm" (ngSubmit)="onSubmit()">
  <input type="text" name="name" [(ngModel)]="formData.name" placeholder="Name" required #name="ngModel" />
  @if (name.invalid && name.touched) {
    <small>Name is required</small>
  }

  <input type="email" name="email" [(ngModel)]="formData.email" placeholder="Email" required email />

  <button type="submit" [disabled]="contactForm.invalid">Submit</button>
</form>- In
contact.ts, declareformDataand handle the submission (keep theidcode from the previous section):
formData = {
  name: '',
  email: '',
};

onSubmit() {
  console.log('Form submitted:', this.formData);
}- Type in the fields and check the browser console after clicking submit:
formDatareflects what you typed thanks to[(ngModel)]. The button stays disabled while the form is invalid.
To go further: Reactive Forms (
FormGroup,FormControl,Validators) are preferred for larger forms.
Next.js - Forms
-
In React, form fields are controlled components: the value lives in a
useStateand each input has bothvalueandonChange. No library is needed for a basic form. -
In
src/app/contact/page.tsx(this file needs"use client"):
"use client";
import { useState } from "react";

export default function Contact() {
  const [formData, setFormData] = useState({ name: "", email: "" });

  function handleChange(e: React.ChangeEvent<HTMLInputElement>) {
    const { name, value } = e.target;
    setFormData((prev) => ({ ...prev, [name]: value }));
  }

  function handleSubmit(e: React.FormEvent<HTMLFormElement>) {
    e.preventDefault(); // prevent page reload
    console.log("Form submitted:", formData);
  }

  return (
    <form onSubmit={handleSubmit} className="flex flex-col gap-2 p-4">
      <input type="text" name="name" value={formData.name} onChange={handleChange} placeholder="Name" required />
      <input type="email" name="email" value={formData.email} onChange={handleChange} placeholder="Email" required />
      <button type="submit" disabled={!formData.name || !formData.email}>
        Submit
      </button>
    </form>
  );
}- Note the difference with Angular: each input needs both
value(from state) andonChange(to update state). Thenameattribute lets one handler serve all the fields.
To go further:
react-hook-form+zodfor validation, and Server Actions to submit a form directly to the server.
Exercise 7: show an error message under the email field when it is not a valid email, in both frameworks.
Environment variables
Never hardcode the API URL in components; it changes between development and production.
| Angular | Next.js | |
|---|---|---|
| Where | src/environments/environment.ts (ng generate environments) |
.env.local |
| Example | export const environment = { apiUrl: 'https://dummyjson.com' }; |
NEXT_PUBLIC_API_URL=https://dummyjson.com |
| Usage | environment.apiUrl |
process.env.NEXT_PUBLIC_API_URL |
In Next.js only variables prefixed with NEXT_PUBLIC_ are visible in the browser; the others stay on the server. Add .env.local to .gitignore (already done by create-next-app).
Angular vs Next.js - Summary
| Topic | Angular | Next.js |
|---|---|---|
| Type | full framework (batteries included) | React framework |
| Language / templates | TypeScript + HTML templates | TypeScript + JSX |
| Component | class + decorator, 3 files | function, 1 file |
| Routing | route table (app.routes.ts) |
file-system (app/…/page.tsx) |
| Layout | root component + <router-outlet> |
layout.tsx + {children} |
| Route params | ActivatedRoute |
useParams() / params prop |
| State | properties, signal() |
useState |
| Parent ↔ child | input() / output() |
props / callback props |
| HTTP | HttpClient (Observables), services + DI |
fetch, Server Components |
| Forms | ngModel, Reactive Forms |
controlled inputs, Server Actions |
| Rendering | client (SSR optional) | server first (SSR / SSG / client) |
| Styling | CSS per component | Tailwind / CSS |
| Dev port | 4200 | 3000 |
Challenge Activity – Multi-Stack Product Catalogue Development
Objectives
Build a web application that displays a product catalogue using two modern front-end approaches:
- Angular + Bootstrap
- Next.js + TailwindCSS
Fetch the data from the public API: https://dummyjson.com/products, then containerize both apps and push the images to Docker Hub.
Requirements
- List page
/products: a responsive grid of cards showing image, name, price and description (truncated). - Detail page
/products/:id(Angular) and/products/[id](Next.js): all the product information, and a “Back to catalogue” link. - Pagination using the API parameters
?limit=12&skip=0(Previous / Next buttons). - Loading and error states (a message or spinner, a message if the API fails).
- Reusable component for the product card (use
input()/ props). - Typed code: a
Productinterface, noany, TypeScriptstrictenabled. - Angular: use a
ProductService. Next.js: use a Server Component for the list,next/imagefor images (configureimages.remotePatternsinnext.config.tsforcdn.dummyjson.com). - Bootstrap:
npm install bootstrapand add its CSS inangular.json(stylesarray). Tailwind is already installed in the Next.js project.
Bonus: search box (/products/search?q=), filter by category, favourites or a shopping cart.
Docker
Containerize each application. Expected work (you write the files, look for documentation):
- a
Dockerfilefor each app, multi-stage (a Node stage to build, a light final stage to serve)- Angular: build with
ng build, serve thedist/with Nginx; the Nginx configuration must redirect unknown paths toindex.html(try_files) or refreshing/products/5gives a 404 - Next.js: set
output: "standalone"innext.config.ts, copy the.next/standalone,.next/staticandpublicfolders in the final image, runnode server.js
- Angular: build with
- a
.dockerignore(at leastnode_modules,.next,dist,.angular,.git) - build, run and test locally:
docker build -t <dockerhub-user>/ngapp:1.0 .
docker run -p 8080:80 <dockerhub-user>/ngapp:1.0- push the images:
docker login
docker push <dockerhub-user>/ngapp:1.0
Deliverables
- a Git repository (
ngapp/,nxapp/, aREADME.mdexplaining how to run each app and how to run the containers) - the two Docker Hub image names (public)
- screenshots of the list and detail pages
Continue with Part II: you will replace dummyjson with your own API.