Lab 02 — S3: Object Storage and Lifecycle Management
Series: Le Café ☕ — AWS Hands-On Labs with LocalStack
Level: Beginner → Intermediate | Duration: ~80 min
Prerequisites: Lab 00 and Lab 01 complete, LocalStack running,awslocalconfigured
🎯 Learning Objectives
By the end of this lab you will be able to:
- Explain how S3 organises data and why it is not a traditional file system
- Create and configure S3 buckets with versioning enabled
- Upload, retrieve, and delete objects using the CLI and the S3 API
- Write a bucket policy to control access at the resource level
- Configure a lifecycle rule to automatically transition or expire objects
- Host a static website directly from an S3 bucket
- Recognise the most common S3 security misconfigurations
🏪 Scenario — Le Café’s Digital Presence
Le Café is expanding its digital footprint. The marketing team wants a public-facing static website that displays the seasonal menu. The development team needs a private bucket to store application assets, build artefacts, and log files — with old logs automatically deleted after 30 days to control storage costs. The operations team wants versioning on the assets bucket so that accidental overwrites can always be recovered.
Your job is to design and implement this three-bucket S3 architecture entirely within LocalStack, applying the access controls and automation rules that would be required in a real production account.
🧠 Concept — S3 Is Not a File System
Before writing a single command, it is worth addressing a misconception that trips up almost every beginner: S3 looks like a folder hierarchy, but it is not one.
In a traditional file system, folders are real containers. A file genuinely lives inside a directory, which lives inside another directory. In S3, there is no such thing as a folder. S3 has only two things: buckets and objects. A bucket is a flat container that lives in a specific AWS region. An object is a file plus its metadata, identified by a key — a string that can look like a path but is just a name.
When you upload a file with the key menus/paris/summer-2026.pdf, S3 is not creating a menus folder and a paris sub-folder. It is simply storing an object whose name happens to contain slashes. The AWS Console and the CLI both use those slashes to simulate a folder view because humans find hierarchies easier to navigate, but underneath, it is all one flat namespace. Understanding this distinction matters for three practical reasons.
First, you cannot create an empty folder in S3, because folders do not exist. What you see as an empty folder in the console is actually a zero-byte object whose key ends with a /. Second, when you write bucket policies or lifecycle rules and need to target “everything inside the logs folder,” you use a prefix like logs/*, not a path. Third, S3 operations like ListObjectsV2 return flat lists of keys, not nested directory trees — your code needs to handle prefix filtering explicitly.
💡 A useful mental model: Think of S3 as an enormous dictionary (in the programming sense — a key-value store) where every key is a string and every value is a file plus its metadata. The slashes in key names are just characters, not structural separators.
🏗️ Architecture — Le Café’s Three-Bucket Design
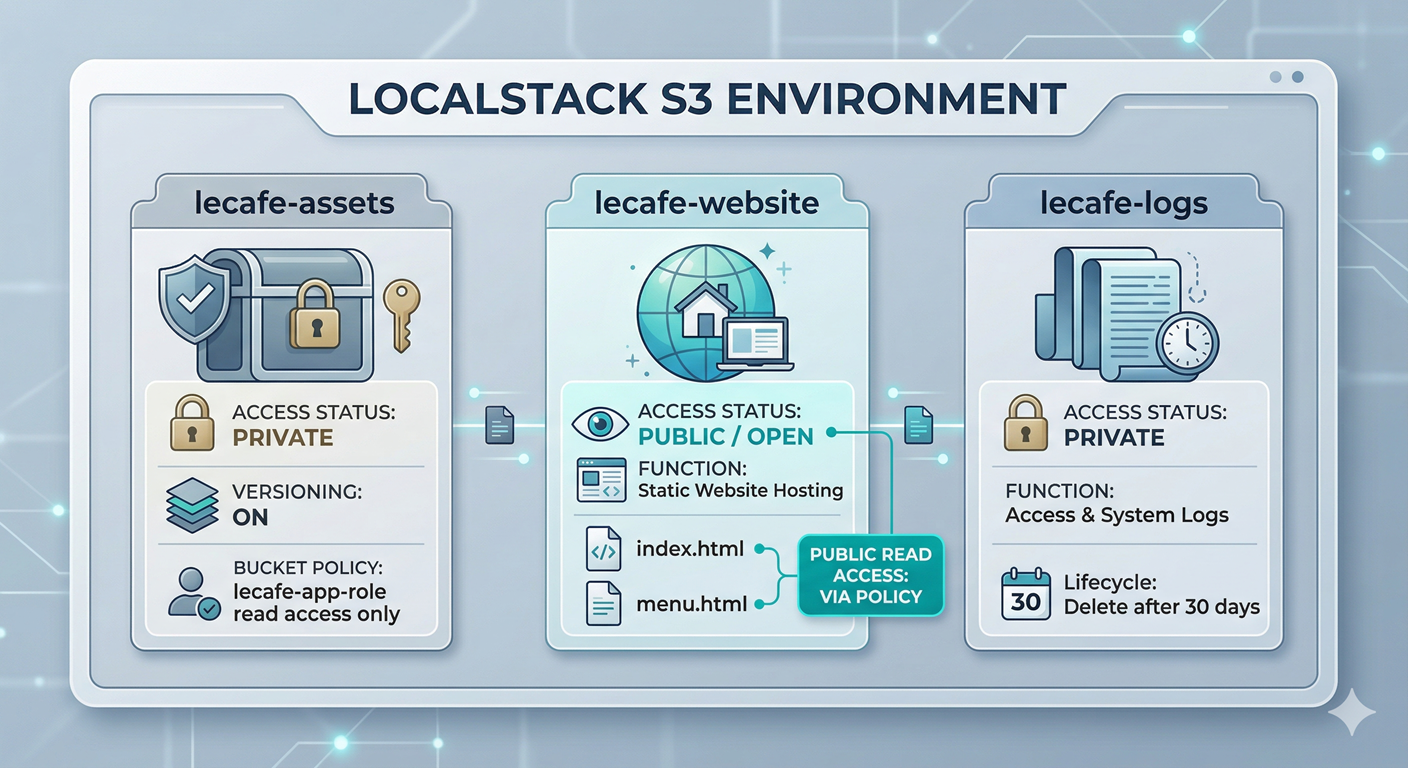
⚙️ Part 1 — Create and Configure the Buckets
Step 1 — Start LocalStack and Set Your Profile
localstack start -d
localstack status services

export AWS_PROFILE=localstack
Step 2 — Create the Three Buckets
# Private bucket for application assets (versioning will be enabled shortly)
awslocal s3 mb s3://lecafe-assets

# Public bucket for the static website
awslocal s3 mb s3://lecafe-website

# Private bucket for log storage
awslocal s3 mb s3://lecafe-logs
# Verify all three buckets exist
awslocal s3 lsStep 3 — Enable Versioning on the Assets Bucket
Versioning is one of S3’s most valuable features and one of the easiest to overlook until something goes wrong. When versioning is enabled, S3 does not overwrite or delete objects — it creates a new version of the object instead. Every object in the bucket now has a version history. If someone accidentally uploads a corrupted file over the correct one, you can restore the previous version in seconds.
awslocal s3api put-bucket-versioning \
  --bucket lecafe-assets \
  --versioning-configuration Status=Enabled
# Confirm versioning is active
awslocal s3api get-bucket-versioning --bucket lecafe-assetsThe response should show "Status": "Enabled". Notice that we switched from the high-level s3 subcommand to the lower-level s3api subcommand. This distinction matters and is worth understanding. The awslocal s3 commands (like cp, mb, ls) are convenience wrappers that simplify common operations. The awslocal s3api commands map directly to the raw S3 REST API, giving you access to features — like versioning, bucket policies, and lifecycle rules — that the high-level wrappers do not expose. You will use both throughout this lab.
💡 Think of it this way:
s3is the friendly assistant who handles the most common tasks, whiles3apiis the manual that lets you configure everything under the hood. When you want fine-grained control, reach fors3api.
📦 Part 2 — Work with Objects and Versioning
Step 4 — Upload an Object and Observe Version IDs
Let’s upload a file to the versioned assets bucket and observe how S3 tracks the versions.
# Create the first version of the asset
echo "Le Café App Config — version 1" > config.txt

awslocal s3 cp config.txt s3://lecafe-assets/app/config.txt
# Now overwrite it with a second version
echo "Le Café App Config — version 2 (updated endpoint)" > config.txt
awslocal s3 cp config.txt s3://lecafe-assets/app/config.txtEven though we uploaded to the same key (app/config.txt), S3 has preserved both versions. Let’s see them.
# List all versions of all objects in the bucket
awslocal s3api list-object-versions --bucket lecafe-assets
You will see two entries in the Versions array, each with a unique VersionId, a LastModified timestamp, and IsLatest: true on the most recent one. Copy the VersionId of the first (older) version — you will need it for the next command.
# Retrieve the older version by its ID (replace VERSION_ID with your actual value)
awslocal s3api get-object \
  --bucket lecafe-assets \
  --key app/config.txt \
  --version-id VERSION_ID \
  recovered-config.txt

cat recovered-config.txt
You should see “version 1” content even though the current object holds “version 2.” This is the recovery workflow: no special backup process, no manual snapshots, just a direct API call with the version ID. In a real incident, this is the difference between a five-second fix and a multi-hour disaster recovery exercise.
Step 5 — Understand Delete Markers
Versioning also changes how deletion works, and this surprises most beginners. When you delete a versioned object without specifying a version ID, S3 does not remove the object. It inserts a special zero-byte object called a delete marker that acts as the “current version.” The object appears deleted to anyone listing the bucket normally, but all the real versions are still there underneath.
# Delete the object (without specifying a version ID)
awslocal s3 rm s3://lecafe-assets/app/config.txt

# List the bucket — the object appears gone
awslocal s3 ls s3://lecafe-assets/app/

# But list versions — all versions plus a delete marker are still present
awslocal s3api list-object-versions --bucket lecafe-assets
You will see a DeleteMarkers array alongside the Versions array. To permanently remove the object and all its history, you must delete each version ID individually — a deliberate friction point that protects you from accidental permanent deletion.
📜 Part 3 — Write a Bucket Policy
In Lab 01 you learned that IAM policies are attached to identities (users, groups, roles) and answer the question “what can this actor do?” Bucket policies work from the other direction: they are attached to the resource (the bucket) and answer “who is allowed to access this bucket?” Both types of policy are evaluated together by IAM whenever an API call is made.
Step 6 — Restrict the Assets Bucket to the App Role
We want lecafe-assets to be accessible only by the lecafe-app-role we created in Lab 01, and to deny all other principals explicitly.
cat > /tmp/assets-bucket-policy.json << 'EOF'
{
  "Version": "2012-10-17",
  "Statement": [
    {
      "Sid": "AllowAppRoleReadAccess",
      "Effect": "Allow",
      "Principal": {
        "AWS": "arn:aws:iam::000000000000:role/lecafe-app-role"
      },
      "Action": [
        "s3:GetObject",
        "s3:ListBucket"
      ],
      "Resource": [
        "arn:aws:s3:::lecafe-assets",
        "arn:aws:s3:::lecafe-assets/*"
      ]
    },
    {
      "Sid": "DenyAllOtherPrincipals",
      "Effect": "Deny",
      "Principal": "*",
      "Action": "s3:*",
      "Condition": {
        "ArnNotEquals": {
          "aws:PrincipalArn": "arn:aws:iam::000000000000:role/lecafe-app-role"
        }
      }
    }
  ]
}
EOF

awslocal s3api put-bucket-policy \
  --bucket lecafe-assets \
  --policy file:///tmp/assets-bucket-policy.json
The second statement — the Deny with a condition — deserves explanation. We are saying “deny all S3 actions to any principal whose ARN is NOT the app role.” This pattern is called a negative condition allow-list, and it is more robust than a simple allow, because in IAM an explicit Deny always wins, even if another policy somewhere grants Allow. If a new IAM user or role is created tomorrow with S3FullAccess, this bucket policy ensures they still cannot touch lecafe-assets.
# Verify the policy is in place
awslocal s3api get-bucket-policy --bucket lecafe-assets
Step 7 — Configure the Website Bucket for Public Access
The website bucket needs to be readable by anyone on the internet — that is the whole point of a public website. This requires two things: a bucket policy that grants s3:GetObject to "Principal": "*" (meaning anonymous public), and static website hosting configuration.
cat > /tmp/website-bucket-policy.json << 'EOF'
{
  "Version": "2012-10-17",
  "Statement": [
    {
      "Sid": "PublicReadForWebsite",
      "Effect": "Allow",
      "Principal": "*",
      "Action": "s3:GetObject",
      "Resource": "arn:aws:s3:::lecafe-website/*"
    }
  ]
}
EOF

awslocal s3api put-bucket-policy \
  --bucket lecafe-website \
  --policy file:///tmp/website-bucket-policy.json
# Enable static website hosting and point to the index document
awslocal s3api put-bucket-website \
--bucket lecafe-website \
--website-configuration '{
"IndexDocument": {"Suffix": "index.html"},
"ErrorDocument": {"Key": "error.html"}
}'🌐 Part 4 — Host the Le Café Static Website
Step 8 — Create and Upload the Website Pages
Let’s build a minimal but complete website with two pages.
# Create the homepage
cat > index.html << 'EOF'
<!DOCTYPE html>
<html lang="en">
<head>
  <meta charset="UTF-8">
  <title>Le Café — Welcome</title>
  <style>
    body { font-family: Georgia, serif; max-width: 700px; margin: 60px auto; color: #333; }
    h1   { color: #5c3d1e; }
    nav a { margin-right: 16px; color: #5c3d1e; }
  </style>
</head>
<body>
  <h1>☕ Le Café</h1>
  <nav><a href="index.html">Home</a><a href="menu.html">Our Menu</a></nav>
  <p>Welcome to Le Café — where every cup tells a story. We source our beans
     from small, sustainable farms and roast them fresh each morning.</p>
  <p>Explore our seasonal menu and visit us at any of our locations across the city.</p>
</body>
</html>
EOF

# Create the menu page
cat > menu.html << 'EOF'
<!DOCTYPE html>
<html lang="en">
<head>
  <meta charset="UTF-8">
  <title>Le Café — Menu</title>
  <style>
    body { font-family: Georgia, serif; max-width: 700px; margin: 60px auto; color: #333; }
    h1   { color: #5c3d1e; }
    nav a { margin-right: 16px; color: #5c3d1e; }
    table { width: 100%; border-collapse: collapse; margin-top: 24px; }
    th    { background: #5c3d1e; color: white; padding: 10px; text-align: left; }
    td    { padding: 8px 10px; border-bottom: 1px solid #ddd; }
  </style>
</head>
<body>
  <h1>☕ Our Menu — Spring 2026</h1>
  <nav><a href="index.html">Home</a><a href="menu.html">Our Menu</a></nav>
  <table>
    <tr><th>Item</th><th>Size</th><th>Price</th></tr>
    <tr><td>Espresso</td><td>Single</td><td>€2.50</td></tr>
    <tr><td>Latte</td><td>Medium</td><td>€3.50</td></tr>
    <tr><td>Cold Brew</td><td>Large</td><td>€4.00</td></tr>
    <tr><td>Croissant</td><td>—</td><td>€2.00</td></tr>
    <tr><td>Pain au Chocolat</td><td>—</td><td>€2.50</td></tr>
  </table>
</body>
</html>
EOF

# Create a simple error page
cat > error.html << 'EOF'
<!DOCTYPE html>
<html lang="en">
<head><meta charset="UTF-8"><title>Le Café — Page Not Found</title></head>
<body style="font-family: Georgia; text-align: center; margin-top: 80px;">
  <h1>☕ Oops!</h1>
  <p>We could not find that page. Perhaps you meant to visit our <a href="index.html">homepage</a>?</p>
</body>
</html>
EOF
# Upload all three pages to the website bucket
awslocal s3 cp index.html s3://lecafe-website/index.html
awslocal s3 cp menu.html s3://lecafe-website/menu.html
awslocal s3 cp error.html s3://lecafe-website/error.htmlStep 9 — Access the Website via LocalStack
In real AWS, S3 static websites are served at a URL like http://bucket-name.s3-website-region.amazonaws.com. In LocalStack, you access objects directly through the S3 endpoint.
# Fetch the homepage content via HTTP (as a browser would)
curl http://localhost:4566/lecafe-website/index.html

# Fetch the menu page
curl http://localhost:4566/lecafe-website/menu.html
You should see the raw HTML returned in your terminal. In a real environment, these would render as a proper webpage in any browser. The key point is that S3 is serving the HTML directly — there is no web server, no EC2 instance, no Nginx configuration. For content that does not require server-side logic, S3 static hosting is dramatically cheaper and more scalable than running dedicated compute.
♻️ Part 5 — Lifecycle Rules for Automatic Cost Control
Step 10 — Understand Why Lifecycle Rules Exist
Storage costs money. In a busy application, log files, old build artefacts, and temporary uploads can accumulate into gigabytes or terabytes over time if nothing cleans them up. Manually deleting old files is tedious and error-prone. S3 lifecycle rules solve this by letting you declare a policy: “after N days, do X.” The rule runs automatically, forever, with no human involvement.
Lifecycle rules support several transitions. The most common patterns are transitioning objects to cheaper storage classes (like S3 Glacier for archival) after a period of inactivity, and expiring (permanently deleting) objects after a maximum retention window. For Le Café’s logs, we simply want them deleted after 30 days.
Step 11 — Apply a Lifecycle Rule to the Logs Bucket
cat > /tmp/logs-lifecycle.json << 'EOF'
{
  "Rules": [
    {
      "ID": "DeleteOldLogs",
      "Status": "Enabled",
      "Filter": {
        "Prefix": ""
      },
      "Expiration": {
        "Days": 30
      },
      "NoncurrentVersionExpiration": {
        "NoncurrentDays": 7
      }
    }
  ]
}
EOF

awslocal s3api put-bucket-lifecycle-configuration \
  --bucket lecafe-logs \
  --lifecycle-configuration file:///tmp/logs-lifecycle.json
The "Prefix": "" means the rule applies to every object in the bucket. If the logs bucket contained both application logs and audit logs that you needed to keep longer, you would use separate rules with prefixes like "app-logs/" and "audit-logs/" and set different expiration windows for each.
The NoncurrentVersionExpiration section handles the versioned copies — if versioning were ever enabled on this bucket, old versions would be purged after 7 days. Defining this proactively is a hygiene practice: it prevents a future versioning enablement from causing unexpected storage growth.
# Verify the lifecycle rule is attached
awslocal s3api get-bucket-lifecycle-configuration --bucket lecafe-logs
Step 12 — Upload Some Sample Log Files
Let’s simulate logs being written to the bucket so the lifecycle rule has something to manage.
# Simulate three days of log files using prefixed keys
for day in 01 02 03; do
  echo "[2026-03-${day}] INFO: Order received — Latte x2, Croissant x1" \
    > app-log-${day}.txt
  awslocal s3 cp app-log-${day}.txt \
    s3://lecafe-logs/app-logs/2026-03-${day}.log
done

# Confirm the uploads
awslocal s3 ls s3://lecafe-logs/app-logs/
In real AWS, the lifecycle engine runs once per day and automatically deletes any object whose age exceeds the configured threshold. LocalStack does not simulate the passage of time, so you will not see the expiration happen in this lab — but the configuration is identical to what you would deploy in production, and that is the point.
🛡️ Defender’s Perspective
S3 is involved in more data breaches than any other AWS service, and the reason is almost always the same: a bucket that should be private was made public, either accidentally or through a misunderstanding of how bucket policies interact with account-level settings.
The public access block is your safety net. AWS introduced account-level and bucket-level “block public access” settings precisely because so many breaches came from accidentally public buckets. In a real AWS account, you should enable all four block public access settings at the account level as a default, and only override them explicitly for buckets that genuinely need to be public (like lecafe-website). In LocalStack, this can be simulated with s3api put-public-access-block.
Encryption at rest is non-negotiable in production. Every S3 bucket in a real AWS account should have server-side encryption enabled, either with AWS-managed keys (SSE-S3) or customer-managed keys in KMS (SSE-KMS). The KMS option gives you audit logs of every decryption event, which is invaluable during a security investigation. LocalStack supports put-bucket-encryption if you want to practise configuring it.
Access logging creates an audit trail. S3 can write a log entry for every API call made against a bucket — who requested what object, from which IP, at what time. Storing these logs in a separate, locked-down S3 bucket gives you forensic evidence after a breach. You should never store a bucket’s own access logs in the same bucket, because a compromised account could then delete both the data and the evidence simultaneously.
Presigned URLs are powerful but dangerous. S3 allows you to generate a time-limited URL that grants temporary access to a private object without any AWS credentials. This is a legitimate and useful feature — for example, letting a customer download their invoice without making the bucket public. But presigned URLs generated with long expiry windows, or shared carelessly, are effectively public links. Always set the shortest reasonable expiry and treat presigned URLs like passwords.
🧩 Challenge Tasks
Challenge 1 — Transition Rule. Add a second lifecycle rule to lecafe-logs that transitions objects in the audit-logs/ prefix to GLACIER storage class after 90 days, and then expires them permanently after 365 days. A single rule can contain both a Transitions array and an Expiration block — use awslocal s3api put-bucket-lifecycle-configuration and combine both rules into one configuration document.
Challenge 2 — Presigned URL. Generate a presigned URL for s3://lecafe-assets/app/config.txt that expires in 5 minutes using awslocal s3 presign. Examine the URL structure and identify the query parameters that encode the expiry (X-Amz-Expires) and the signature (X-Amz-Signature). Then fetch the object using curl with that URL.
Challenge 3 — Cross-Bucket Replication Simulation. Real S3 replication requires two buckets in different regions and a replication role. Simulate the concept manually: write a small Bash script that reads every object key from lecafe-assets using awslocal s3api list-objects-v2, then copies each one to a new bucket called lecafe-assets-backup using awslocal s3 cp. Think about how you would handle versioned objects in a real replication scenario.
🤔 Reflection Questions
-
Versioning protects you from accidental overwrites, but it also means your storage costs grow over time because old versions are retained indefinitely unless you configure expiration. How would you design a lifecycle rule that balances recovery capability (keeping versions for a reasonable window) against cost control? What retention window would you choose for a production application, and why?
-
The website bucket policy grants
"Principal": "*"withs3:GetObject. In a real AWS account, why would you also want to place a CloudFront distribution in front of the S3 bucket rather than exposing the S3 URL directly to users, even if the bucket is meant to be public? -
S3 keys are flat strings, not real file paths. Given this, what problem might arise if two different services both write objects to the same bucket using a common prefix like
logs/, and how would you design your key naming convention to avoid conflicts and make lifecycle rules more precise?
🧹 Cleanup
# Empty all three buckets before deleting them
# (S3 refuses to delete non-empty buckets)

# For versioned buckets, you must delete all versions and markers first
awslocal s3api list-object-versions --bucket lecafe-assets \
  --query 'Versions[].{Key:Key,VersionId:VersionId}' \
  --output text | while read key version; do
    awslocal s3api delete-object \
      --bucket lecafe-assets \
      --key "$key" \
      --version-id "$version"
  done

# Also remove any delete markers
awslocal s3api list-object-versions --bucket lecafe-assets \
  --query 'DeleteMarkers[].{Key:Key,VersionId:VersionId}' \
  --output text | while read key version; do
    awslocal s3api delete-object \
      --bucket lecafe-assets \
      --key "$key" \
      --version-id "$version"
  done

# Empty and remove the other two buckets normally
awslocal s3 rm s3://lecafe-website --recursive
awslocal s3 rm s3://lecafe-logs    --recursive

# Remove all three buckets
awslocal s3 rb s3://lecafe-assets
awslocal s3 rb s3://lecafe-website
awslocal s3 rb s3://lecafe-logs

localstack stop
Why the extra steps for versioned buckets? A regular
s3 rb --forceempties a non-versioned bucket before removing it, but it does not know how to remove versioned objects and delete markers. You must handle those explicitly. This is another reminder that versioning, while protective, adds operational complexity — a worthwhile trade-off, but one to account for in your runbooks.
📋 Quick Reference
| Task | Command |
|---|---|
| Create bucket | awslocal s3 mb s3://name |
| Enable versioning | awslocal s3api put-bucket-versioning --bucket B --versioning-configuration Status=Enabled |
| List object versions | awslocal s3api list-object-versions --bucket B |
| Get specific version | awslocal s3api get-object --bucket B --key K --version-id V file.txt |
| Apply bucket policy | awslocal s3api put-bucket-policy --bucket B --policy file://path.json |
| Enable static hosting | awslocal s3api put-bucket-website --bucket B --website-configuration '{...}' |
| Apply lifecycle rule | awslocal s3api put-bucket-lifecycle-configuration --bucket B --lifecycle-configuration file://path.json |
| Generate presigned URL | awslocal s3 presign s3://bucket/key --expires-in SECONDS |
| Delete with version ID | awslocal s3api delete-object --bucket B --key K --version-id V |