Cross-Platform Mobile App Development Tutorial (React Native and Flutter Side by Side) - Part 3
In Part 2 anybody could read and change every note. In this last part we add user accounts, make each user see only their own notes (and enforce it on the server, not only in the app), improve the empty state, and finally build and publish the app.
Versions used in this part: Expo SDK 57 / Expo Router 57 /
react-native-appwrite1.x, Flutter 3.47 /appwrite27.x /provider6.x /go_router18.x, EAS CLI (latest).
Visual guide. Use this map to locate the current part before starting the examples.
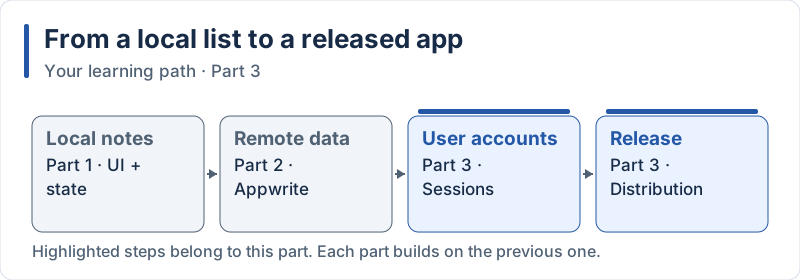
The highlighted steps are developed in this part.
Table of Contents
- Authentication for Notes App
- Filtering User Notes
- Empty State
- Building and Publishing
- Summary and Comparison
7. Authentication for Notes App
Expected result. The Android captures below use real Appwrite email/password sessions. Alice and Bob are demonstration accounts, each with one private note.
7.1 Enable Email/Password Authentication
Expected result. With email/password authentication enabled, the login form in section 7.4 can create a session. The captures include a rejected password and a successful login; they are not screenshots of the Appwrite Console.
Concepts in this section:
- Authentication answers “who are you?” (account + password → session). Authorization answers “what may you do?” (permissions). We need both.
- A session is created by the server after a successful login and stored by the SDK; every following request carries it.
- A user id (
$id) uniquely identifies the account: it is what permissions refer to.
Visual guide. Keep two questions separate: authentication identifies the current user; the permissions diagram in section 8 explains what that user may access.
In the Appwrite console, open Auth → Settings and check that Email/Password is enabled (it is by default). Then Auth → Users will list the accounts created from your app.
7.2 Authentication Service
Expected result. This service has no separate interface. Verify the successful sign-in, registration form and sign-out shown below. Registration was also exercised with new demonstration accounts before capturing the empty list in section 9.
Concepts in this section:
- The same four operations in both frameworks: get the current user, sign up, sign in, sign out
- Creating an account does not open a session: you must sign in afterwards
createEmailPasswordSessionis the current method name (the oldcreateEmailSessionwas removed)
Visual guide. Follow the new-user path: creating an account is followed by signing in and reading the current user.
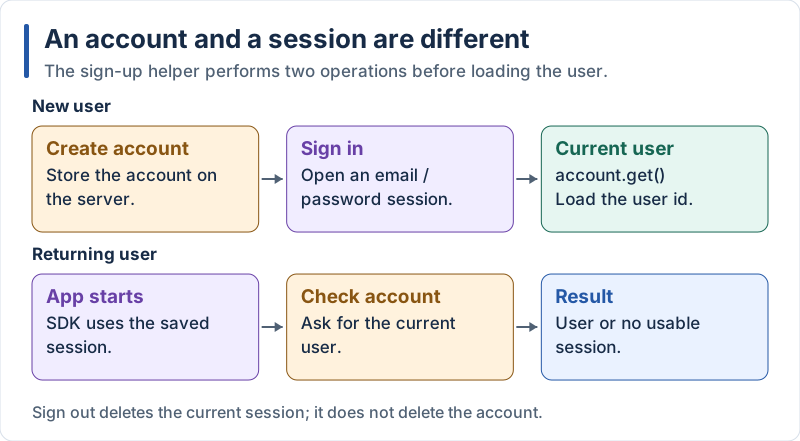
The SDK manages the session; deleting that session signs out the current device.
React Native
// src/services/auth.ts
import { ID, type Models } from 'react-native-appwrite';

import { account } from '../lib/appwrite';

export type User = Models.User<Models.DefaultPreferences>;

/** Returns the logged-in user, or null when there is no valid session. */
export async function getCurrentUser(): Promise<User | null> {
  try {
    return await account.get();
  } catch {
    return null;
  }
}

export async function signIn(email: string, password: string): Promise<User> {
  await account.createEmailPasswordSession({ email, password });
  return account.get();
}

export async function signUp(name: string, email: string, password: string): Promise<User> {
  await account.create({ userId: ID.unique(), email, password, name });
  // Creating an account does not open a session: sign in right after
  return signIn(email, password);
}

export async function signOut(): Promise<void> {
  await account.deleteSession({ sessionId: 'current' });
}
Explanation:
account.get()fails when nobody is logged in: we turn that failure intonull, which is easier to usedeleteSession({ sessionId: 'current' })ends the session of this device- Passwords are never stored by the app: only the session managed by the SDK
Flutter
flutter pub add provider// lib/services/auth_service.dart
import 'package:appwrite/appwrite.dart';
import 'package:appwrite/models.dart' as models;
import 'appwrite_client.dart';
class AuthService {
/// Returns the logged-in user, or null when there is no valid session.
Future<models.User?> currentUser() async {
try {
return await account.get();
} on AppwriteException {
return null;
}
}
Future<models.User> signIn(String email, String password) async {
await account.createEmailPasswordSession(email: email, password: password);
return account.get();
}
Future<models.User> signUp(String name, String email, String password) async {
await account.create(
userId: ID.unique(),
email: email,
password: password,
name: name,
);
// Creating an account does not open a session: sign in right after
return signIn(email, password);
}
Future<void> signOut() async {
await account.deleteSession(sessionId: 'current');
}
}Explanation:
- Same four operations as in React Native, with named parameters
on AppwriteExceptioncatches the “not logged in” error only- We reuse the
accountobject created inappwrite_client.dart(section 6.4)
7.3 Global Authentication State
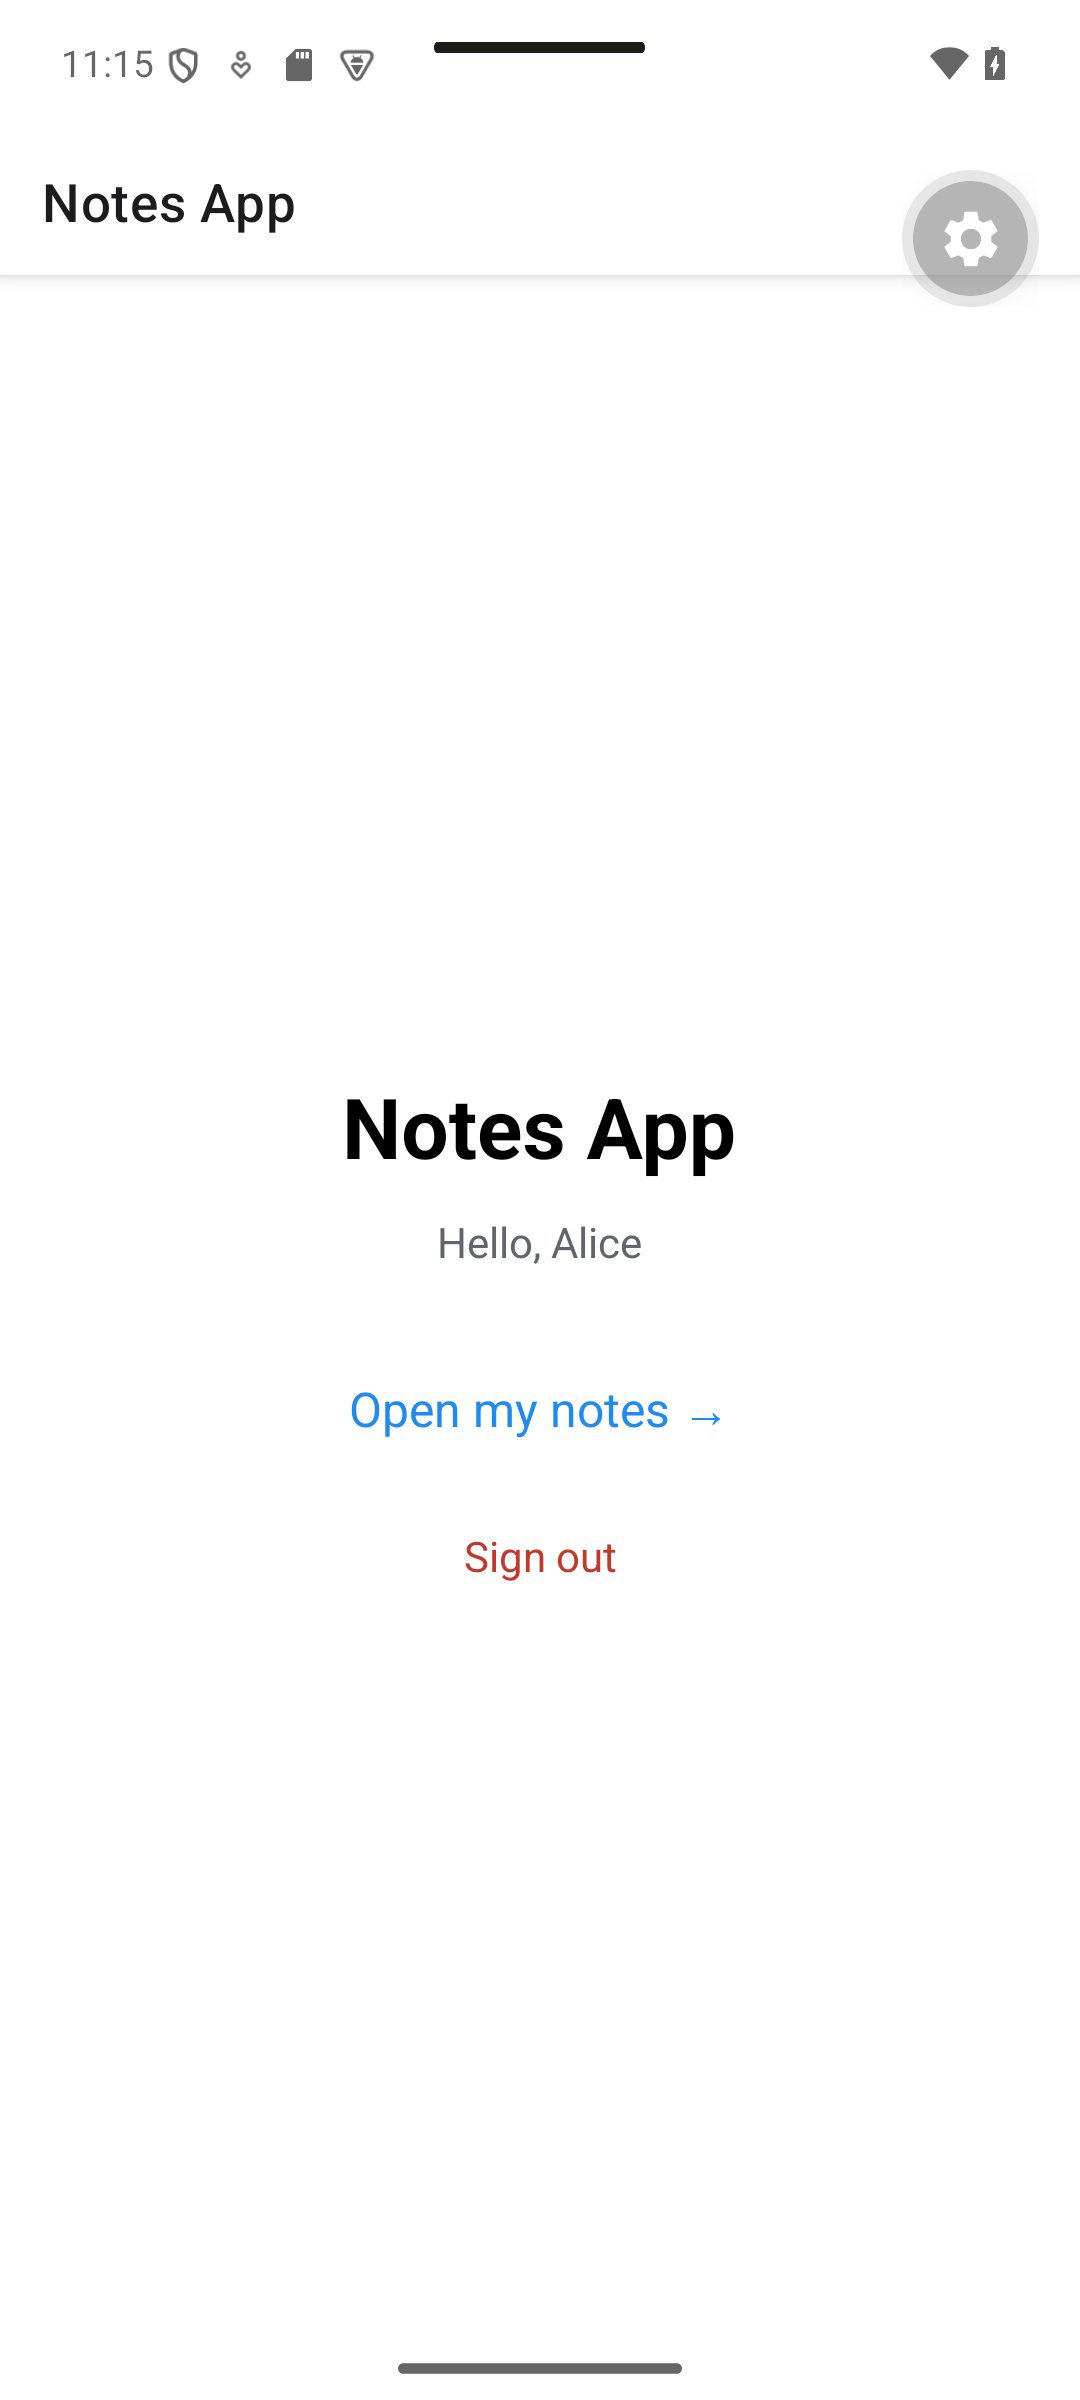
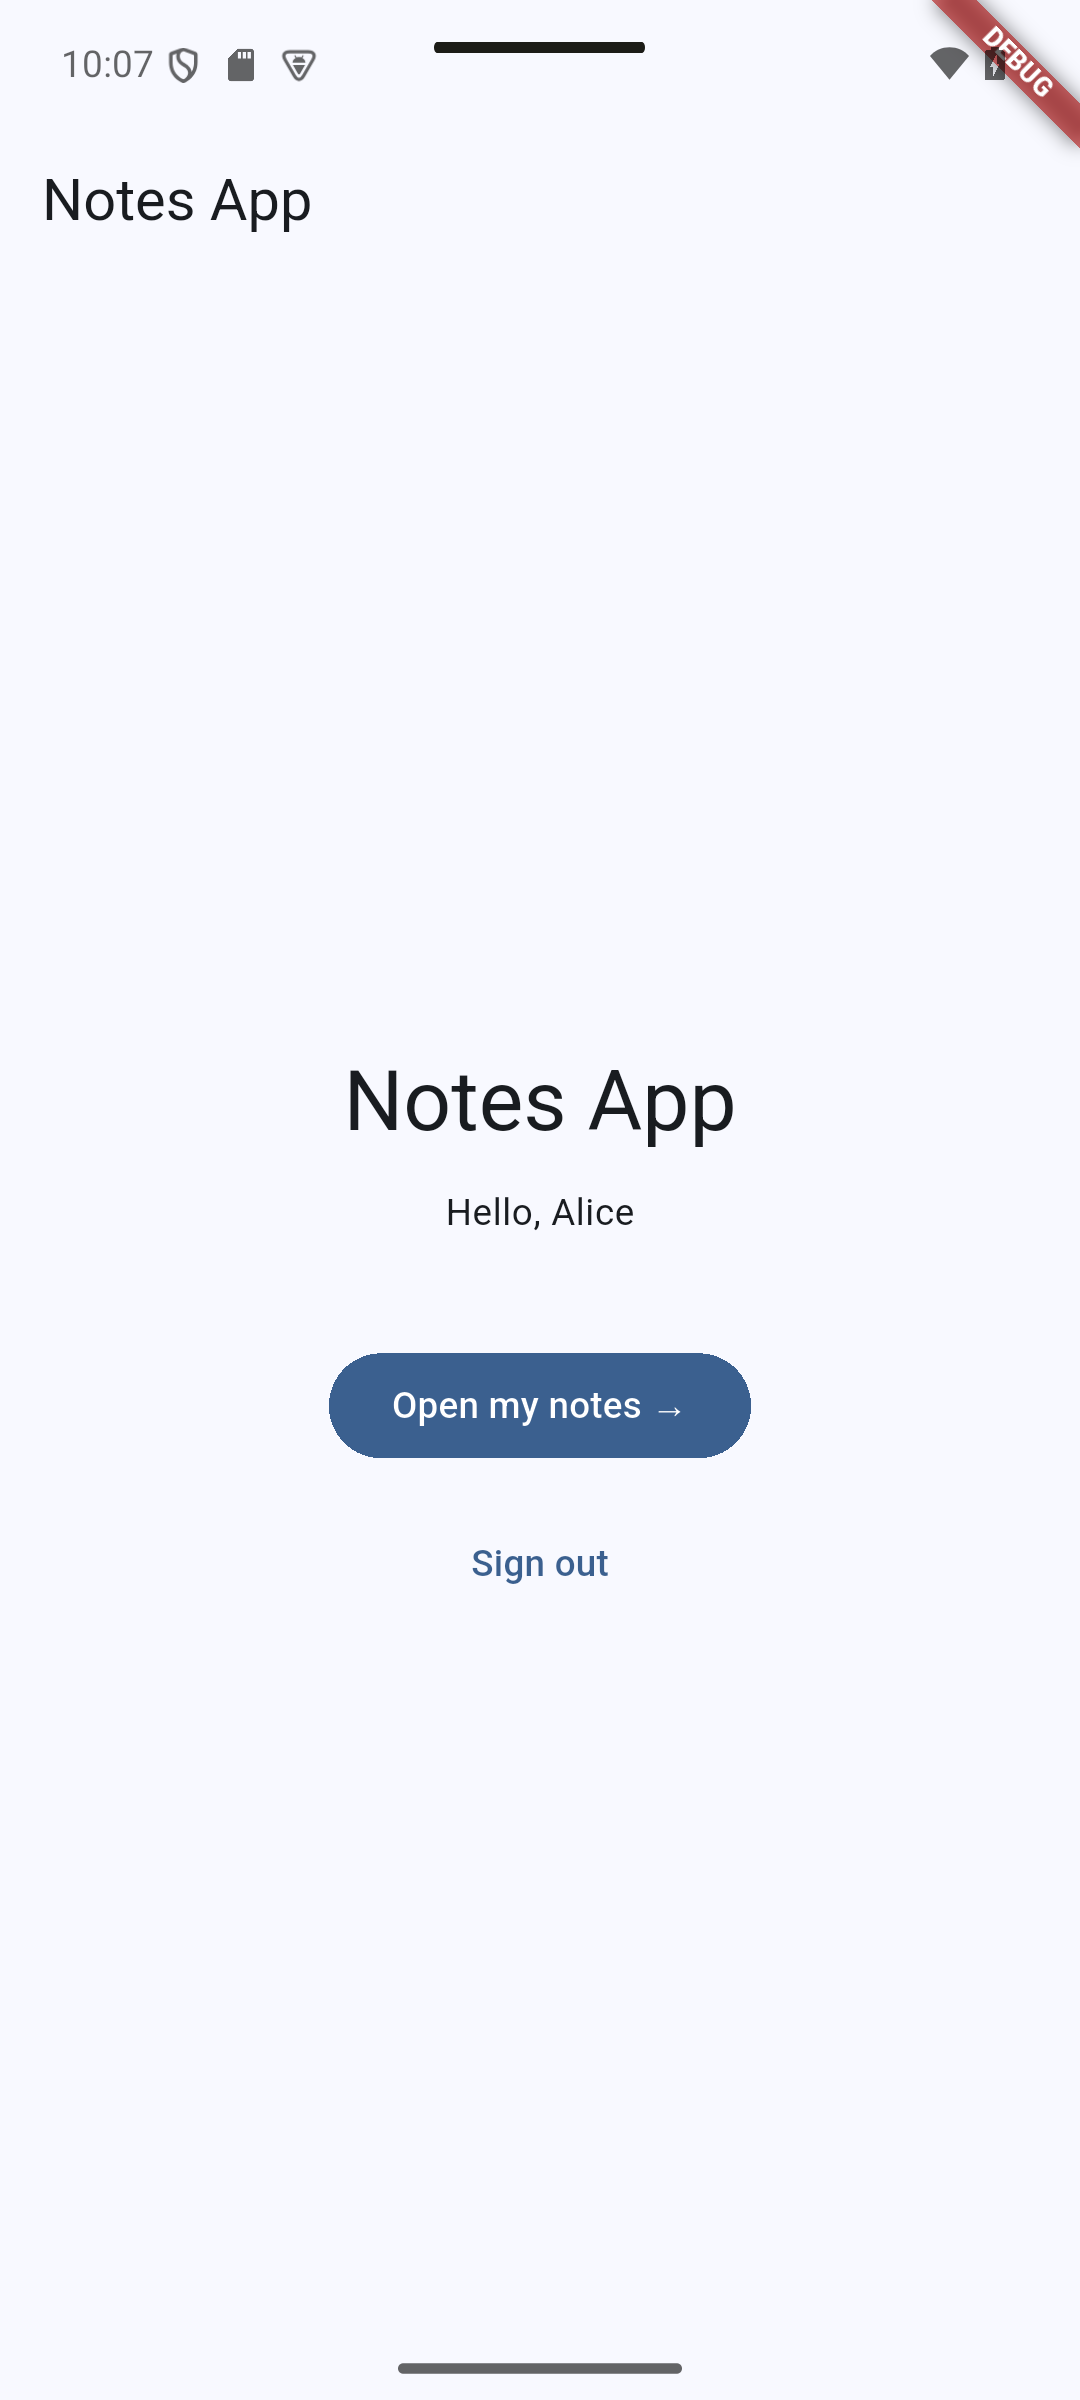
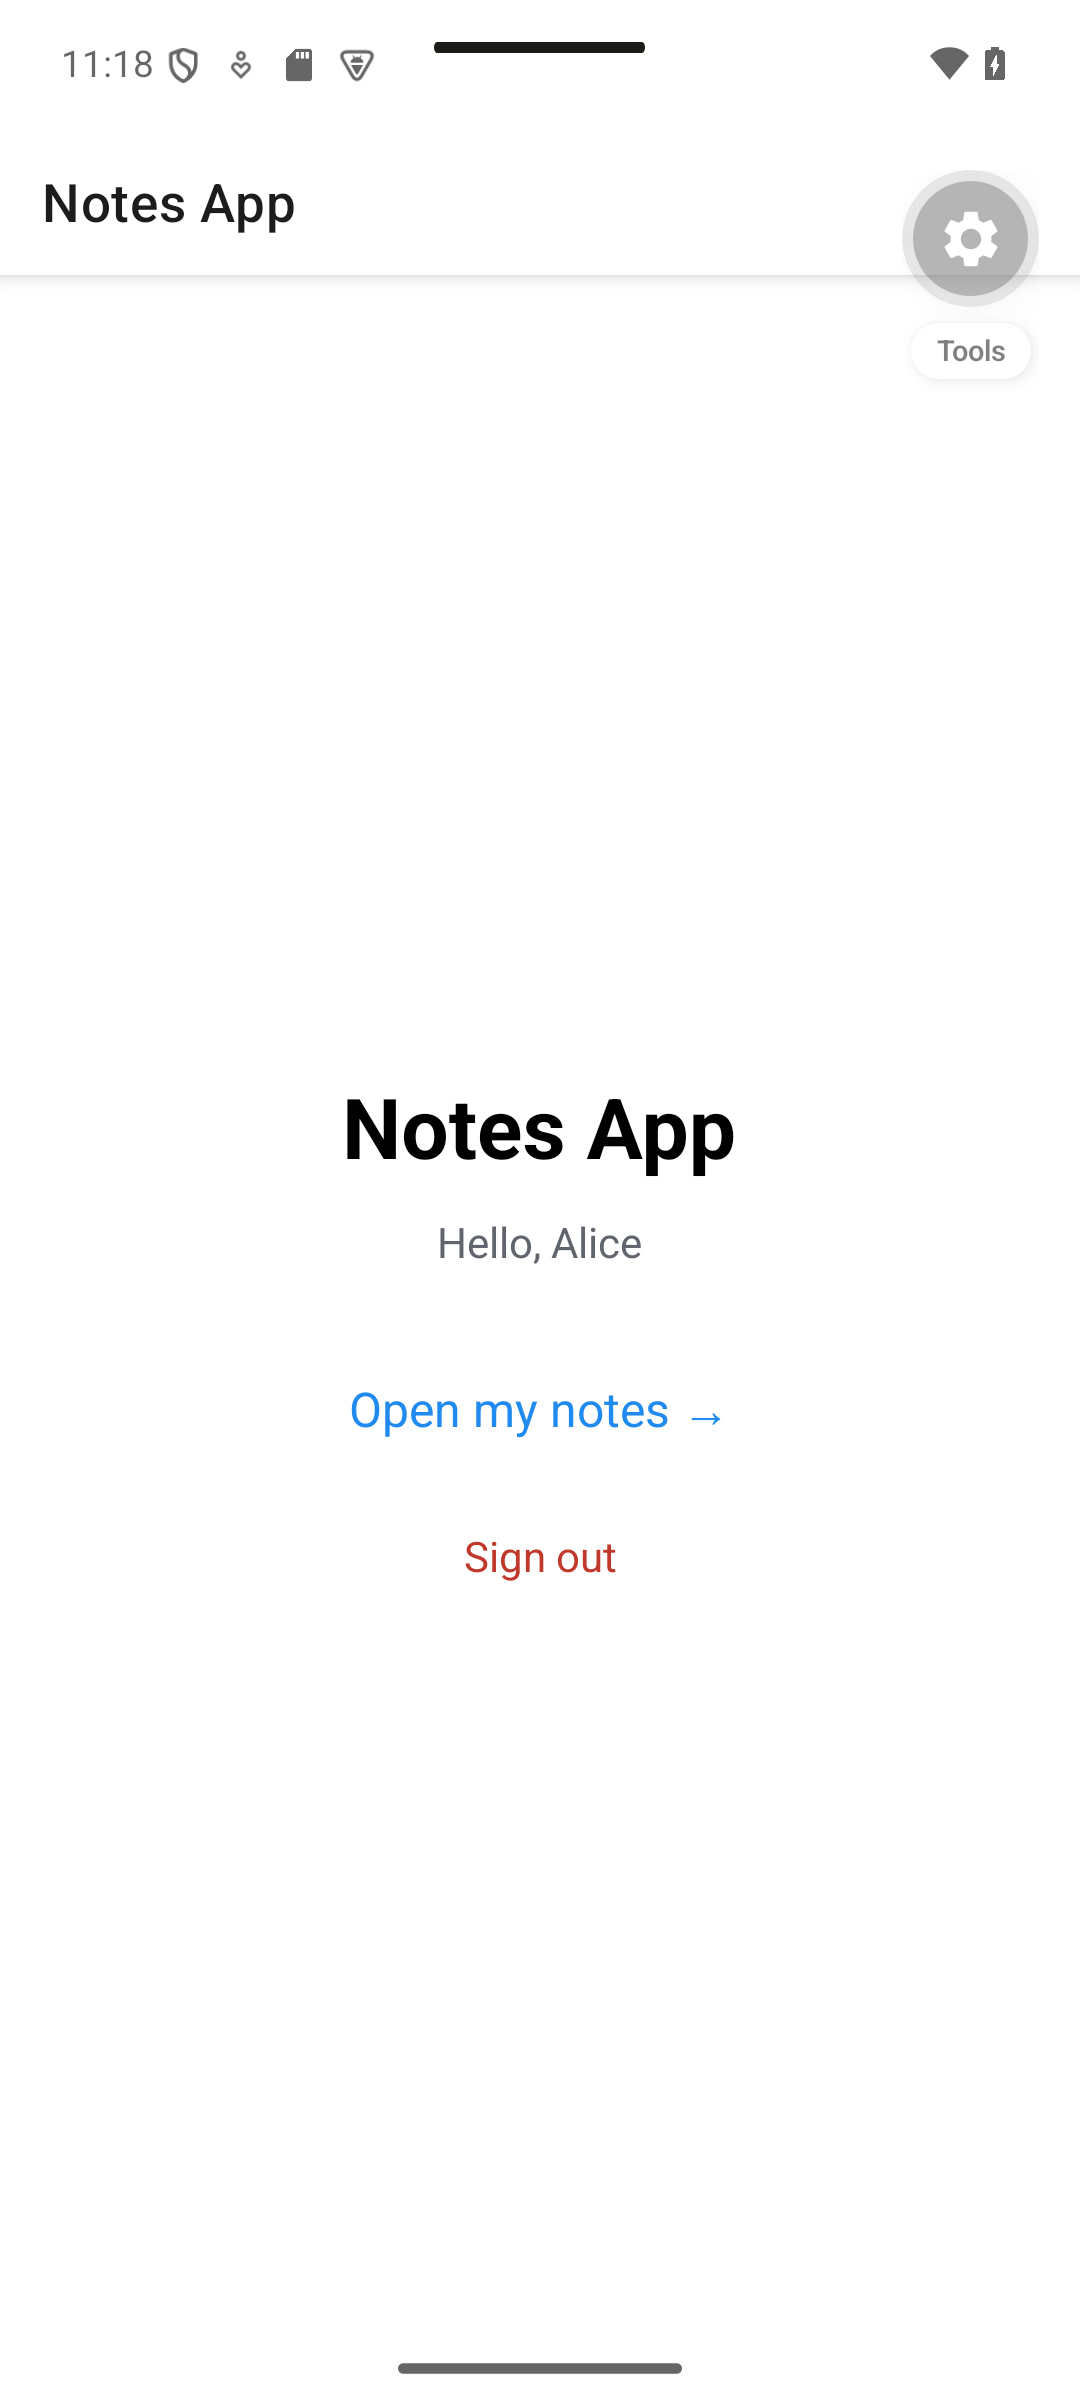
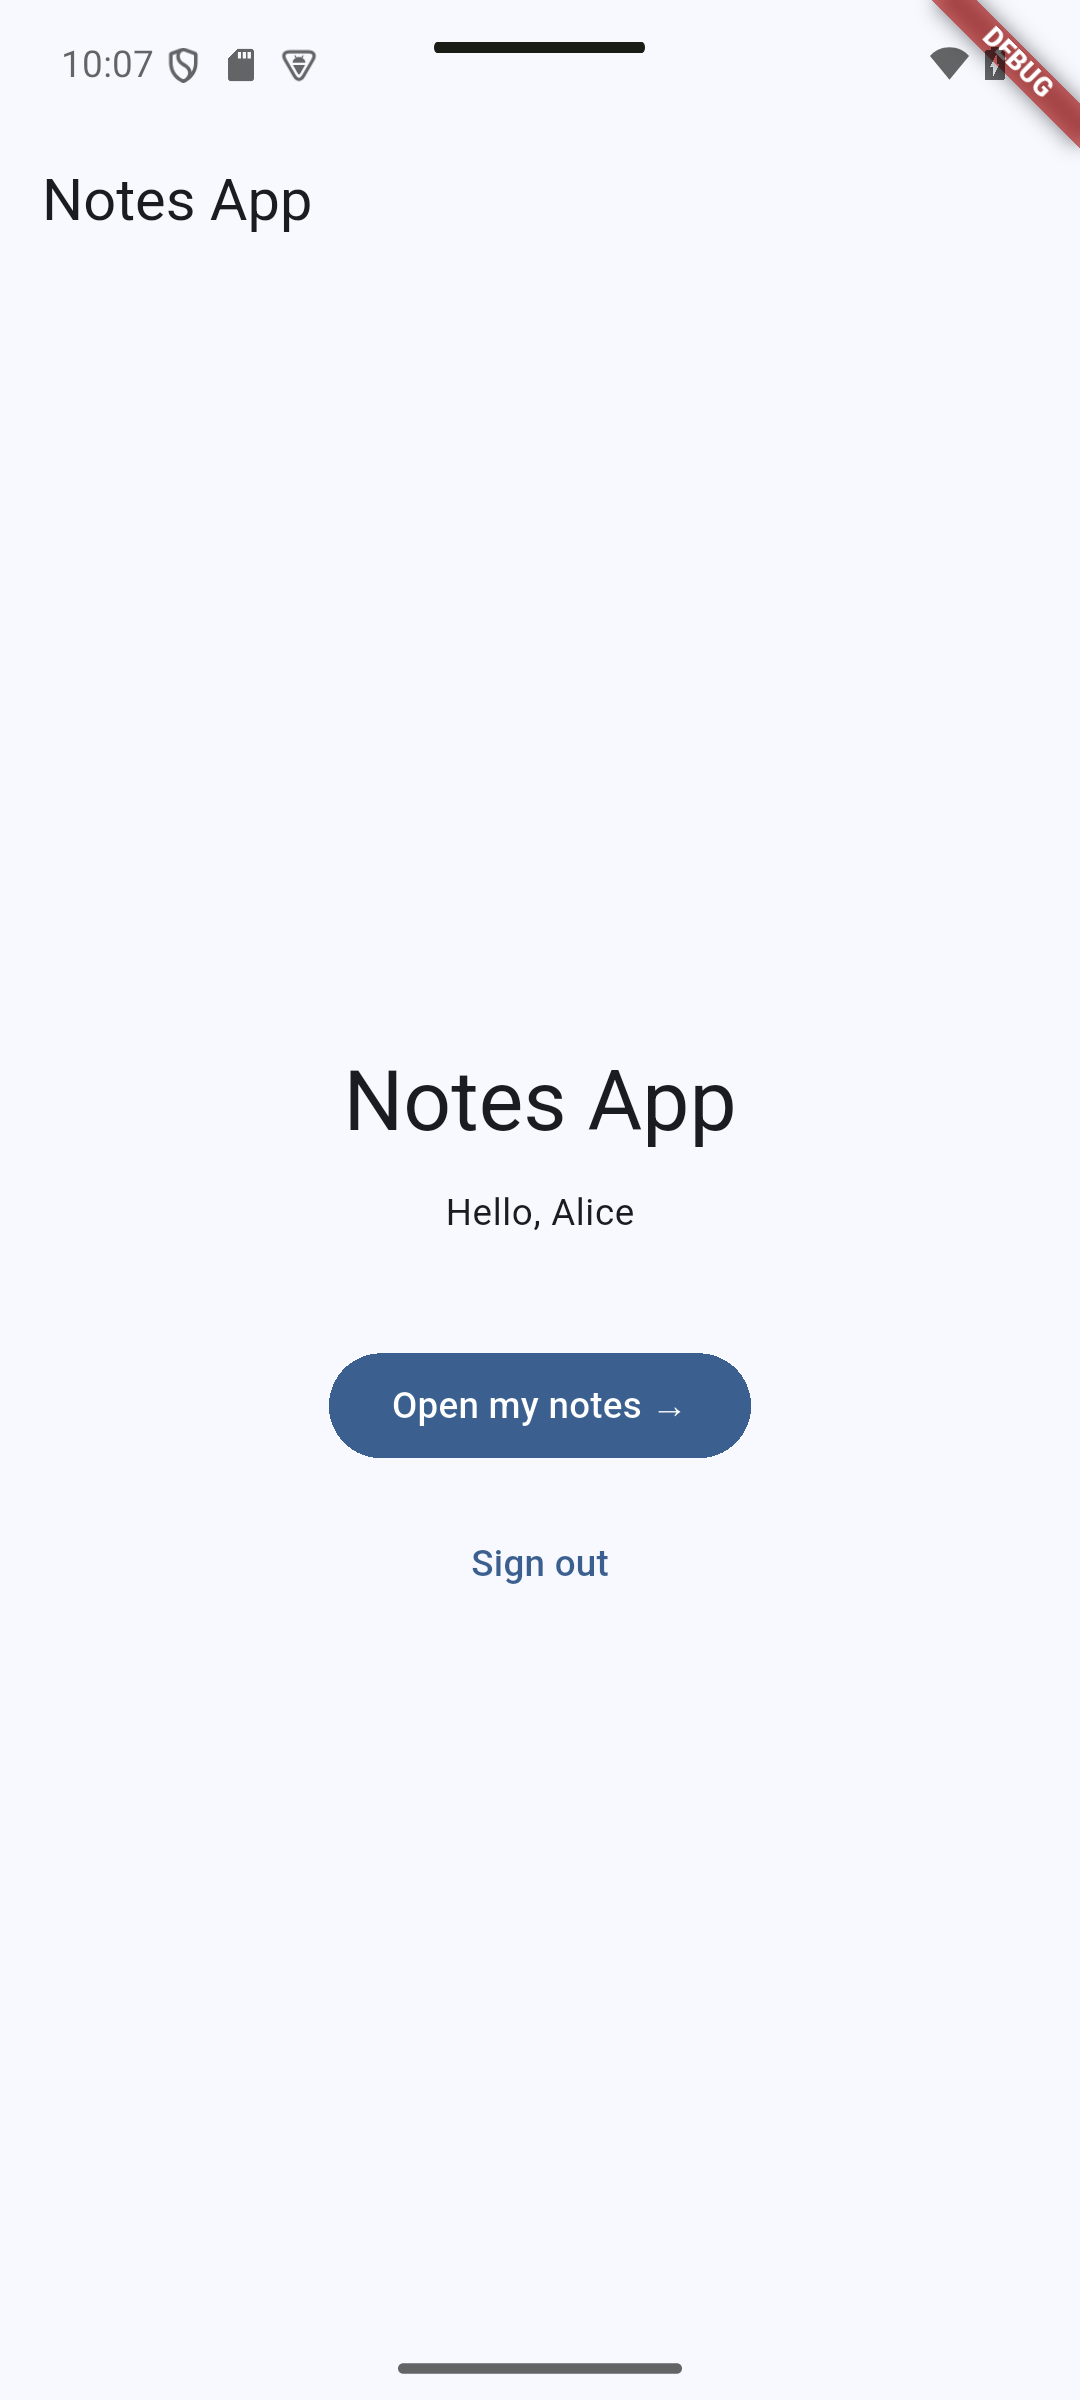
Expected result. After sign-in, the Home screen greets Alice and offers Sign out.
| React Native · Android | Flutter · Android |
|---|---|
|
|
Force-stopping and reopening each app restored the session: React Native, Flutter. The startup spinner is transient; use the state diagram below to understand that phase.
Concepts in this section:
- Many screens need to know who is logged in: this is global state, shared by the whole app
- React: Context + a custom hook. Flutter: a
ChangeNotifierexposed with theproviderpackage. - The state has three phases: initializing (do we have a session?), logged out, logged in
Visual guide. Start in Initializing; do not choose Login or Home until the account check finishes.
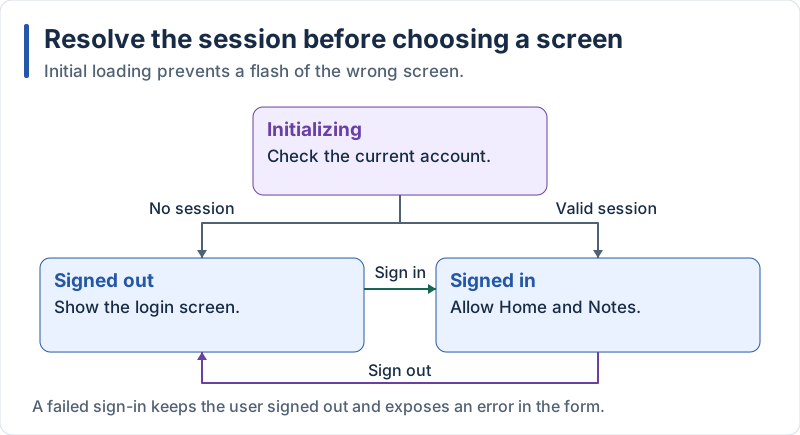
The session has three phases even though only two represent a known login status.
React Native
// src/context/AuthContext.tsx
import { createContext, useContext, useEffect, useMemo, useState, type ReactNode } from 'react';

import * as auth from '../services/auth';

type AuthState = {
  user: auth.User | null;
  initializing: boolean; // true until we know whether a session exists
  signIn: (email: string, password: string) => Promise<void>;
  signUp: (name: string, email: string, password: string) => Promise<void>;
  signOut: () => Promise<void>;
};

const AuthContext = createContext<AuthState | null>(null);

export function AuthProvider({ children }: { children: ReactNode }) {
  const [user, setUser] = useState<auth.User | null>(null);
  const [initializing, setInitializing] = useState(true);

  // Restore the session once, when the app starts
  useEffect(() => {
    auth
      .getCurrentUser()
      .then(setUser)
      .finally(() => setInitializing(false));
  }, []);

  const value = useMemo<AuthState>(
    () => ({
      user,
      initializing,
      signIn: async (email, password) => setUser(await auth.signIn(email, password)),
      signUp: async (name, email, password) => setUser(await auth.signUp(name, email, password)),
      signOut: async () => {
        await auth.signOut();
        setUser(null);
      },
    }),
    [user, initializing],
  );

  return <AuthContext.Provider value={value}>{children}</AuthContext.Provider>;
}

export function useAuth(): AuthState {
  const context = useContext(AuthContext);
  if (!context) throw new Error('useAuth must be used inside <AuthProvider>');
  return context;
}
Explanation:
createContext+Providermakesvalueavailable to every component below it;useAuth()reads ituseMemoavoids creating a newvalueobject (and re-rendering all consumers) on every rendersignInandsignUpthrow on failure: the login screen catches the error and shows ituseAuththrows a clear error if it is used outside the provider
Flutter
// lib/providers/auth_provider.dart
import 'package:appwrite/appwrite.dart';
import 'package:appwrite/models.dart' as models;
import 'package:flutter/foundation.dart';

import '../services/auth_service.dart';

class AuthProvider extends ChangeNotifier {
  AuthProvider(this._service);

  final AuthService _service;

  models.User? user;
  bool initializing = true; // true until we know if a session exists
  bool busy = false; // true while a sign-in/sign-up request is running
  String? error;

  /// Called once at startup: restores the session stored by the SDK.
  Future<void> init() async {
    user = await _service.currentUser();
    initializing = false;
    notifyListeners();
  }

  Future<bool> signIn(String email, String password) =>
      _run(() async => user = await _service.signIn(email, password));

  Future<bool> signUp(String name, String email, String password) =>
      _run(() async => user = await _service.signUp(name, email, password));

  Future<void> signOut() async {
    await _service.signOut();
    user = null;
    notifyListeners();
  }

  Future<bool> _run(Future<void> Function() action) async {
    busy = true;
    error = null;
    notifyListeners();
    try {
      await action();
      return true;
    } on AppwriteException catch (e) {
      error = e.message ?? 'Something went wrong';
      return false;
    } finally {
      busy = false;
      notifyListeners();
    }
  }
}
Explanation:
ChangeNotifieris Flutter’s built-in observable: callingnotifyListeners()rebuilds every widget that listens to it- The provider keeps
busyanderroritself, so the login form only displays them _runfactors out the “busy → try → error → not busy” pattern shared by sign-in and sign-up- Unlike the React Native context, the state and the error handling live in one class
7.4 Login and Registration Screen
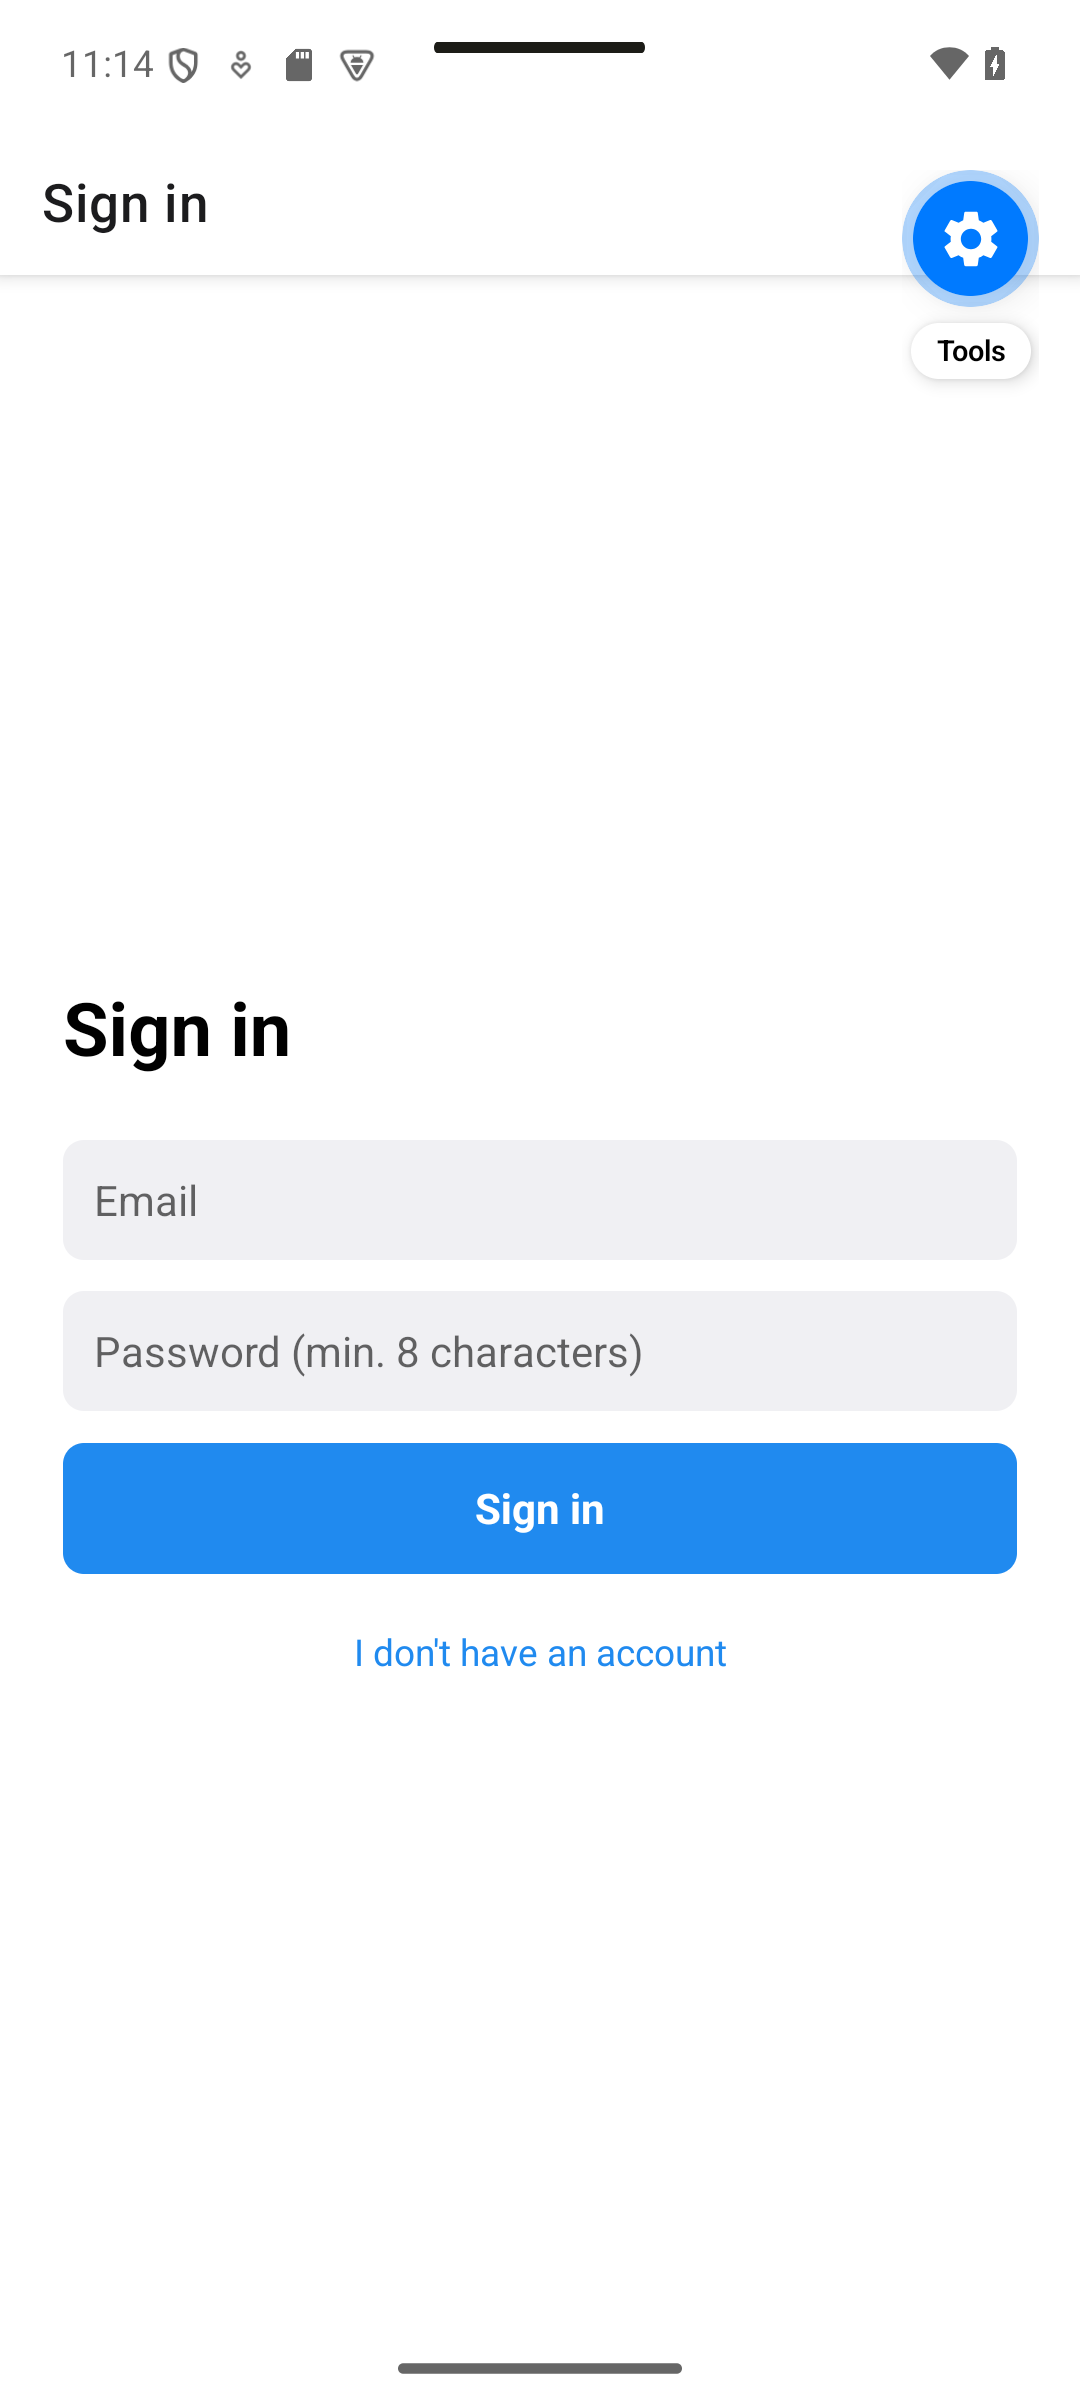
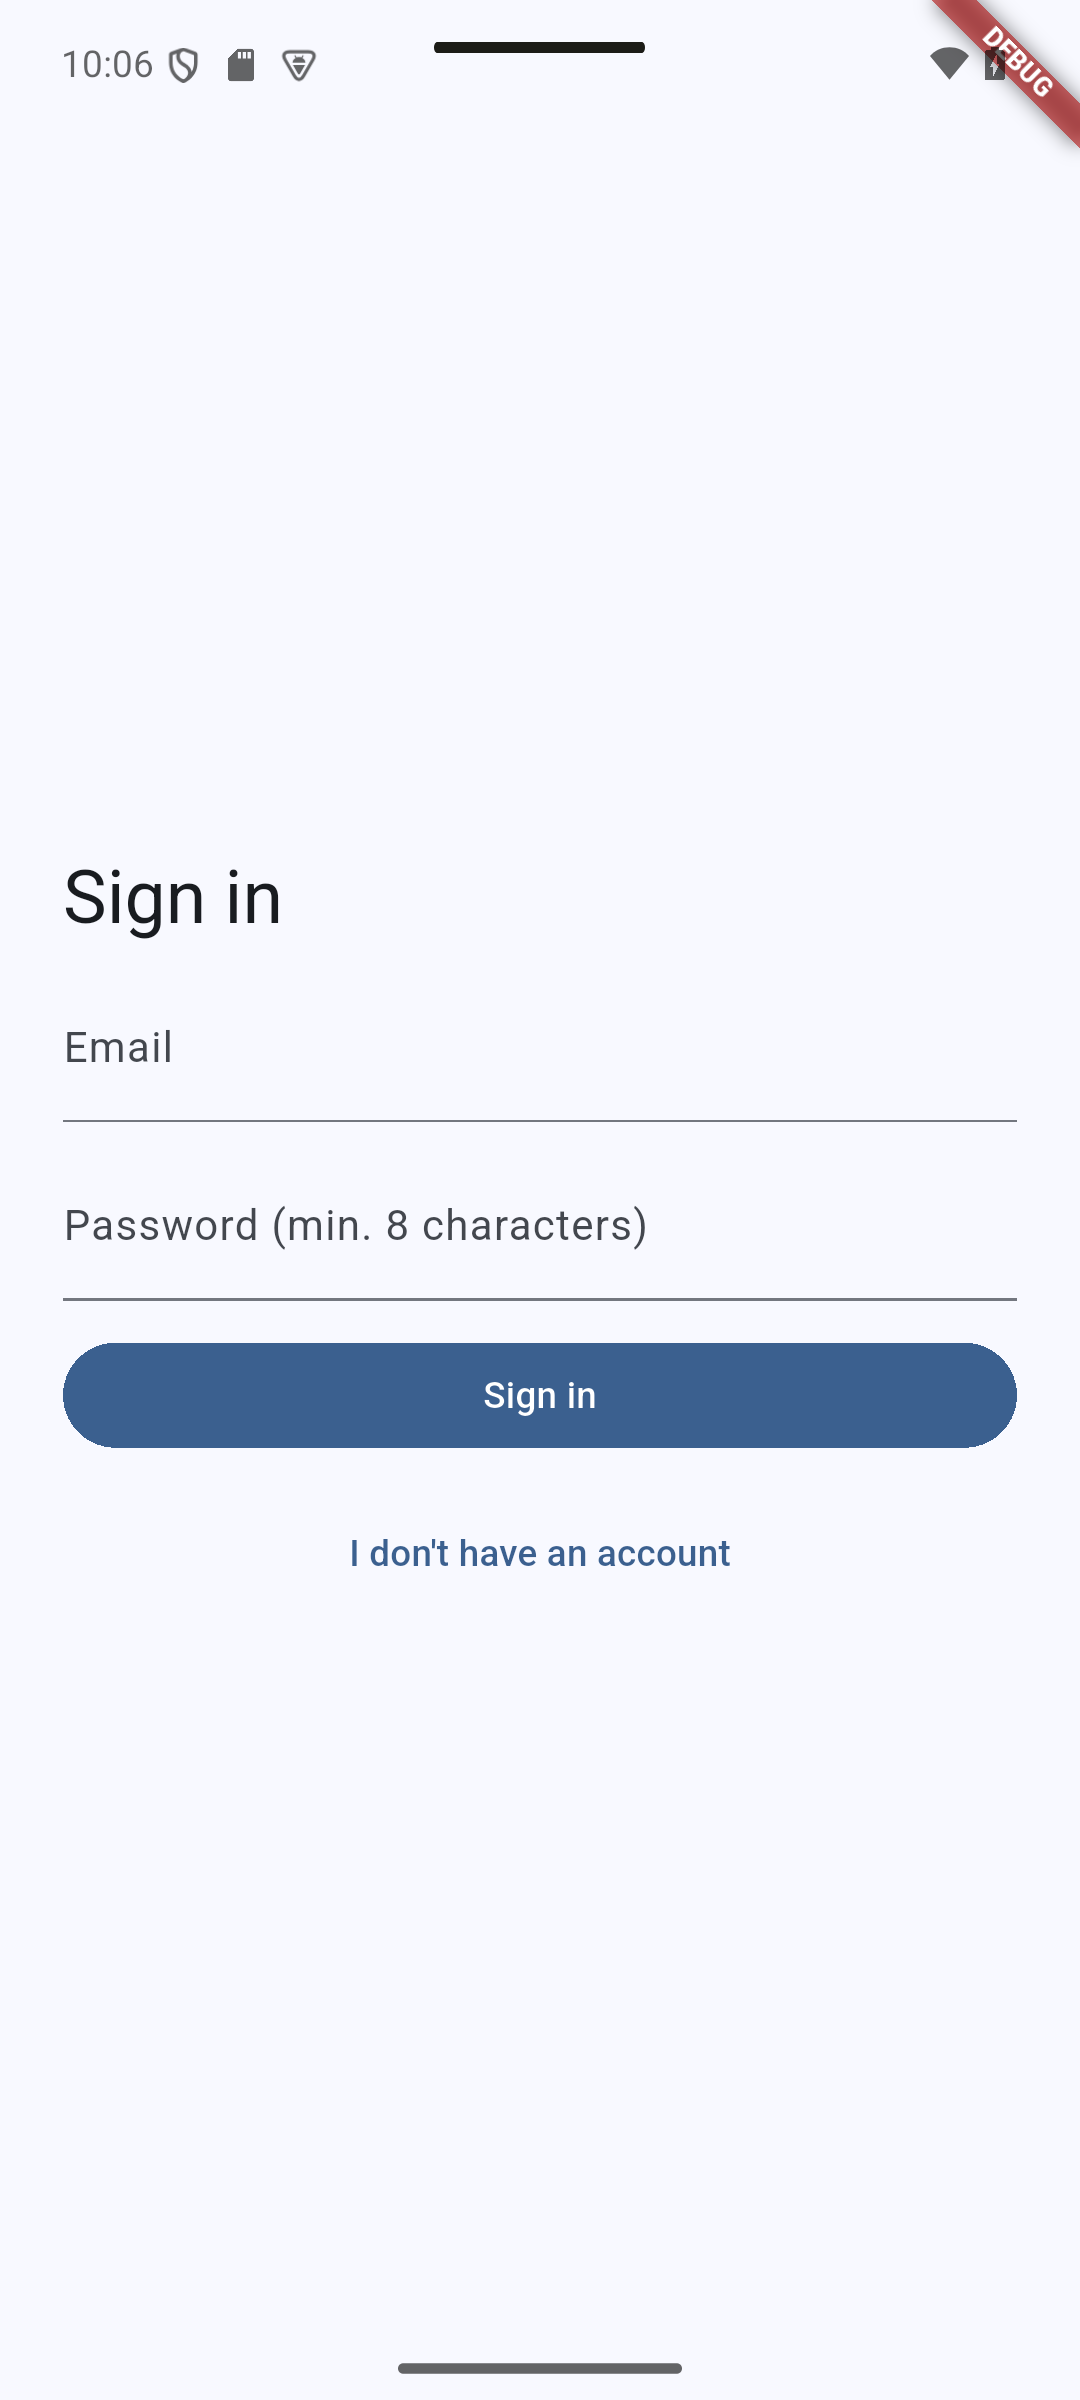
Expected result. Signed-out users see the email/password form.
| React Native · Android | Flutter · Android |
|---|---|
|
|
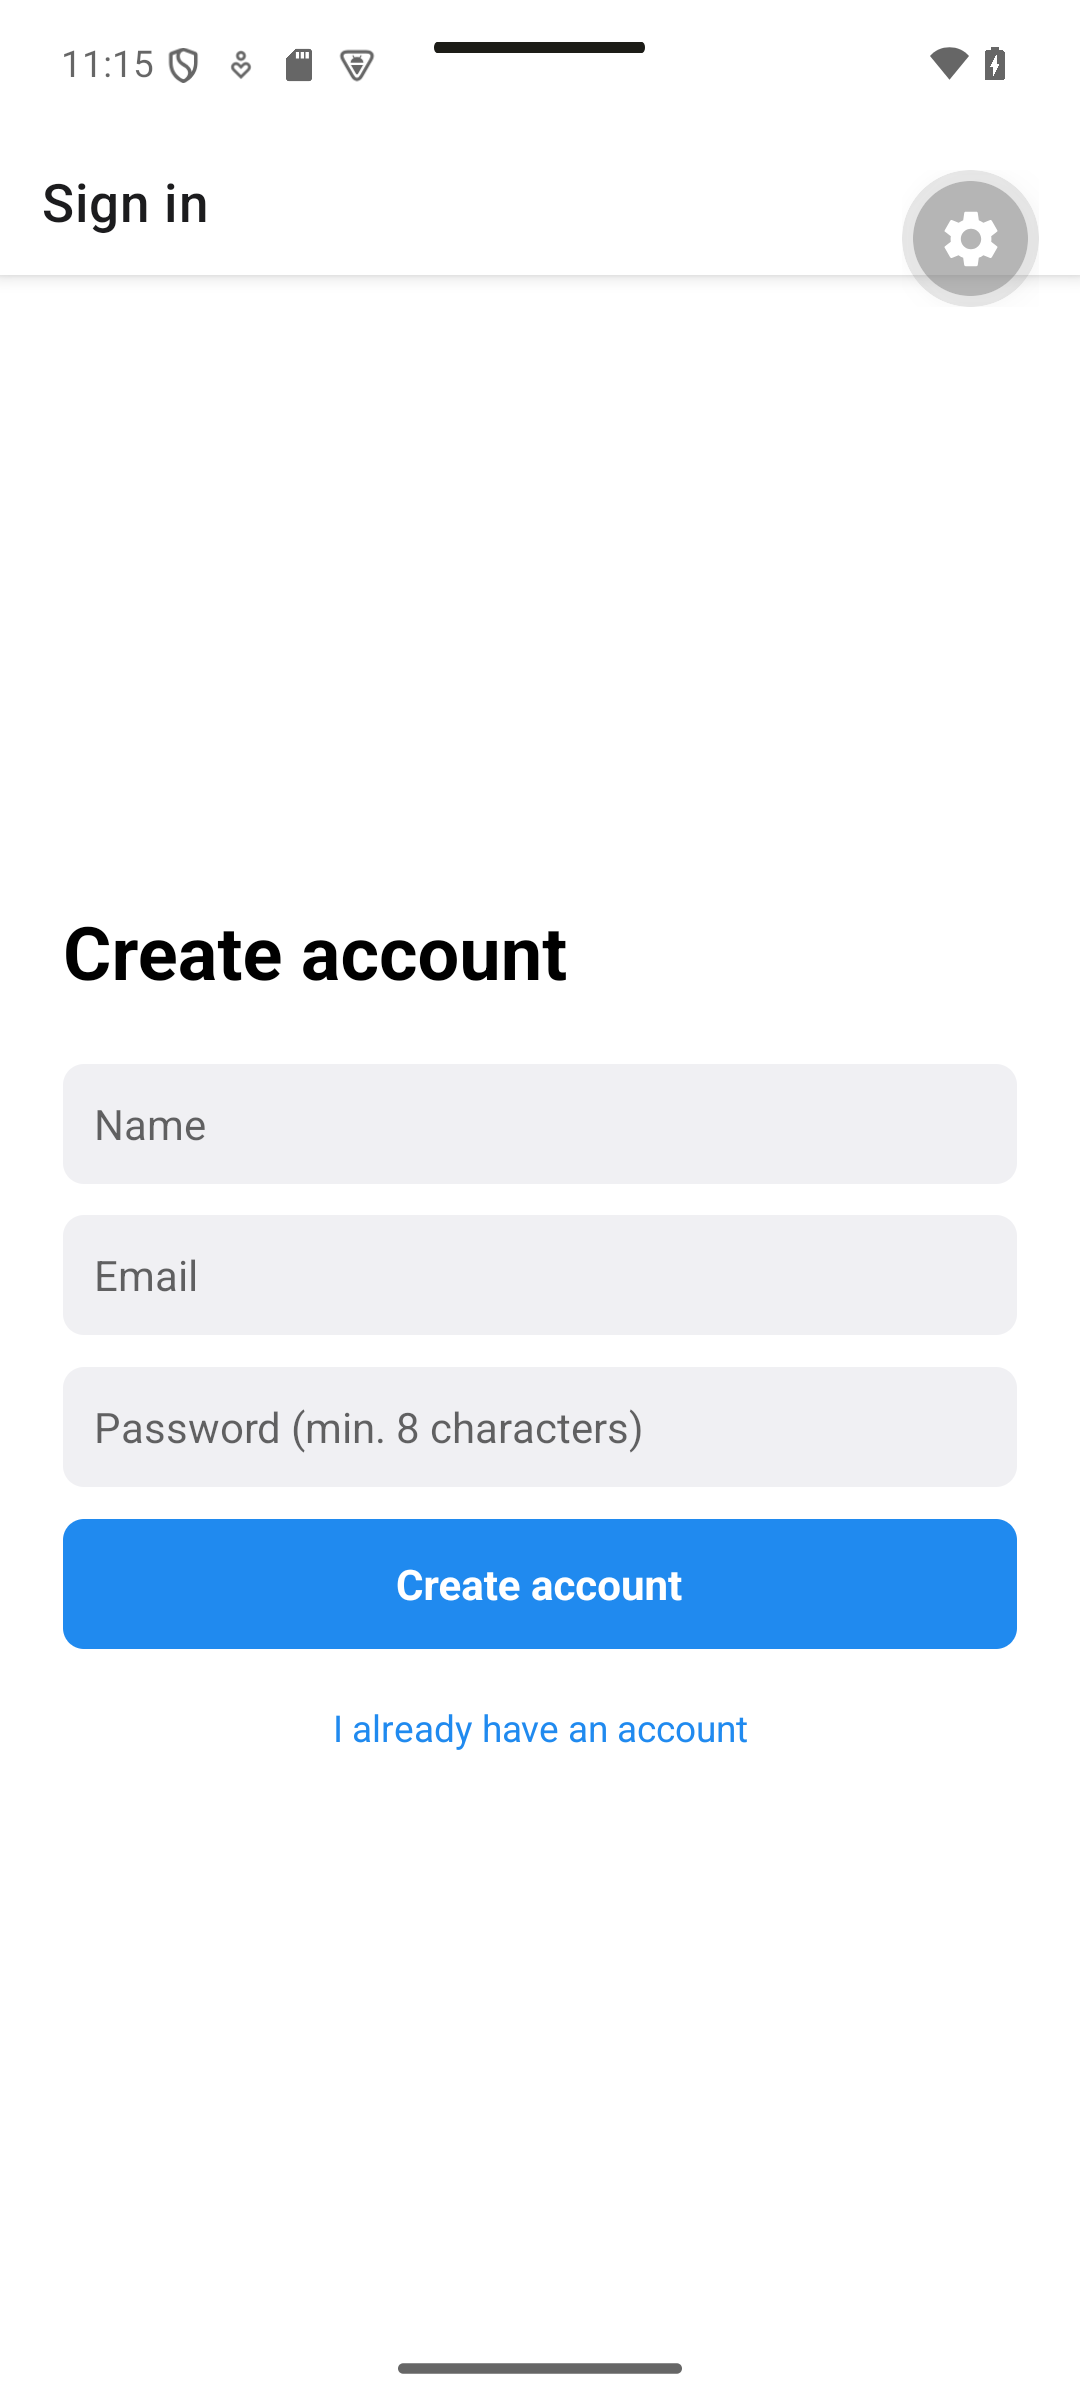
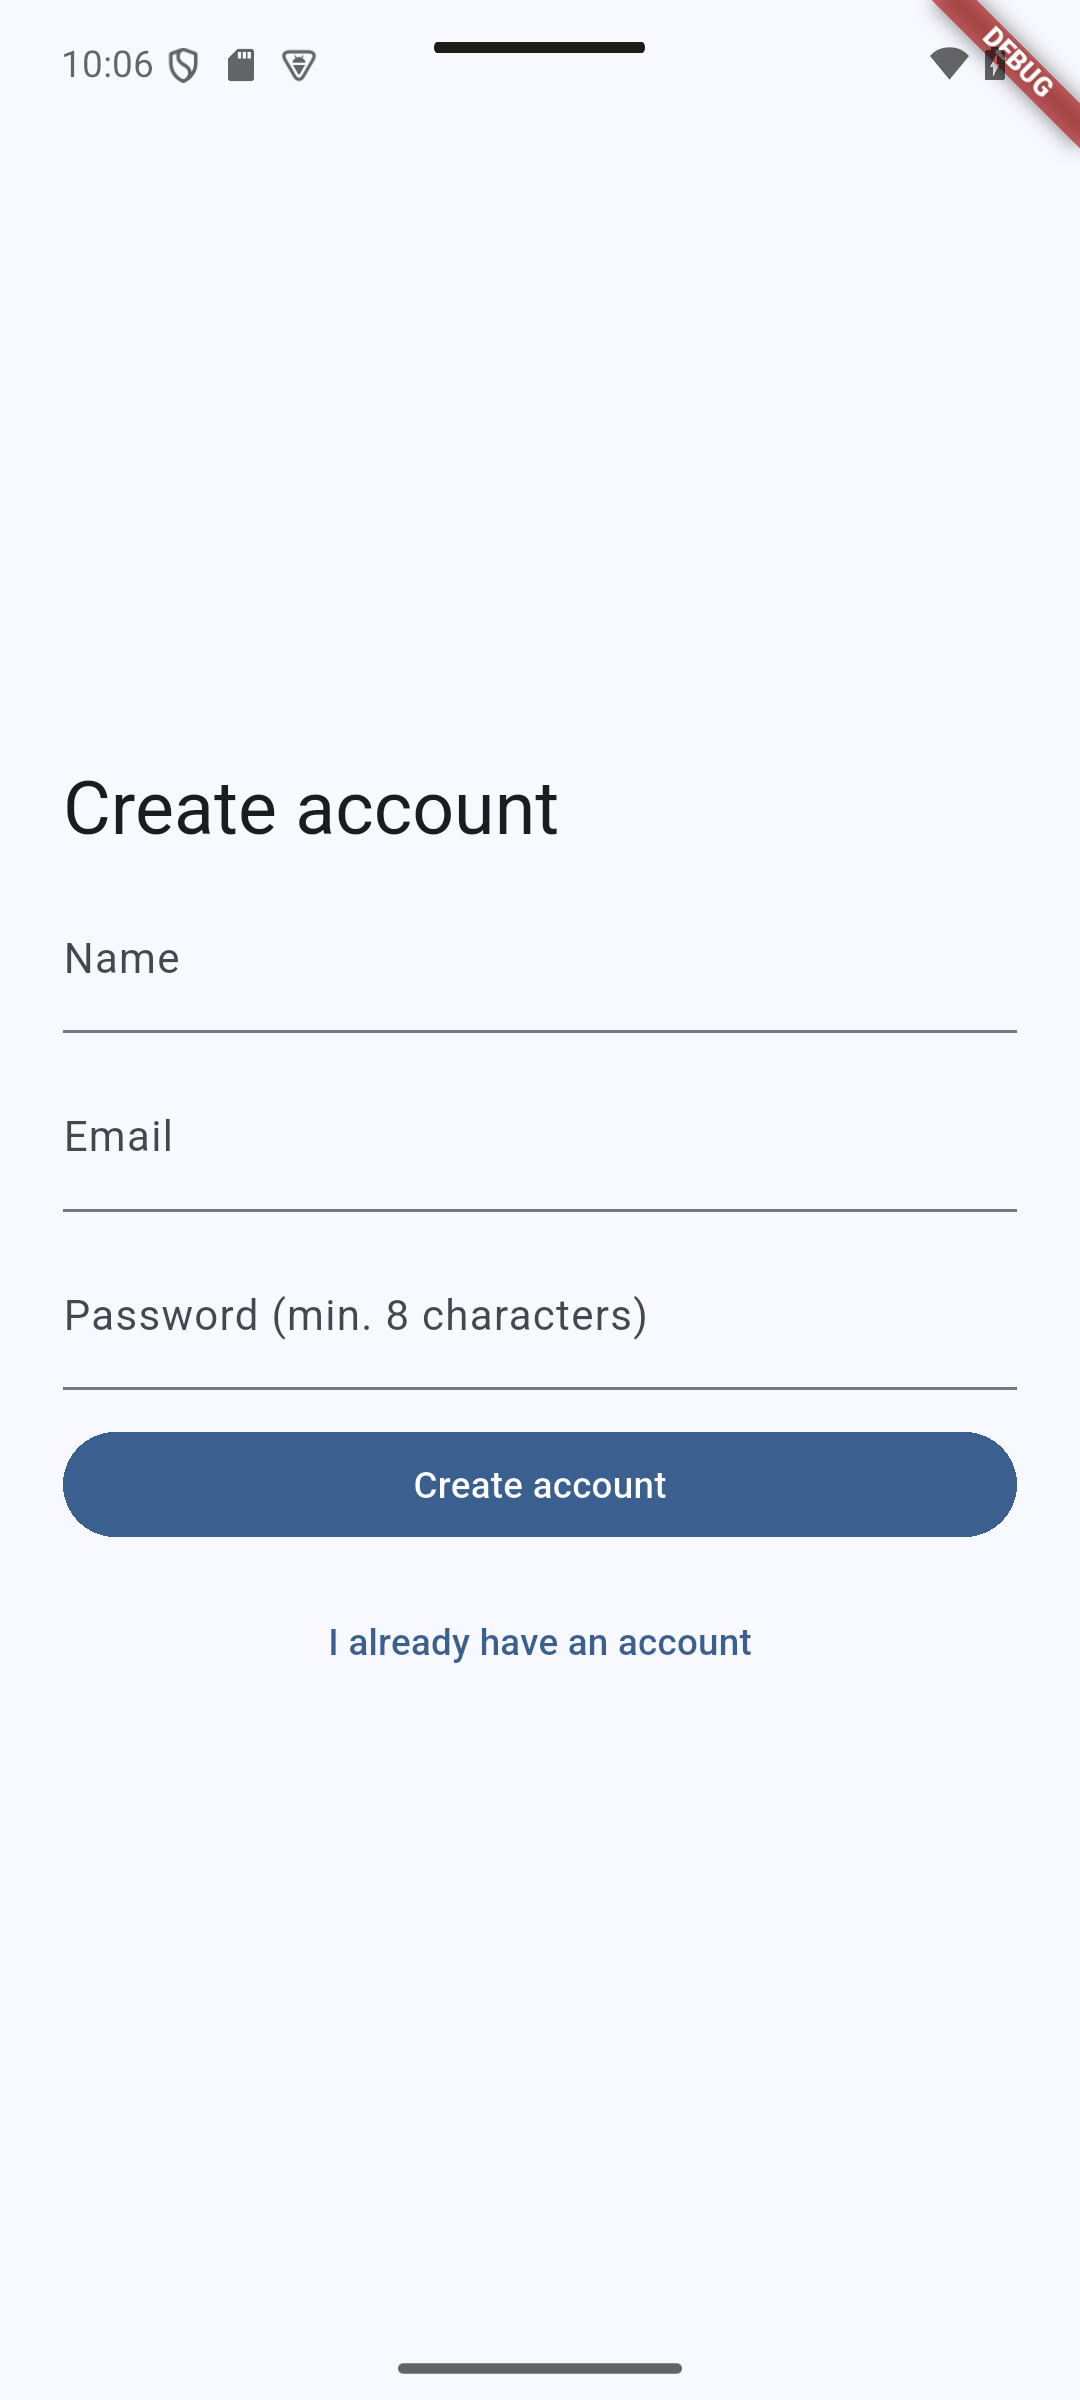
Switching to registration adds the Name field.
| React Native · Android | Flutter · Android |
|---|---|
|
|
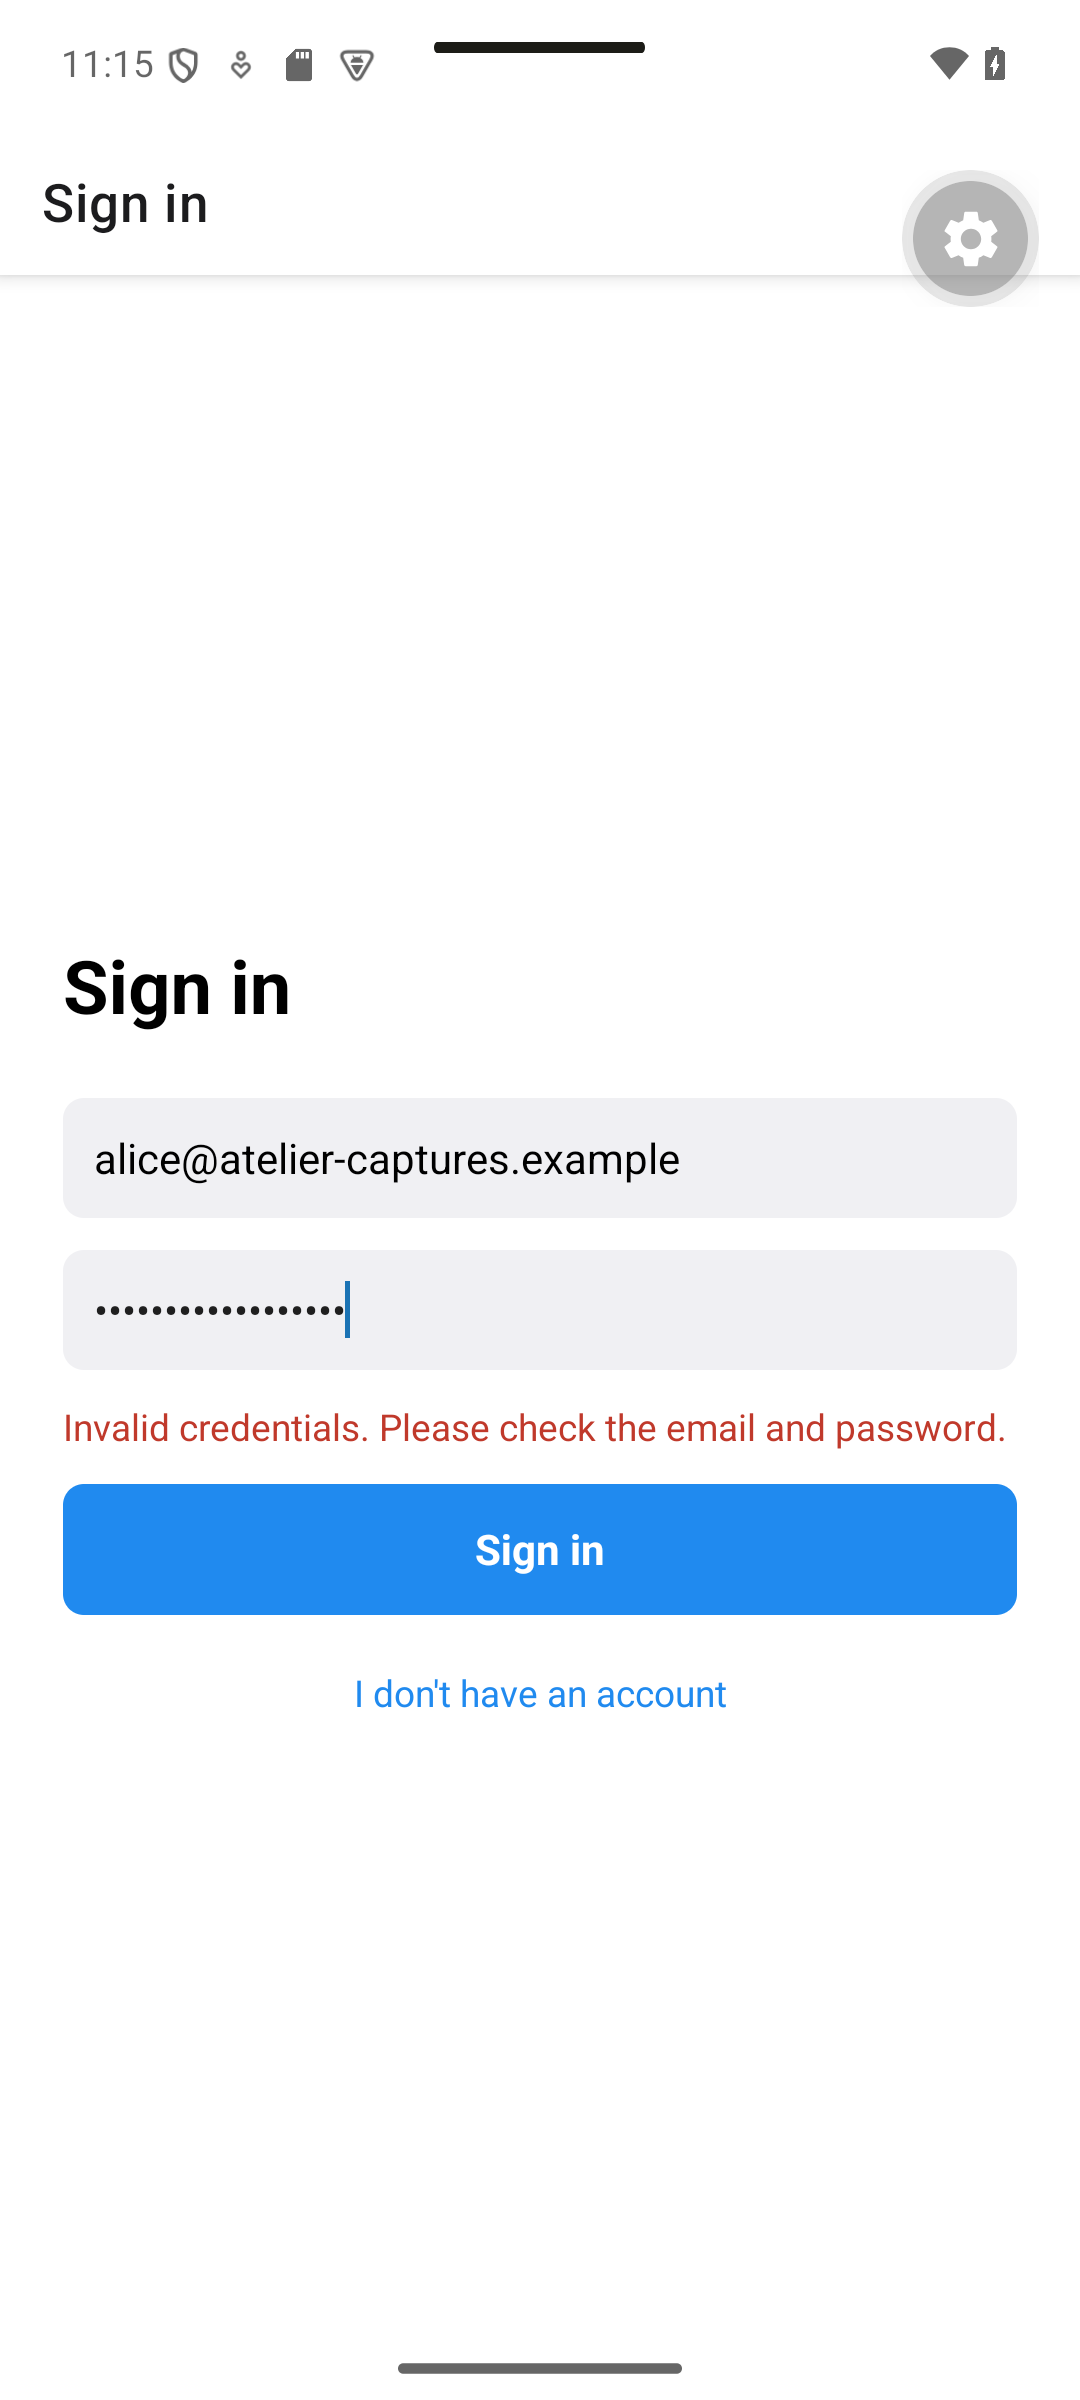
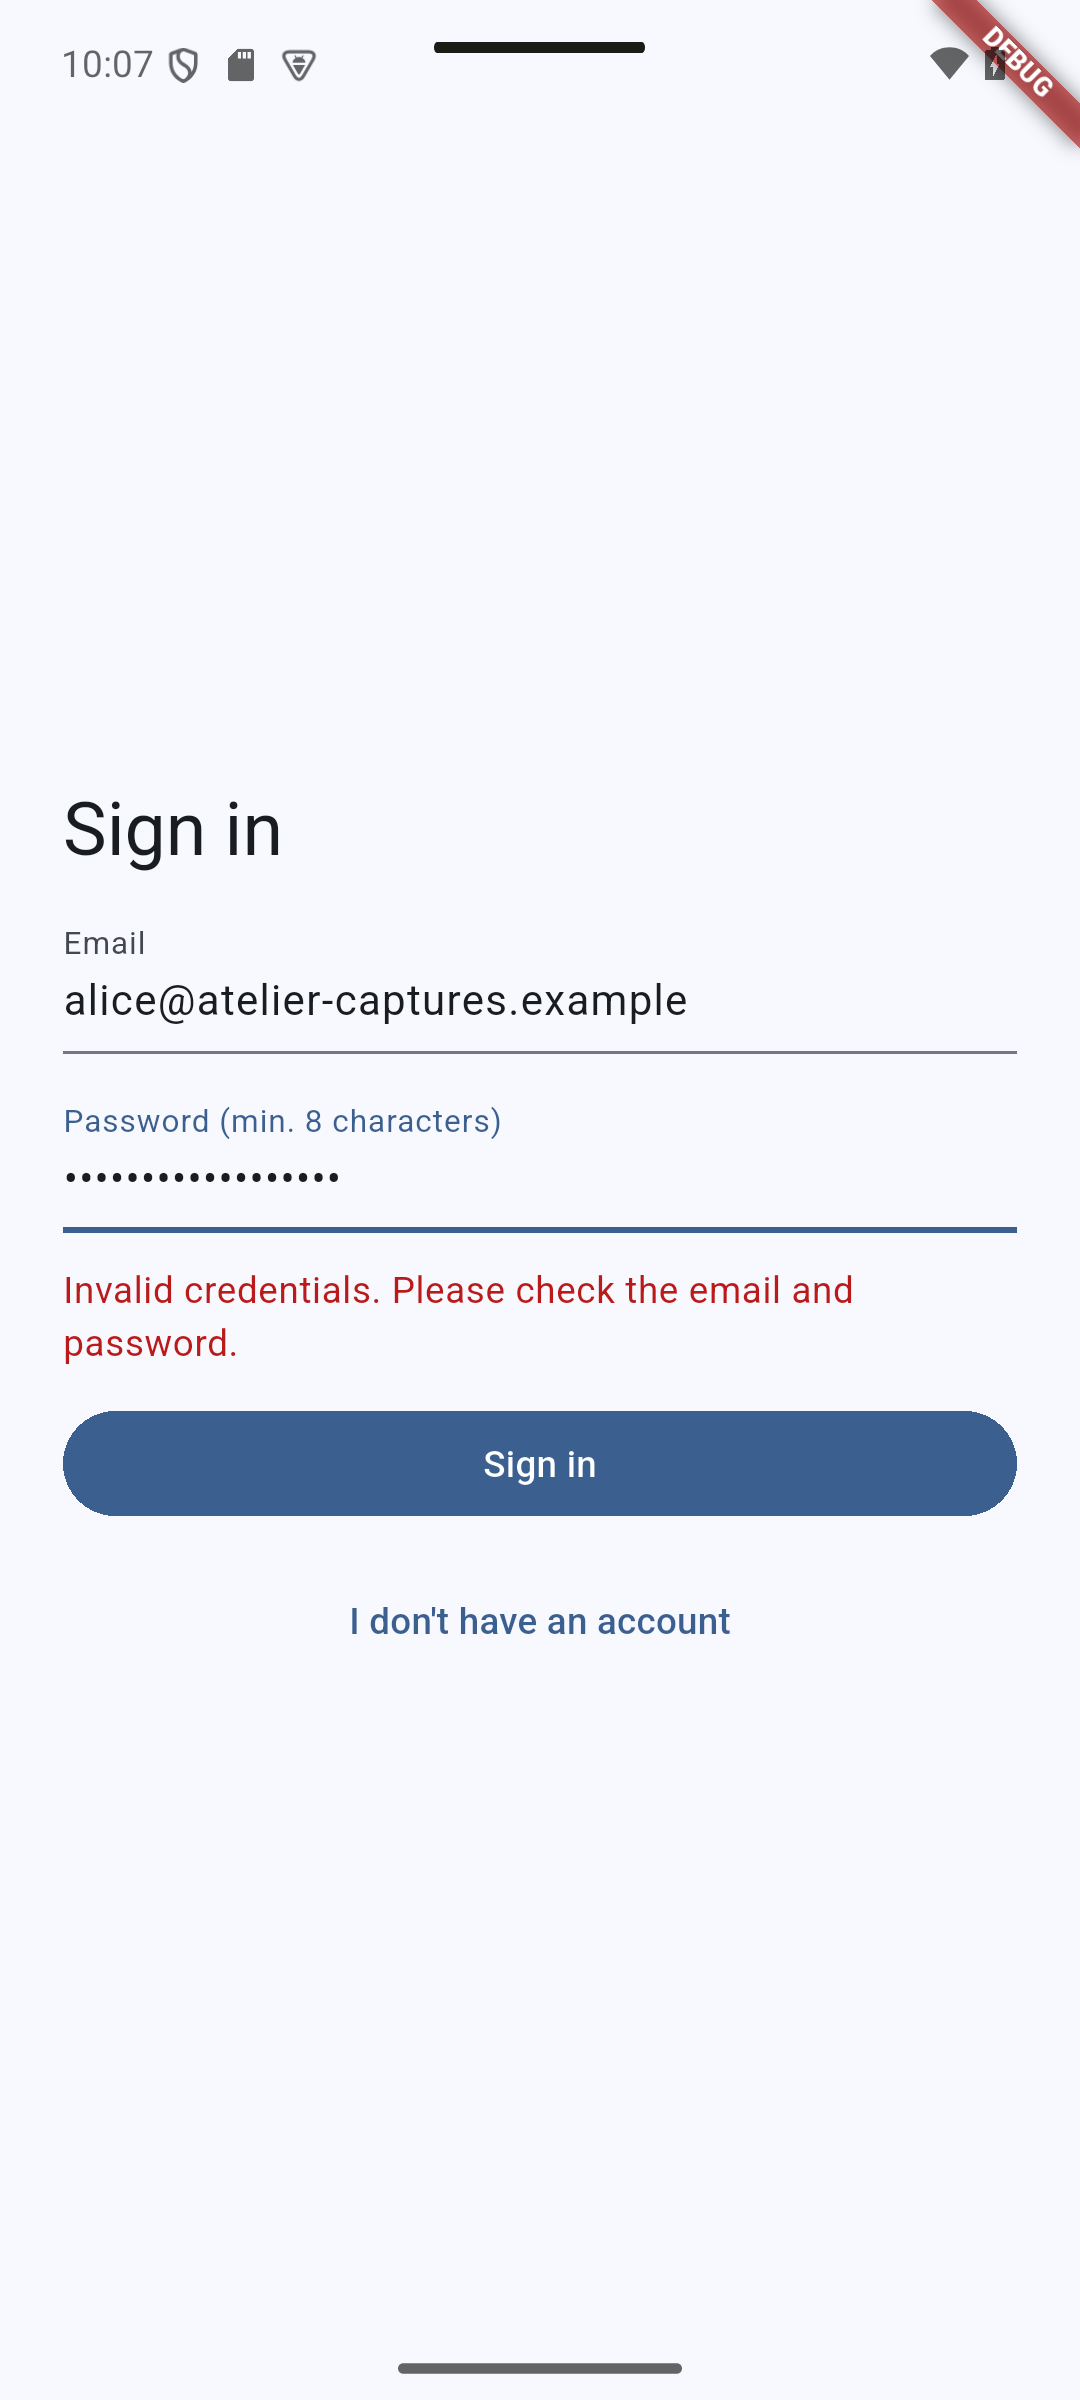
An incorrect password leaves the user on the form and displays the server error.
| React Native · Android | Flutter · Android |
|---|---|
|
|
Concepts in this section: one form for two modes (sign in / create account), disabling the button while a request runs, showing server errors.
Visual guide. Track the submit button from ready to busy, then inspect the success and error feedback.
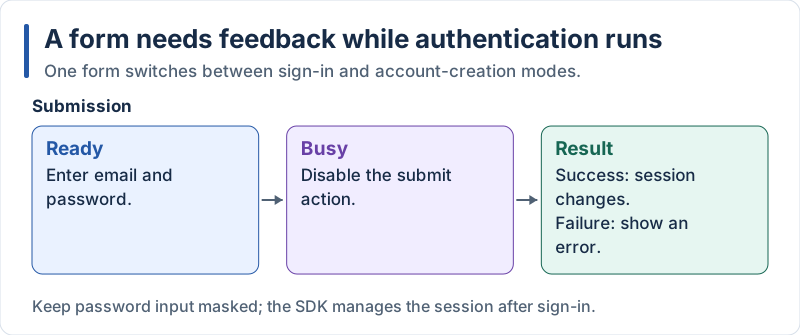
Successful authentication changes the shared session; a failure remains visible in the form.
React Native
// src/app/login.tsx
import { useState } from 'react';
import {
  ActivityIndicator,
  KeyboardAvoidingView,
  Platform,
  Pressable,
  StyleSheet,
  Text,
  TextInput,
  View,
} from 'react-native';

import { useAuth } from '../context/AuthContext';
import { errorMessage } from '../lib/errors';

export default function LoginScreen() {
  const { signIn, signUp } = useAuth();
  const [registering, setRegistering] = useState(false);
  const [name, setName] = useState('');
  const [email, setEmail] = useState('');
  const [password, setPassword] = useState('');
  const [busy, setBusy] = useState(false);
  const [error, setError] = useState<string | null>(null);

  const submit = async () => {
    setBusy(true);
    setError(null);
    try {
      if (registering) await signUp(name.trim(), email.trim(), password);
      else await signIn(email.trim(), password);
      // On success the user becomes non-null and the router leaves this screen by itself
    } catch (e) {
      setError(errorMessage(e));
      setBusy(false);
    }
  };

  return (
    <KeyboardAvoidingView
      style={styles.container}
      behavior={Platform.OS === 'ios' ? 'padding' : undefined}>
      <Text style={styles.title}>{registering ? 'Create account' : 'Sign in'}</Text>

      {registering && (
        <TextInput style={styles.input} placeholder="Name" value={name} onChangeText={setName} />
      )}
      <TextInput
        style={styles.input}
        placeholder="Email"
        value={email}
        onChangeText={setEmail}
        autoCapitalize="none"
        keyboardType="email-address"
      />
      <TextInput
        style={styles.input}
        placeholder="Password (min. 8 characters)"
        value={password}
        onChangeText={setPassword}
        secureTextEntry
      />

      {error && <Text style={styles.error}>{error}</Text>}

      <Pressable style={[styles.button, busy && styles.disabled]} onPress={submit} disabled={busy}>
        {busy ? (
          <ActivityIndicator color="#fff" />
        ) : (
          <Text style={styles.buttonText}>{registering ? 'Create account' : 'Sign in'}</Text>
        )}
      </Pressable>

      <Pressable onPress={() => setRegistering(!registering)}>
        <Text style={styles.link}>
          {registering ? 'I already have an account' : "I don't have an account"}
        </Text>
      </Pressable>
    </KeyboardAvoidingView>
  );
}

const styles = StyleSheet.create({
  container: { flex: 1, justifyContent: 'center', padding: 24, gap: 12, backgroundColor: '#fff' },
  title: { fontSize: 28, fontWeight: 'bold', marginBottom: 12 },
  input: { backgroundColor: '#f0f0f3', borderRadius: 8, padding: 12, fontSize: 16 },
  error: { color: '#c0392b' },
  button: { backgroundColor: '#208AEF', borderRadius: 8, padding: 14, alignItems: 'center' },
  disabled: { opacity: 0.6 },
  buttonText: { color: '#fff', fontSize: 16, fontWeight: 'bold' },
  link: { color: '#208AEF', textAlign: 'center', padding: 8 },
});
Explanation:
autoCapitalize="none"andkeyboardType="email-address"give a proper keyboard for e-mailsecureTextEntryhides the password- After a successful sign-in we do not navigate manually: the route guard of section 7.5 reacts to the new
user KeyboardAvoidingViewkeeps the form visible when the keyboard opens on iOS
Flutter
// lib/screens/login_screen.dart
import 'package:flutter/material.dart';
import 'package:provider/provider.dart';

import '../providers/auth_provider.dart';

class LoginScreen extends StatefulWidget {
  const LoginScreen({super.key});

  @override
  State<LoginScreen> createState() => _LoginScreenState();
}

class _LoginScreenState extends State<LoginScreen> {
  final _name = TextEditingController();
  final _email = TextEditingController();
  final _password = TextEditingController();
  bool _registering = false;

  @override
  void dispose() {
    _name.dispose();
    _email.dispose();
    _password.dispose();
    super.dispose();
  }

  Future<void> _submit() async {
    final auth = context.read<AuthProvider>();
    if (_registering) {
      await auth.signUp(_name.text.trim(), _email.text.trim(), _password.text);
    } else {
      await auth.signIn(_email.text.trim(), _password.text);
    }
    // On success the router redirects to "/" by itself (section 7.5)
  }

  @override
  Widget build(BuildContext context) {
    final auth = context.watch<AuthProvider>();

    return Scaffold(
      body: SafeArea(
        child: Center(
          child: SingleChildScrollView(
            padding: const EdgeInsets.all(24),
            child: ConstrainedBox(
              constraints: const BoxConstraints(maxWidth: 400),
              child: Column(
                mainAxisSize: MainAxisSize.min,
                crossAxisAlignment: CrossAxisAlignment.stretch,
                spacing: 12,
                children: [
                  Text(
                    _registering ? 'Create account' : 'Sign in',
                    style: Theme.of(context).textTheme.headlineMedium,
                  ),
                  if (_registering)
                    TextField(
                      controller: _name,
                      decoration: const InputDecoration(labelText: 'Name'),
                    ),
                  TextField(
                    controller: _email,
                    keyboardType: TextInputType.emailAddress,
                    autocorrect: false,
                    decoration: const InputDecoration(labelText: 'Email'),
                  ),
                  TextField(
                    controller: _password,
                    obscureText: true,
                    decoration: const InputDecoration(
                      labelText: 'Password (min. 8 characters)',
                    ),
                  ),
                  if (auth.error != null)
                    Text(
                      auth.error!,
                      style: TextStyle(color: Theme.of(context).colorScheme.error),
                    ),
                  FilledButton(
                    onPressed: auth.busy ? null : _submit,
                    child: auth.busy
                        ? const SizedBox(
                            height: 20,
                            width: 20,
                            child: CircularProgressIndicator(strokeWidth: 2),
                          )
                        : Text(_registering ? 'Create account' : 'Sign in'),
                  ),
                  TextButton(
                    onPressed: () => setState(() => _registering = !_registering),
                    child: Text(
                      _registering ? 'I already have an account' : "I don't have an account",
                    ),
                  ),
                ],
              ),
            ),
          ),
        ),
      ),
    );
  }
}
Explanation:
context.readreads the provider once (use it in callbacks);context.watchrebuilds the widget when the provider changes (use it inbuild)onPressed: nulldisables a Material buttonif (condition) Widgetinside a list is Dart’s collection if: the equivalent of{condition && <Widget />}in JSXConstrainedBoxkeeps the form readable on tablets and on the web
7.5 Protecting Routes and Logging Out
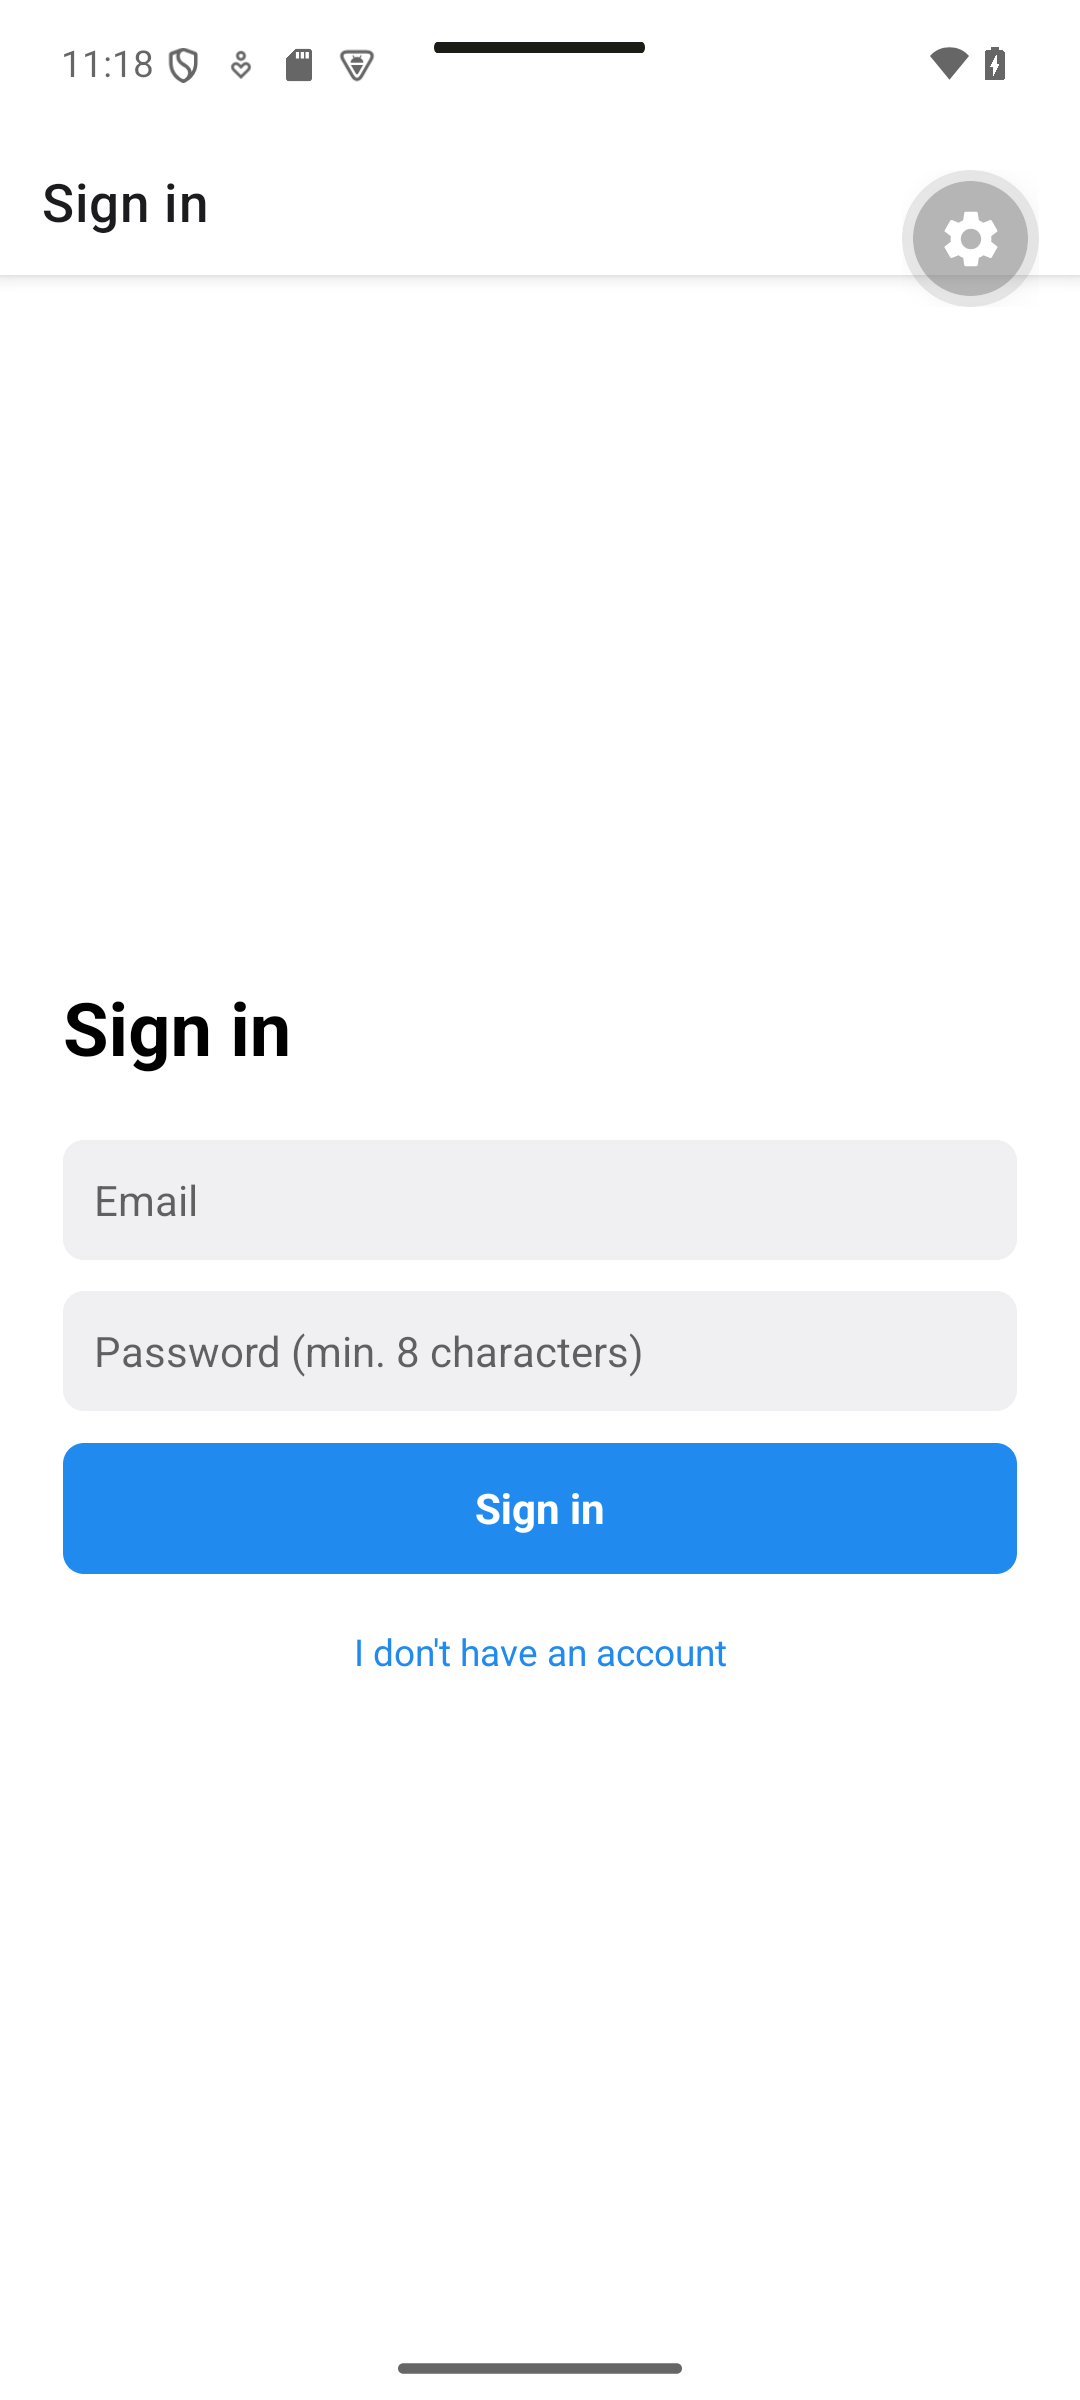
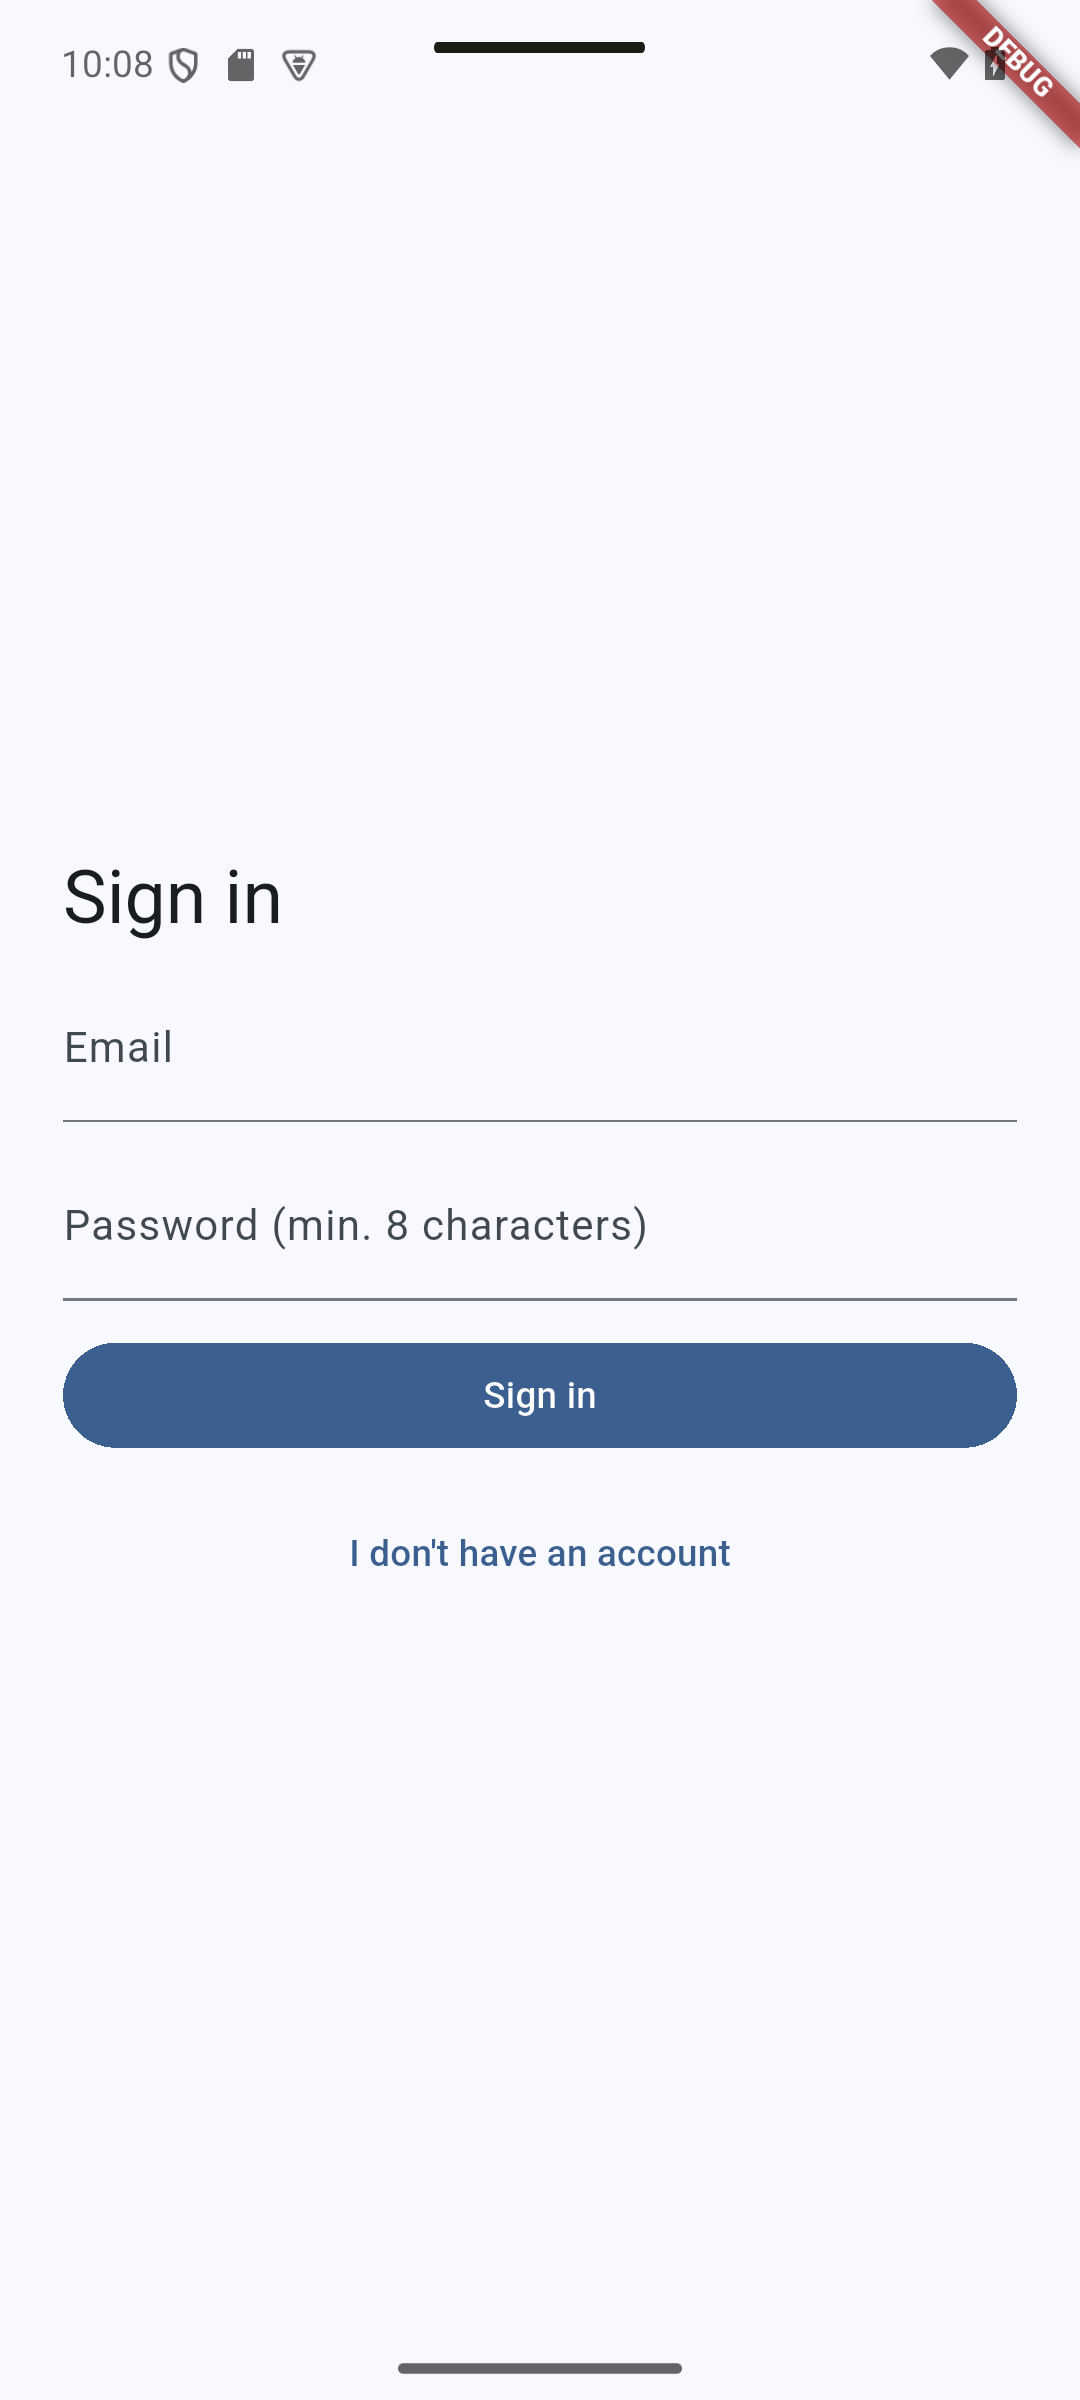
Expected result. Sign out returns to the login screen.
| React Native · Android | Flutter · Android |
|---|---|
|
|
Concepts in this section:
- Route guards: the router, not each screen, decides which screens a logged-out user may see
- Waiting for the initial session check before showing anything (otherwise the login screen flashes for a logged-in user)
- Important: a route guard is a user-experience feature. Real protection is done by the server permissions in section 8.
Visual guide. Match each session state to its navigation branch.
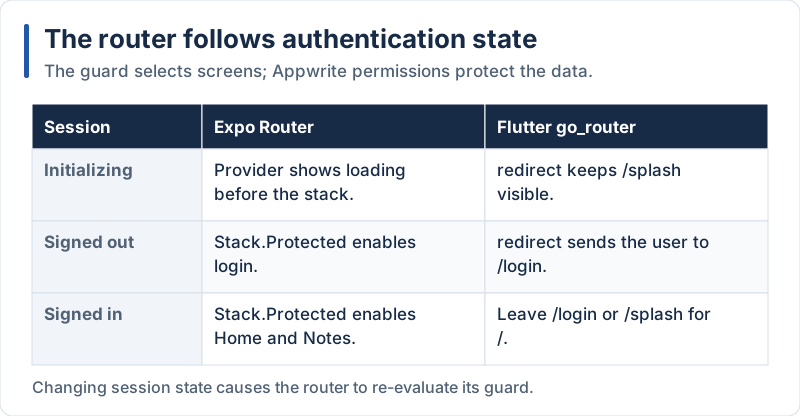
The router controls screen access; server permissions remain responsible for data access.
React Native
Wrap the app in the provider and declare which screens are protected. Stack.Protected takes a guard: when it is false, those screens are unreachable and Expo Router falls back to the first available screen.
// src/app/_layout.tsx
import { Stack } from 'expo-router';
import * as SplashScreen from 'expo-splash-screen';
import { useEffect } from 'react';

import { AuthProvider, useAuth } from '../context/AuthContext';

// Keep the splash screen visible until we know if there is a session
SplashScreen.preventAutoHideAsync();

function RootNavigator() {
  const { user, initializing } = useAuth();

  useEffect(() => {
    if (!initializing) SplashScreen.hide();
  }, [initializing]);

  if (initializing) return null;

  return (
    <Stack>
      <Stack.Protected guard={user !== null}>
        <Stack.Screen name="index" options={{ title: 'Notes App' }} />
        <Stack.Screen name="notes" options={{ title: 'My Notes' }} />
      </Stack.Protected>

      <Stack.Protected guard={user === null}>
        <Stack.Screen name="login" options={{ title: 'Sign in' }} />
      </Stack.Protected>
    </Stack>
  );
}

export default function RootLayout() {
  return (
    <AuthProvider>
      <RootNavigator />
    </AuthProvider>
  );
}
Add the user name and a Sign out button to the home screen:
// src/app/index.tsx
import { Link } from 'expo-router';
import { Pressable, StyleSheet, Text, View } from 'react-native';

import { useAuth } from '../context/AuthContext';

export default function HomeScreen() {
  const { user, signOut } = useAuth();

  return (
    <View style={styles.container}>
      <Text style={styles.title}>Notes App</Text>
      <Text style={styles.subtitle}>Hello, {user?.name || user?.email}</Text>

      <Link href="/notes" style={styles.link}>
        Open my notes →
      </Link>

      <Pressable onPress={signOut}>
        <Text style={styles.signOut}>Sign out</Text>
      </Pressable>
    </View>
  );
}

const styles = StyleSheet.create({
  container: {
    flex: 1,
    alignItems: 'center',
    justifyContent: 'center',
    gap: 12,
    backgroundColor: '#fff',
  },
  title: { fontSize: 32, fontWeight: 'bold' },
  subtitle: { fontSize: 16, color: '#60646c' },
  link: { marginTop: 16, padding: 12, fontSize: 18, color: '#208AEF' },
  signOut: { color: '#c0392b', fontSize: 16, padding: 8 },
});
Explanation:
RootLayoutmountsAuthProviderfirst, becauseRootNavigatorusesuseAuth- While
initializing, the layout returnsnulland the native splash screen stays visible - The two
Stack.Protectedgroups are mutually exclusive: logged in →indexandnotes; logged out →login. Whenuserchanges, the visible screen changes automatically, which is why the login and logout code never callsrouter.push SplashScreen.hide()removes the splash screen once the session check is done
Flutter
go_router offers a redirect function evaluated on every navigation, and refreshListenable to re-evaluate it when the authentication state changes.
// lib/main.dart
import 'package:flutter/material.dart';
import 'package:go_router/go_router.dart';
import 'package:provider/provider.dart';

import 'config/app_config.dart';
import 'providers/auth_provider.dart';
import 'screens/home_screen.dart';
import 'screens/login_screen.dart';
import 'screens/notes_screen.dart';
import 'services/auth_service.dart';

Future<void> main() async {
  WidgetsFlutterBinding.ensureInitialized();
  AppConfig.validate();

  final auth = AuthProvider(AuthService())..init();
  runApp(
    ChangeNotifierProvider.value(value: auth, child: NotesApp(auth: auth)),
  );
}

class NotesApp extends StatefulWidget {
  const NotesApp({super.key, required this.auth});

  final AuthProvider auth;

  @override
  State<NotesApp> createState() => _NotesAppState();
}

class _NotesAppState extends State<NotesApp> {
  late final GoRouter _router = GoRouter(
    initialLocation: '/splash',
    refreshListenable: widget.auth,
    redirect: (context, state) {
      final location = state.matchedLocation;

      // 1. We do not know yet if a session exists: show the splash screen
      if (widget.auth.initializing) {
        return location == '/splash' ? null : '/splash';
      }
      // 2. Logged out: only the login screen is allowed
      if (widget.auth.user == null) {
        return location == '/login' ? null : '/login';
      }
      // 3. Logged in: leave the login and splash screens
      if (location == '/login' || location == '/splash') return '/';
      return null; // no redirection
    },
    routes: [
      GoRoute(
        path: '/splash',
        builder: (context, state) =>
            const Scaffold(body: Center(child: CircularProgressIndicator())),
      ),
      GoRoute(path: '/login', builder: (context, state) => const LoginScreen()),
      GoRoute(path: '/', builder: (context, state) => const HomeScreen()),
      GoRoute(path: '/notes', builder: (context, state) => const NotesScreen()),
    ],
  );

  @override
  void dispose() {
    _router.dispose();
    super.dispose();
  }

  @override
  Widget build(BuildContext context) {
    return MaterialApp.router(
      title: 'Notes App',
      theme: ThemeData(colorSchemeSeed: const Color(0xFF208AEF)),
      darkTheme: ThemeData(
        colorSchemeSeed: const Color(0xFF208AEF),
        brightness: Brightness.dark,
      ),
      routerConfig: _router,
    );
  }
}
Add the user name and a Sign out button to the home screen:
// lib/screens/home_screen.dart
import 'package:flutter/material.dart';
import 'package:go_router/go_router.dart';
import 'package:provider/provider.dart';

import '../providers/auth_provider.dart';

class HomeScreen extends StatelessWidget {
  const HomeScreen({super.key});

  @override
  Widget build(BuildContext context) {
    final textTheme = Theme.of(context).textTheme;
    final user = context.watch<AuthProvider>().user;

    return Scaffold(
      appBar: AppBar(title: const Text('Notes App')),
      body: Center(
        child: Column(
          mainAxisSize: MainAxisSize.min,
          spacing: 12,
          children: [
            Text('Notes App', style: textTheme.headlineLarge),
            Text('Hello, ${user?.name.isNotEmpty == true ? user!.name : user?.email}'),
            const SizedBox(height: 16),
            FilledButton(
              onPressed: () => context.go('/notes'),
              child: const Text('Open my notes →'),
            ),
            TextButton(
              onPressed: () => context.read<AuthProvider>().signOut(),
              child: const Text('Sign out'),
            ),
          ],
        ),
      ),
    );
  }
}
Explanation:
redirectreturns the path to go to instead, ornullto stay: three simple rules written in orderrefreshListenable: widget.authmakes the router runredirectagain each timenotifyListeners()is called, so logging in or out moves the user automatically- The router is created once in the
State(not inbuild), otherwise navigation would reset on every rebuild ChangeNotifierProvider.valueexposes the existingAuthProviderobject to the whole widget tree
8. Filtering User Notes
Expected result. The target is a different private list for each signed-in account, as shown in section 8.3. Client-side filtering is complemented by server-side row permissions.
8.1 Understanding Row Permissions
Expected result. Observed permissions and access checks using real user sessions.
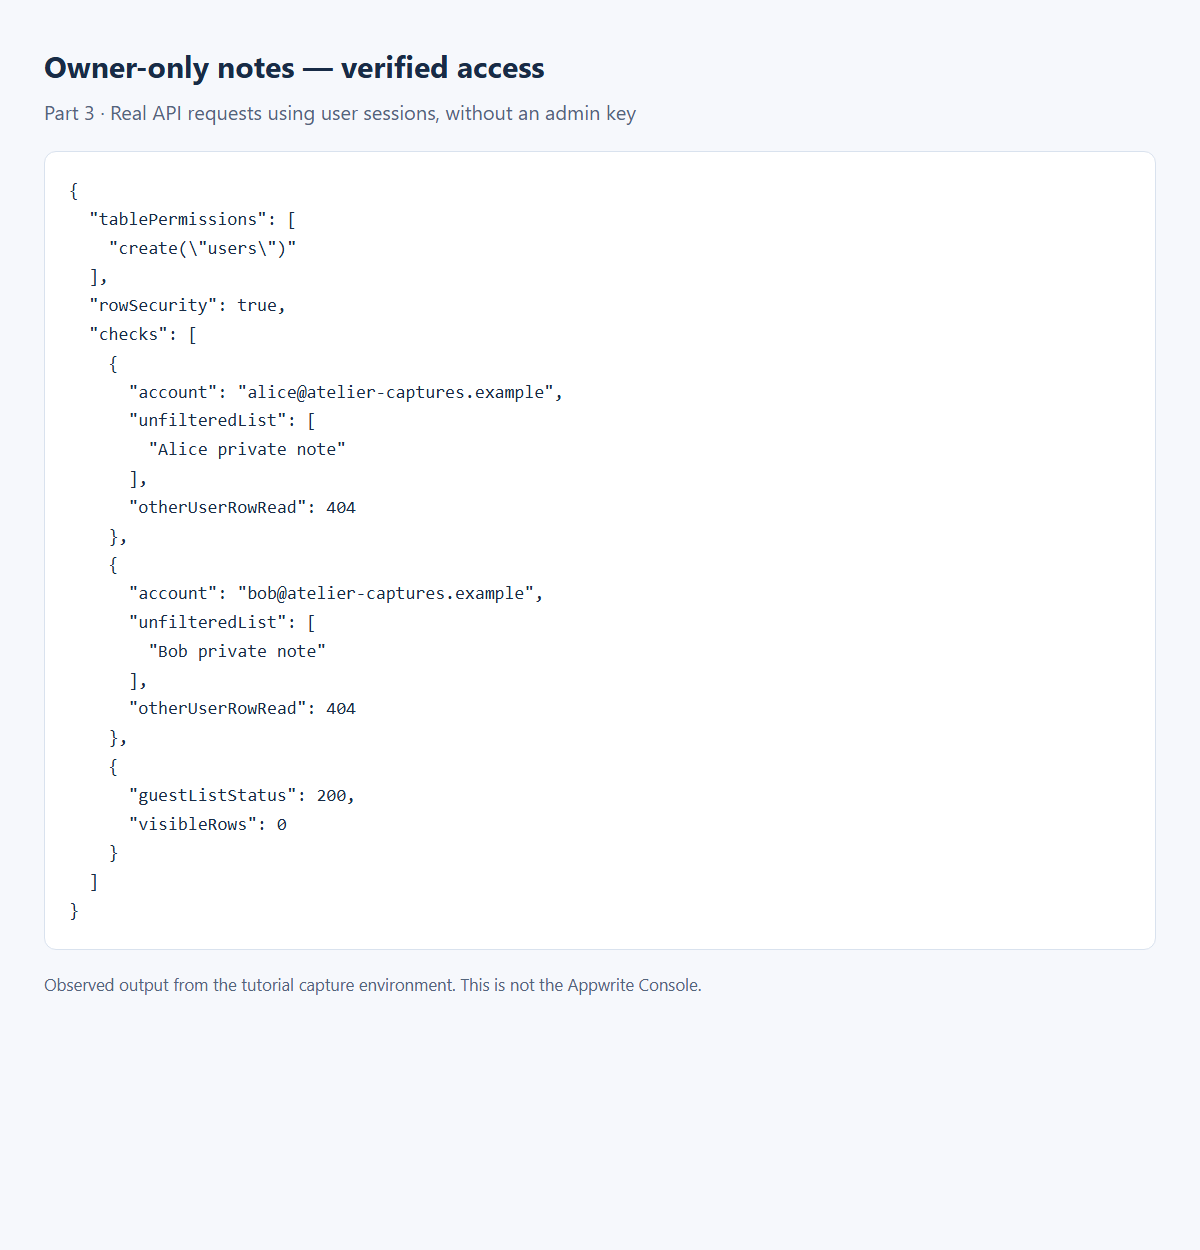
This is an API verification report, not the Appwrite Console. The unfiltered list request returns only the caller’s row, direct reads of the other user’s row are denied, and a guest sees no notes. No administration key was used for these access checks.
Concepts in this section:
- Filtering in the app is not security. A user could call the API without your app and ask for every note. Only server-side permissions are reliable.
- Appwrite permissions are strings made of an action and a role:
read("user:123"),update("user:123"),delete("user:123"),create("users") - Table-level permissions apply to all rows. Row security, when enabled, lets each row carry its own permissions.
- Combining both gives the model we want: any logged-in user can create a row, but only its owner can read, update or delete it.
Visual guide. Read this matrix as Alice, then as Bob. Remove broad table read/update/delete grants before applying this model.
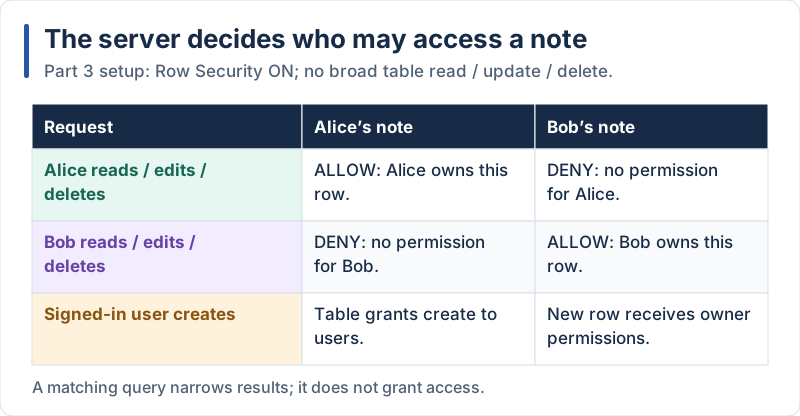
With Row Security enabled, grant create to signed-in users at table level and owner access on each row.
Change the table configuration in the Appwrite console (Databases → NotesDB → notes → Settings):
- Remove the “Any” role you added in Part 2.
- Add the role Users with Create only.
- Turn Row security ON.
- Delete the test rows created in Part 2 (they have no owner).
Then every row we create from now on will be created with explicit permissions for its owner. The userId column also records the owner, which allows us to filter explicitly.
8.2 Update the Notes Service
Expected result. Compare the Alice and Bob lists in section 8.3. A note created through the authenticated app also appears in its owner’s list: React Native, Flutter.
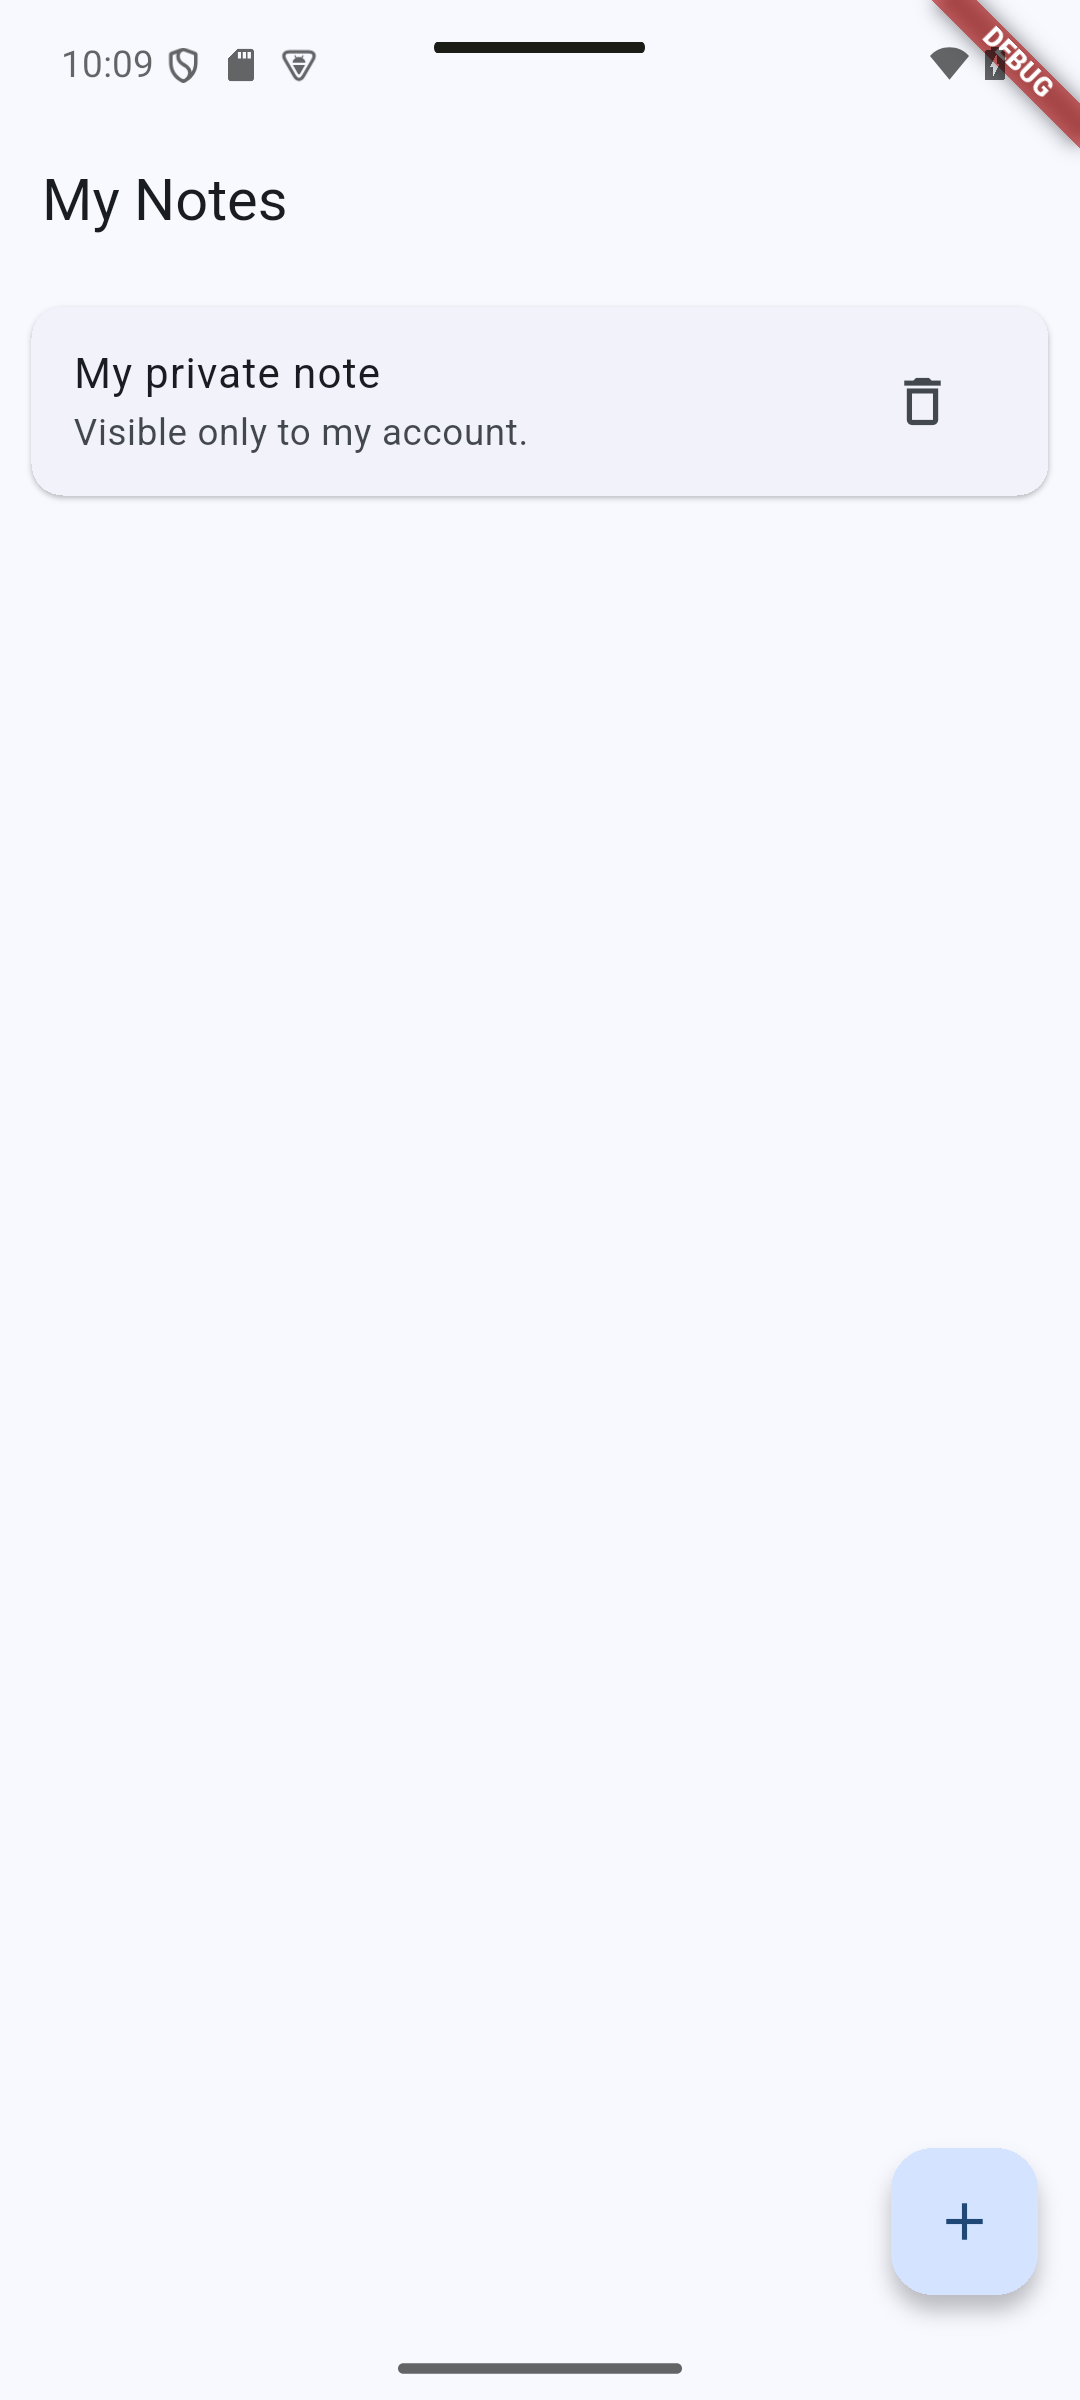
Concepts in this section: attaching permissions when creating a row, filtering with Query.equal.
Visual guide. Follow userId from the authenticated user to the query and the permissions on a newly created row.
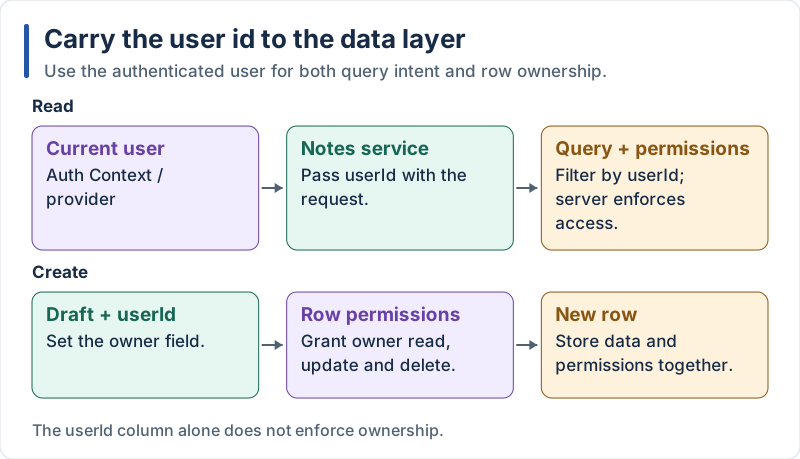
The owner column supports filtering; row permissions enforce access.
React Native
// src/services/notes.ts
import { ID, Permission, Query, Role, type Models } from 'react-native-appwrite';

import { config, tablesDB } from '../lib/appwrite';
import type { Note, NoteDraft } from '../types';

// Shape of a row in the "notes" table (system fields come from Models.Row)
type NoteRow = Models.Row & {
  title: string;
  content?: string;
  userId?: string;
};

const target = { databaseId: config.databaseId, tableId: config.tableId };

const toNote = (row: NoteRow): Note => ({
  id: row.$id,
  title: row.title,
  content: row.content ?? '',
});

export async function listNotes(userId: string): Promise<Note[]> {
  const result = await tablesDB.listRows<NoteRow>({
    ...target,
    queries: [Query.equal('userId', userId), Query.orderDesc('$createdAt')],
  });
  return result.rows.map(toNote);
}

export async function createNote(userId: string, draft: NoteDraft): Promise<Note> {
  const row = await tablesDB.createRow<NoteRow>({
    ...target,
    rowId: ID.unique(),
    data: { ...draft, userId },
    // Only the owner can read, update or delete this row
    permissions: [
      Permission.read(Role.user(userId)),
      Permission.update(Role.user(userId)),
      Permission.delete(Role.user(userId)),
    ],
  });
  return toNote(row);
}

export async function updateNote(id: string, draft: NoteDraft): Promise<Note> {
  const row = await tablesDB.updateRow<NoteRow>({ ...target, rowId: id, data: draft });
  return toNote(row);
}

export async function deleteNote(id: string): Promise<void> {
  await tablesDB.deleteRow({ ...target, rowId: id });
}
Explanation:
Permission.read(Role.user(userId))builds the stringread("user:<id>")- When
permissionsis given, only those permissions are set: the creator gets nothing else automatically, so we list every action the owner needs updateNoteanddeleteNotedid not change: the server refuses them (error 401) if the row belongs to somebody elseQuery.equal('userId', userId)makes the intent explicit. Even without it, the server would only return the rows the user may read: the permission is the protection, the query is a convenience
Flutter
// lib/services/notes_service.dart
import 'package:appwrite/appwrite.dart';

import '../config/app_config.dart';
import '../models/note.dart';
import 'appwrite_client.dart';

class NotesService {
  NotesService(this._db);

  final TablesDB _db;

  Future<List<Note>> list(String userId) async {
    final result = await _db.listRows(
      databaseId: AppConfig.databaseId,
      tableId: AppConfig.tableId,
      queries: [Query.equal('userId', userId), Query.orderDesc('\$createdAt')],
    );
    return result.rows.map(Note.fromRow).toList();
  }

  Future<Note> create(String userId, NoteDraft draft) async {
    final row = await _db.createRow(
      databaseId: AppConfig.databaseId,
      tableId: AppConfig.tableId,
      rowId: ID.unique(),
      data: {'title': draft.title, 'content': draft.content, 'userId': userId},
      // Only the owner can read, update or delete this row
      permissions: [
        Permission.read(Role.user(userId)),
        Permission.update(Role.user(userId)),
        Permission.delete(Role.user(userId)),
      ],
    );
    return Note.fromRow(row);
  }

  Future<Note> update(String id, NoteDraft draft) async {
    final row = await _db.updateRow(
      databaseId: AppConfig.databaseId,
      tableId: AppConfig.tableId,
      rowId: id,
      data: {'title': draft.title, 'content': draft.content},
    );
    return Note.fromRow(row);
  }

  Future<void> delete(String id) async {
    await _db.deleteRow(
      databaseId: AppConfig.databaseId,
      tableId: AppConfig.tableId,
      rowId: id,
    );
  }
}

final notesService = NotesService(tablesDB);
Explanation:
- Same changes as in React Native:
userIdis stored in the row and the owner gets explicit permissions PermissionandRolecome frompackage:appwrite/appwrite.dartupdateanddeleteare unchanged: permissions are checked by the server
8.3 Update the Notes Screen
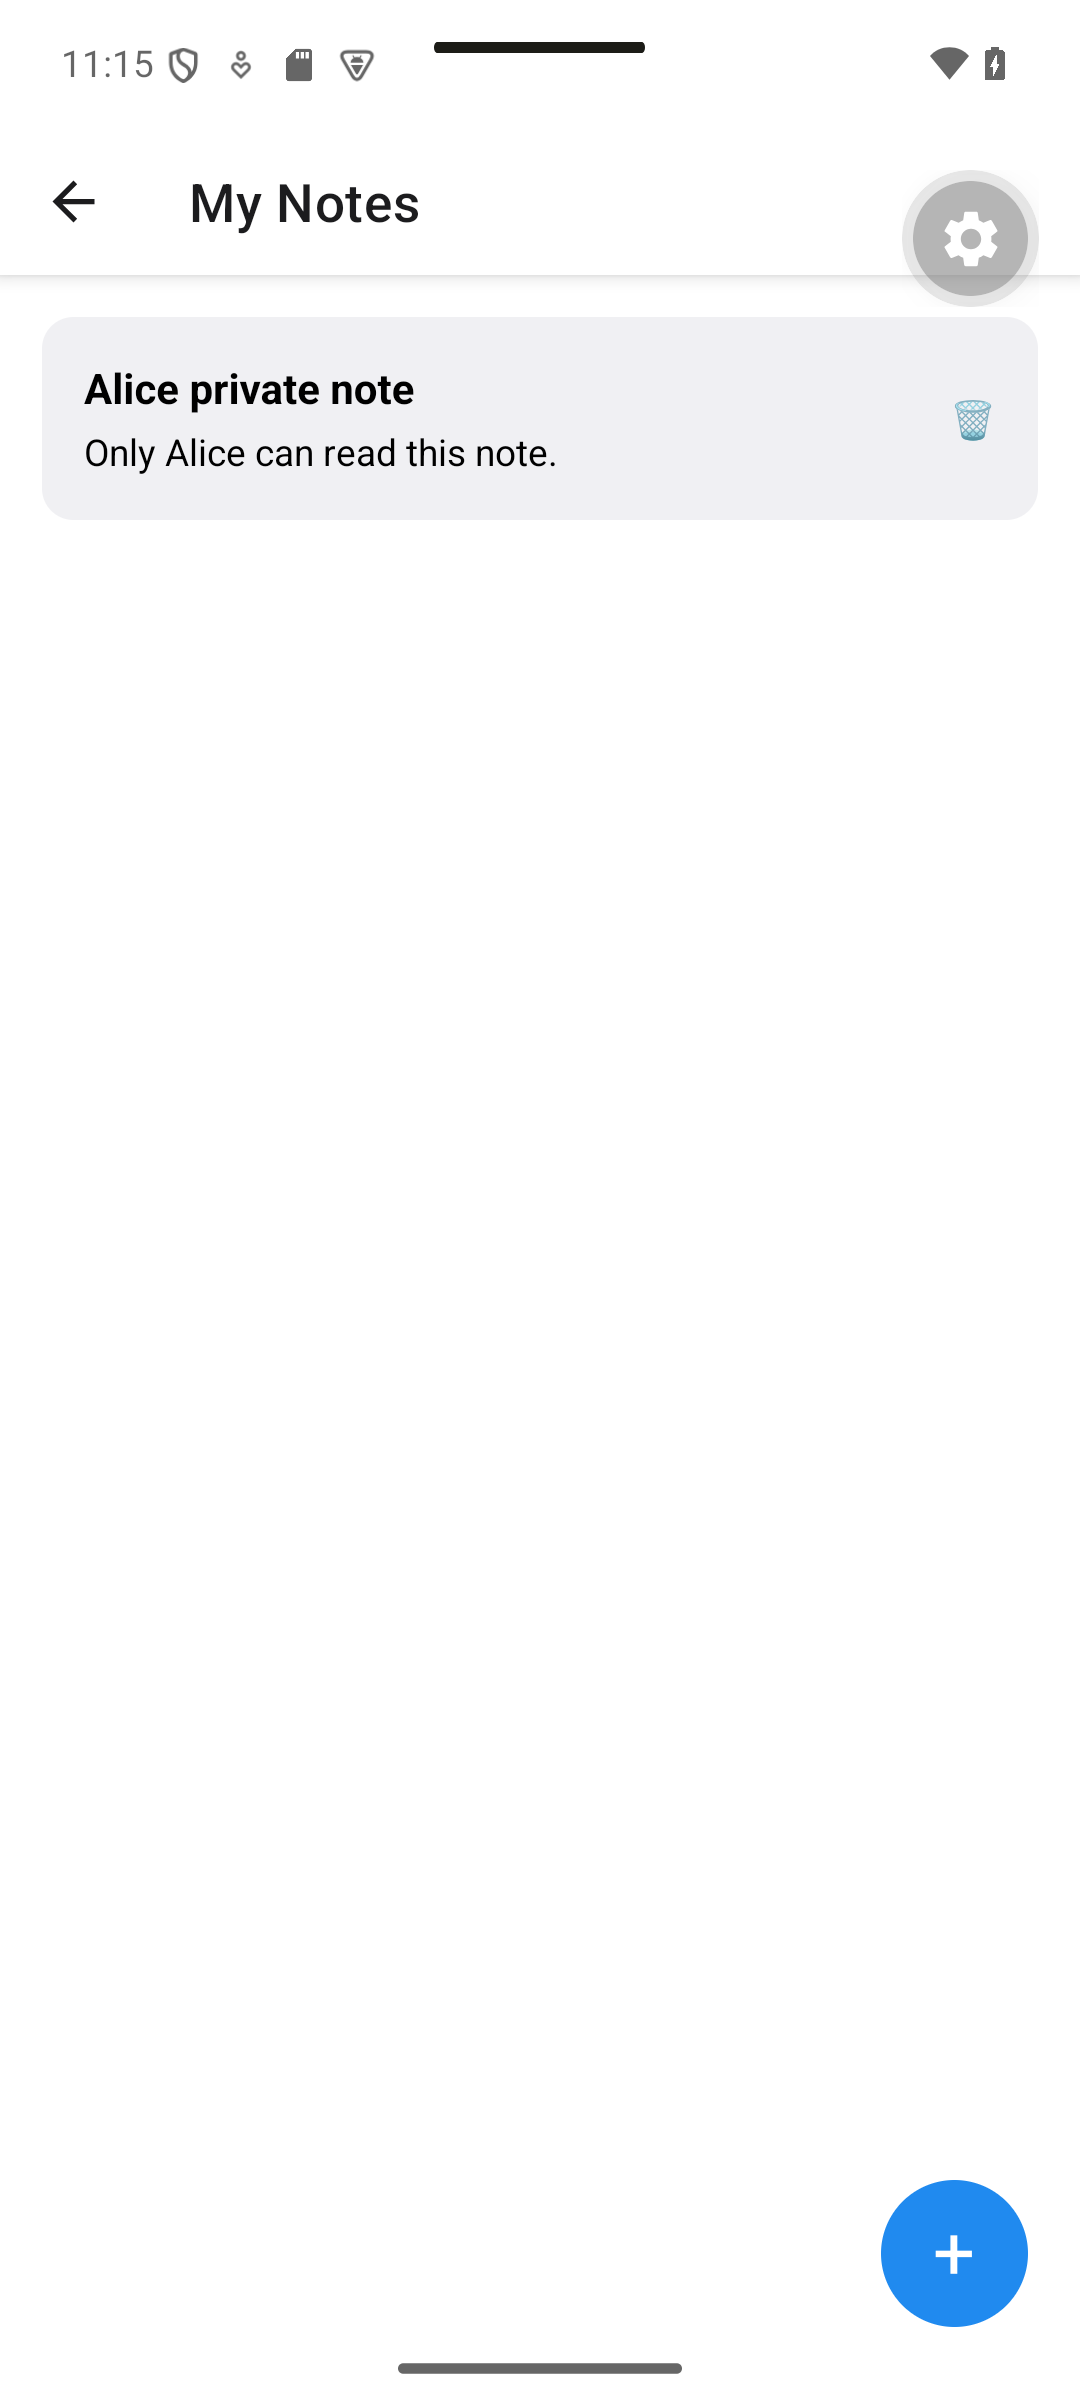
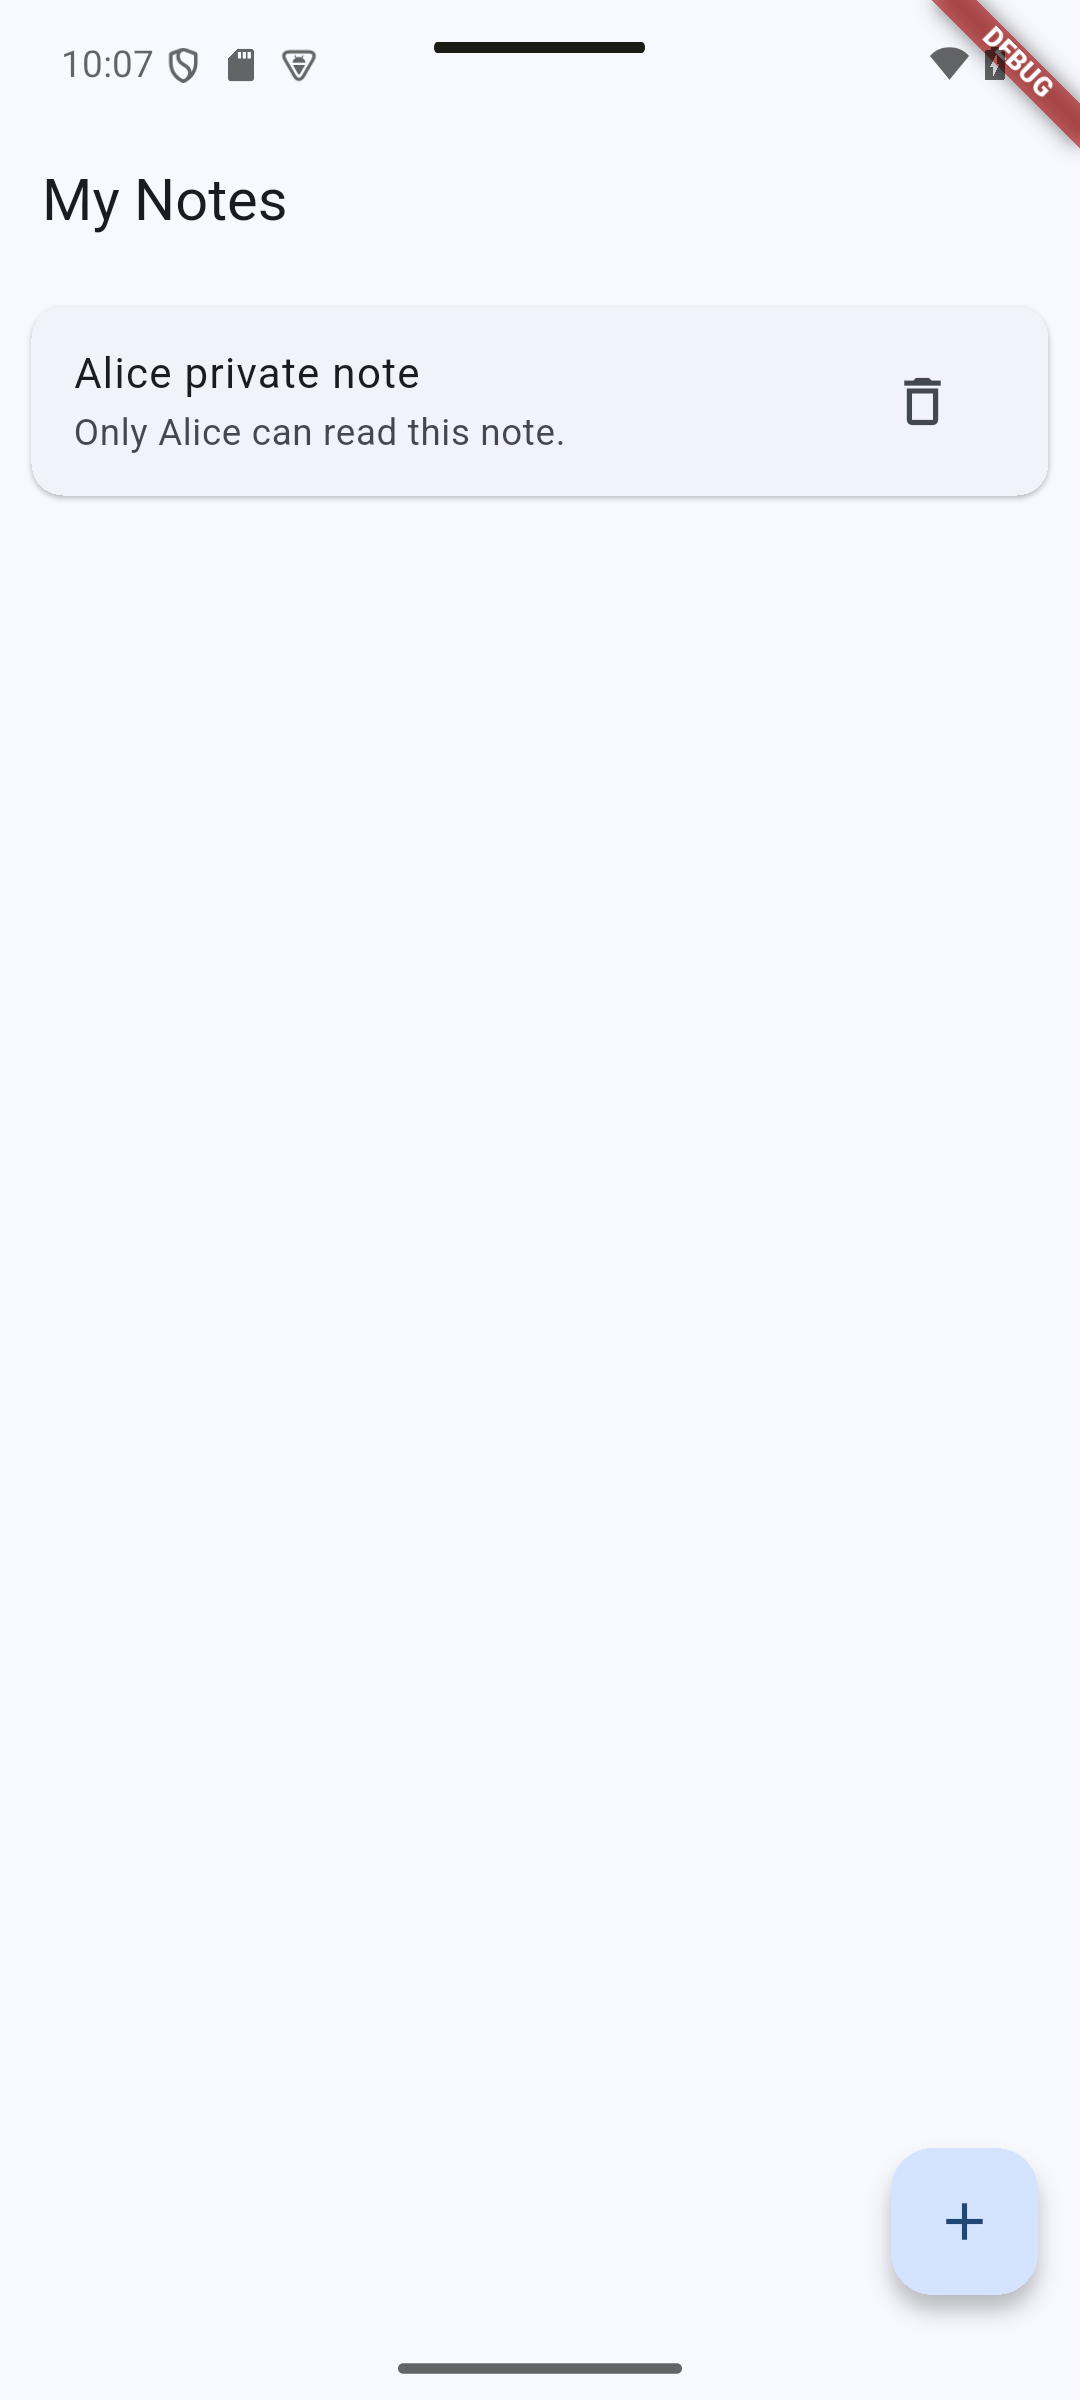
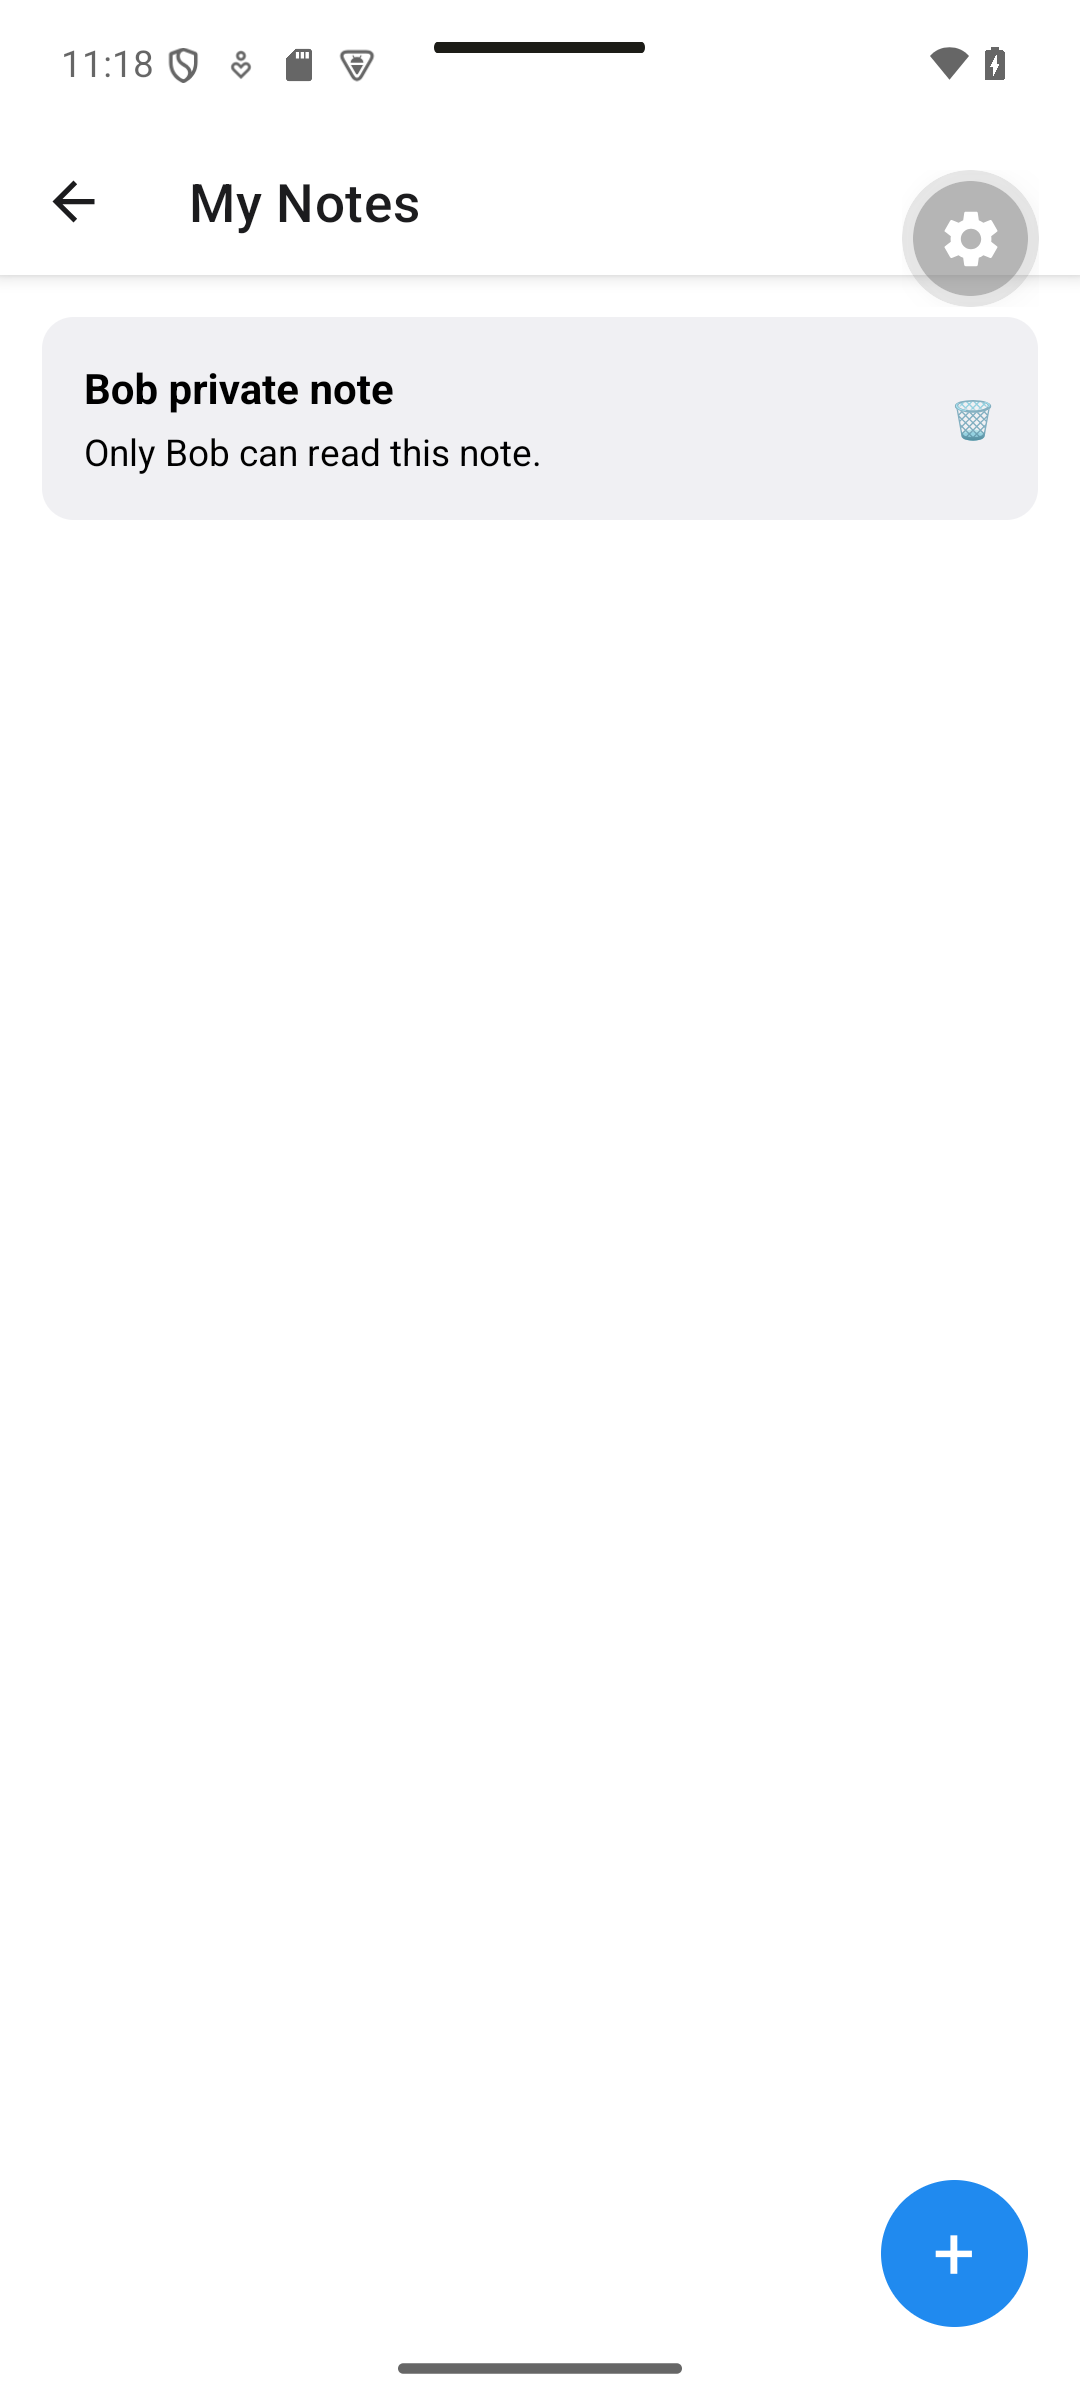
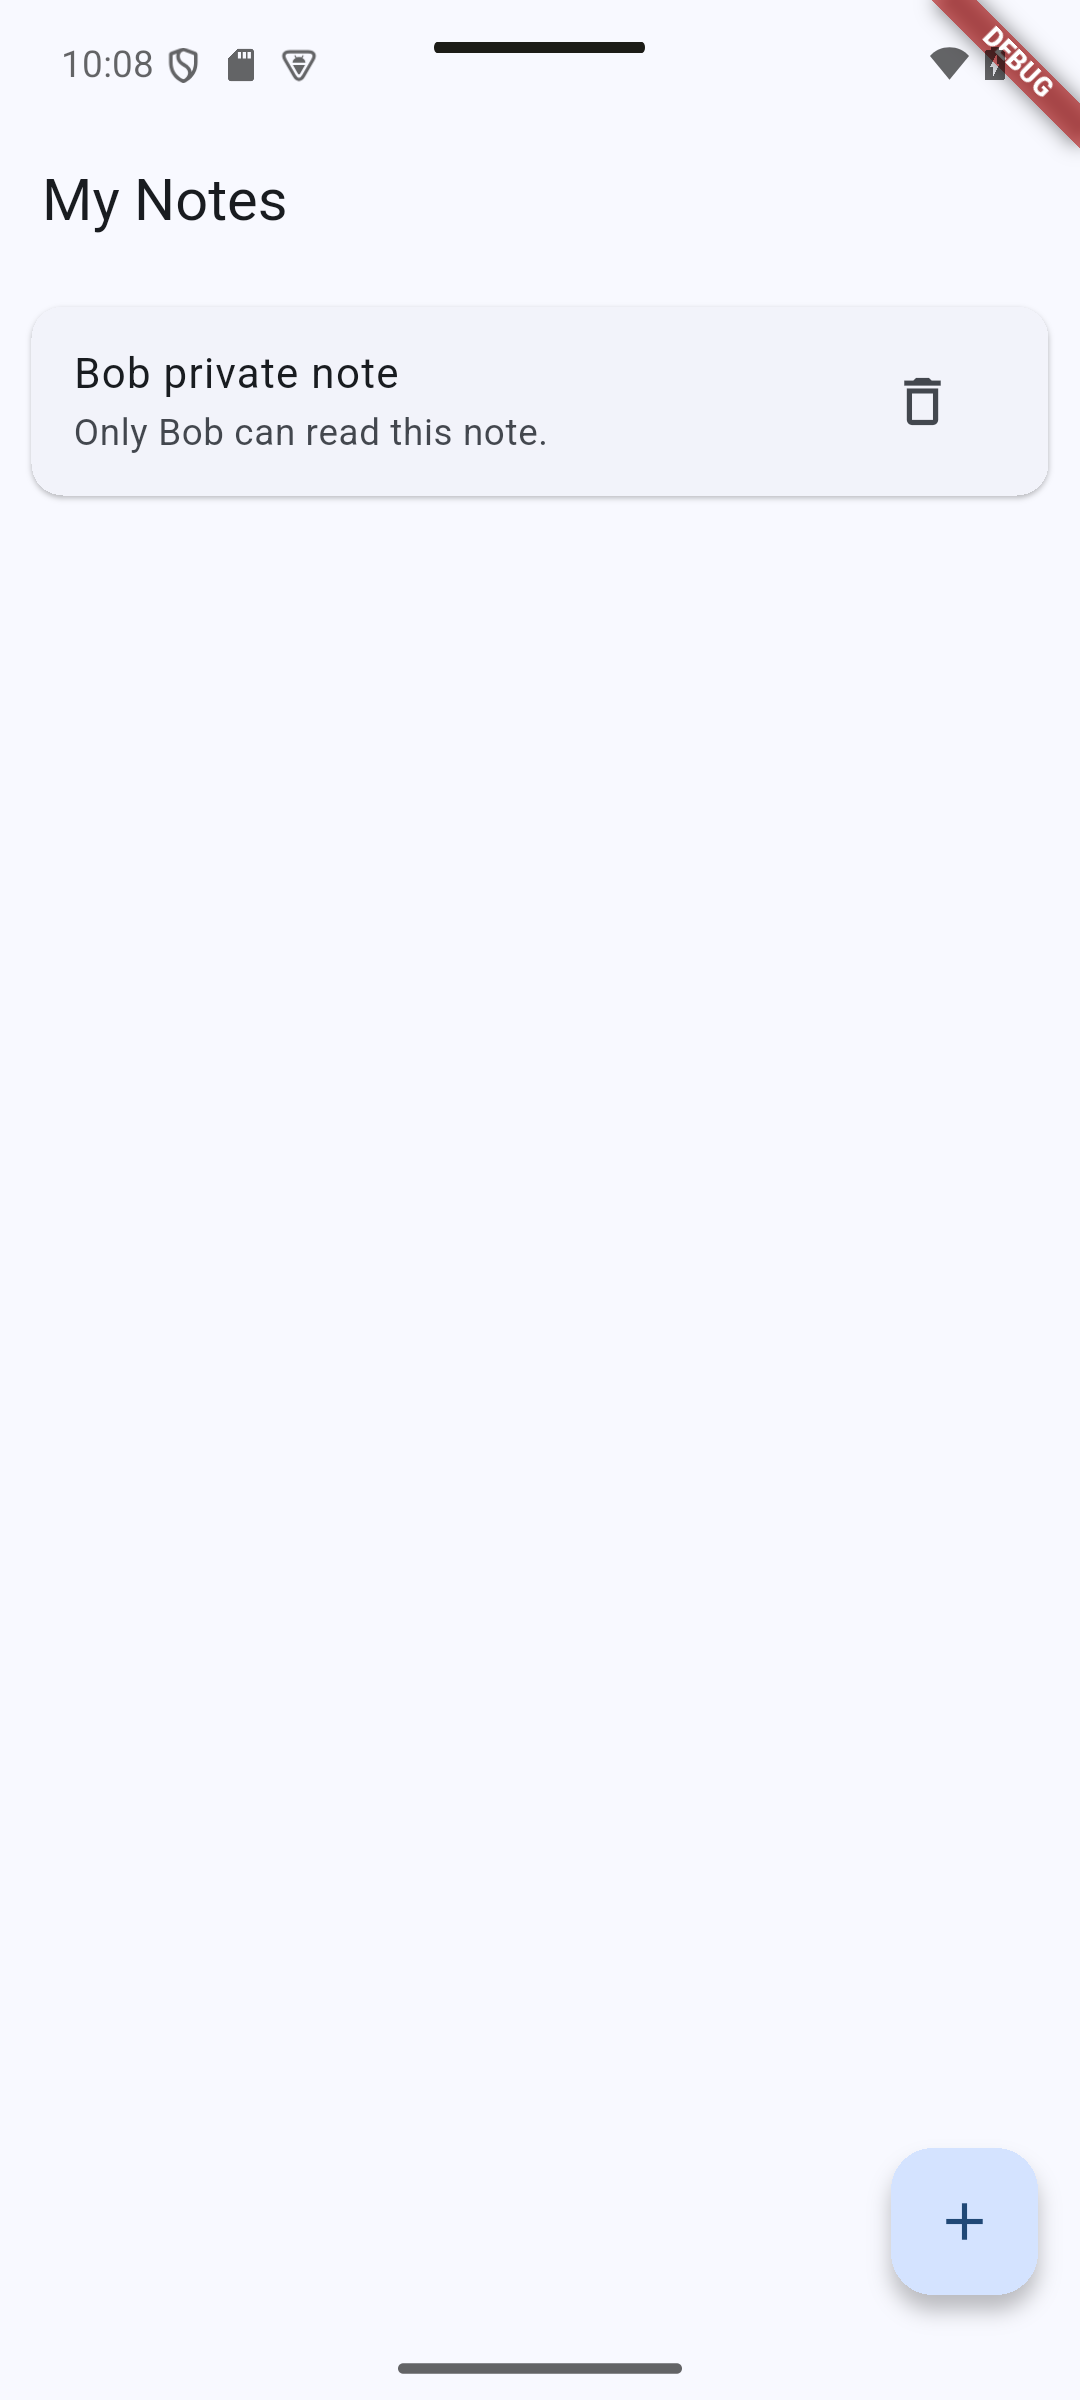
Expected result. Alice sees Alice private note and no Bob note.
| React Native · Android | Flutter · Android |
|---|---|
|
|
After switching accounts, Bob sees Bob private note and no Alice note.
| React Native · Android | Flutter · Android |
|---|---|
|
|
Concepts in this section: reading the current user from the global state; passing its id to the service.
Visual guide. Apply the user-id flow above when wiring the screen. Check with two accounts: each should see only its own notes.
React Native
Read the user id with useAuth and pass it to the service. Only the lines below change in src/app/notes.tsx:
// src/app/notes.tsx (excerpt)
import { useAuth } from '../context/AuthContext';

export default function NotesScreen() {
  // The route is protected, so a user always exists on this screen
  const userId = useAuth().user!.$id;

  // ...state unchanged...

  const load = useCallback(async () => {
    setLoading(true);
    setError(null);
    try {
      setNotes(await listNotes(userId));
    } catch (e) {
      setError(errorMessage(e));
    } finally {
      setLoading(false);
    }
  }, [userId]);

  // in save():
  const created = await createNote(userId, draft);
Explanation:
user!(non-null assertion) is justified by the route guard of section 7.5: this screen cannot be displayed without a useruserIdis added to theuseCallbackdependencies, becauseloadnow uses it
Flutter
// lib/screens/notes_screen.dart (excerpt)
import 'package:provider/provider.dart';

import '../providers/auth_provider.dart';

class _NotesScreenState extends State<NotesScreen> {
  // The route is protected, so a user always exists on this screen
  late final String _userId = context.read<AuthProvider>().user!.$id;

  // in _load():
  final notes = await notesService.list(_userId);

  // in _add():
  final created = await notesService.create(_userId, draft);
}
Explanation:
late finalinitializes_userIdthe first time it is used, whencontextis availablecontext.readis enough here: the id does not change while the screen is open (logging out replaces the whole screen)
Test it with two accounts: create two users, add notes with each one, and check that each user only sees their own notes. In the Appwrite console (Databases → NotesDB → notes), open a row and look at its Permissions tab: only the owner appears.
9. Empty State
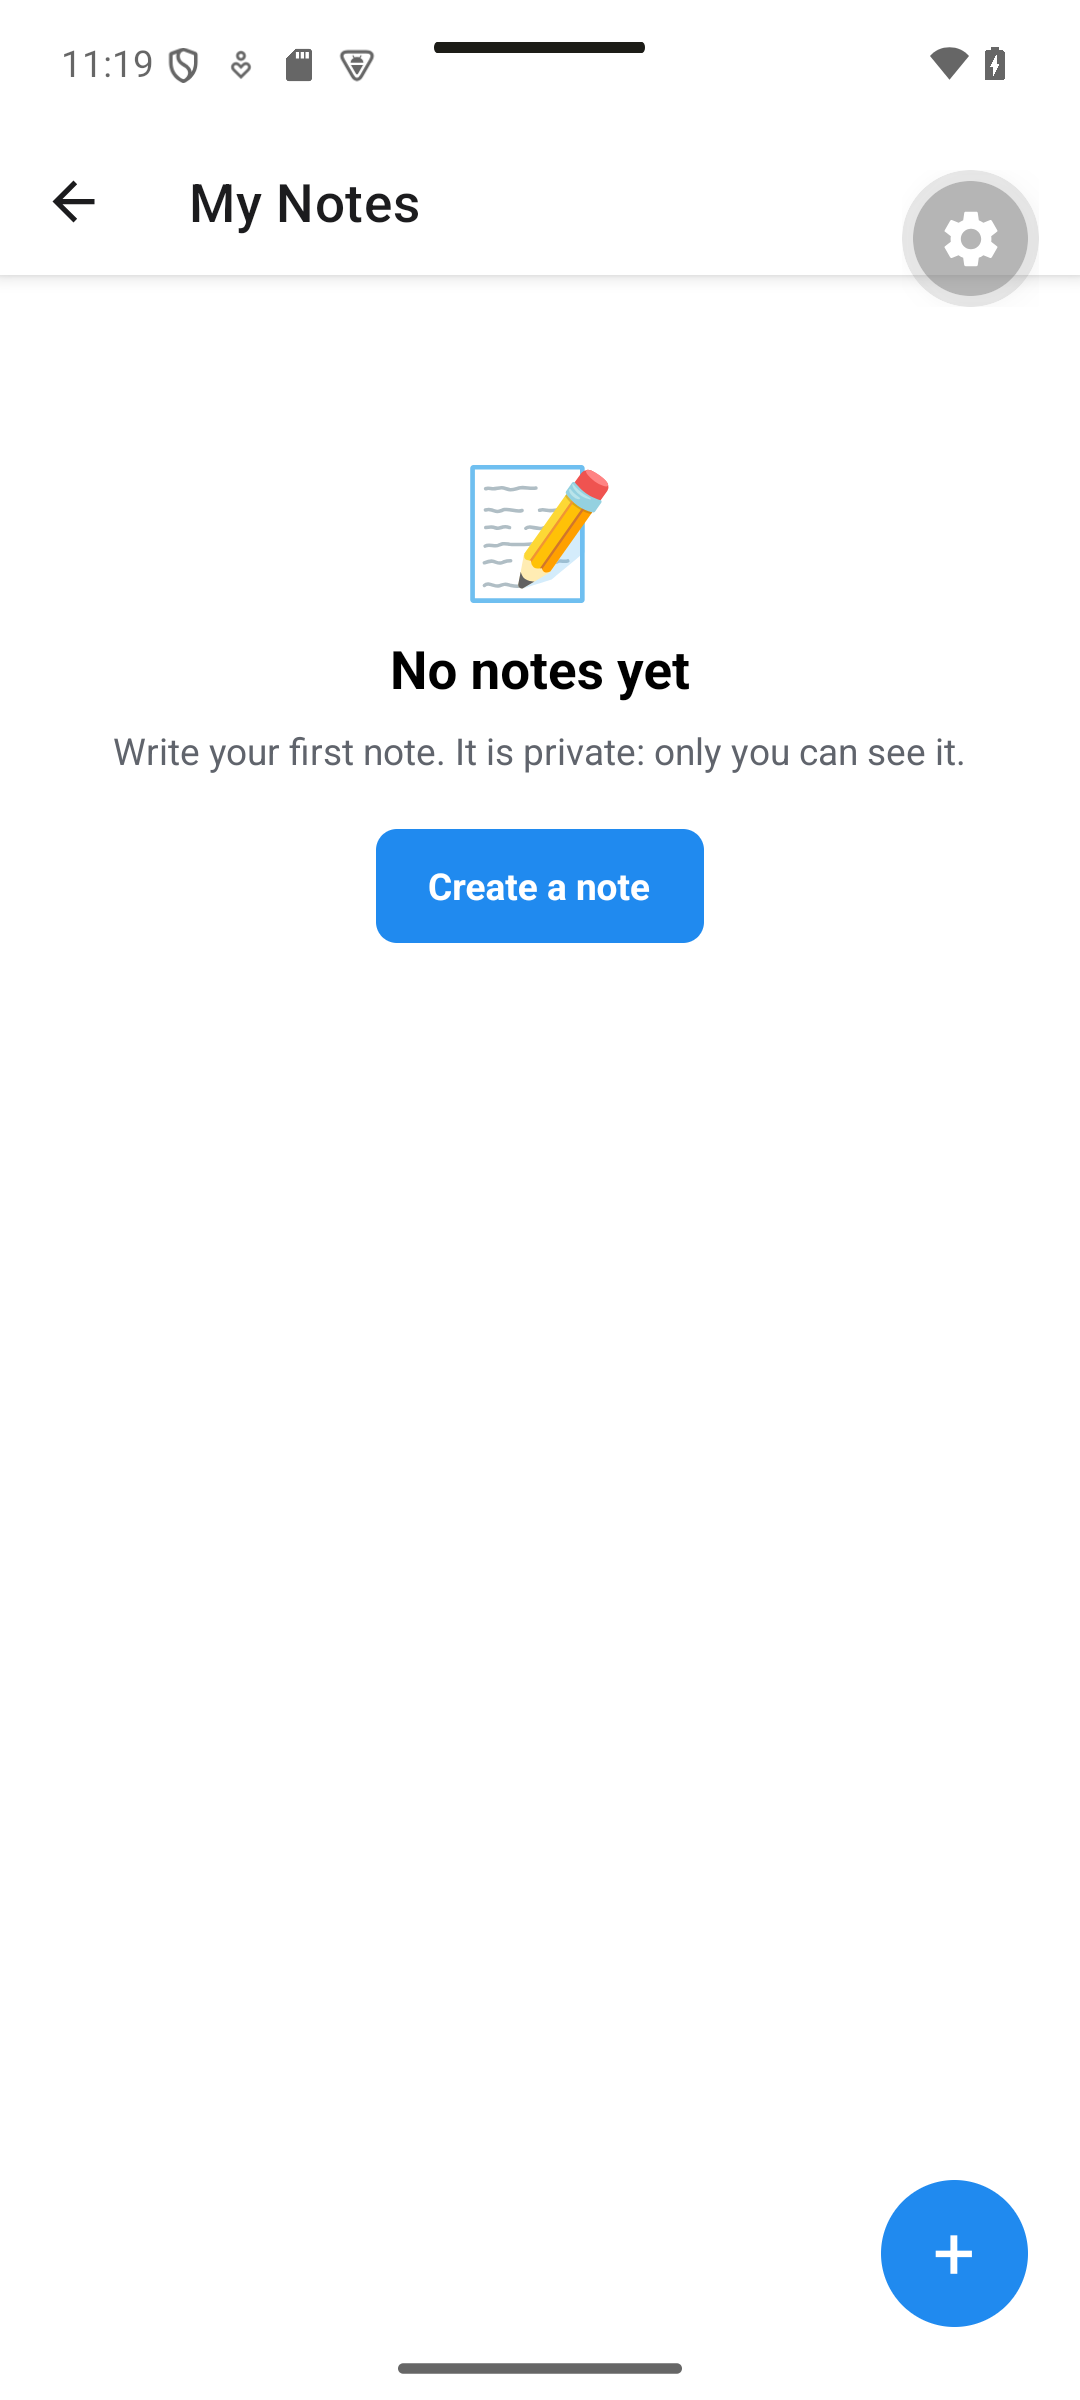
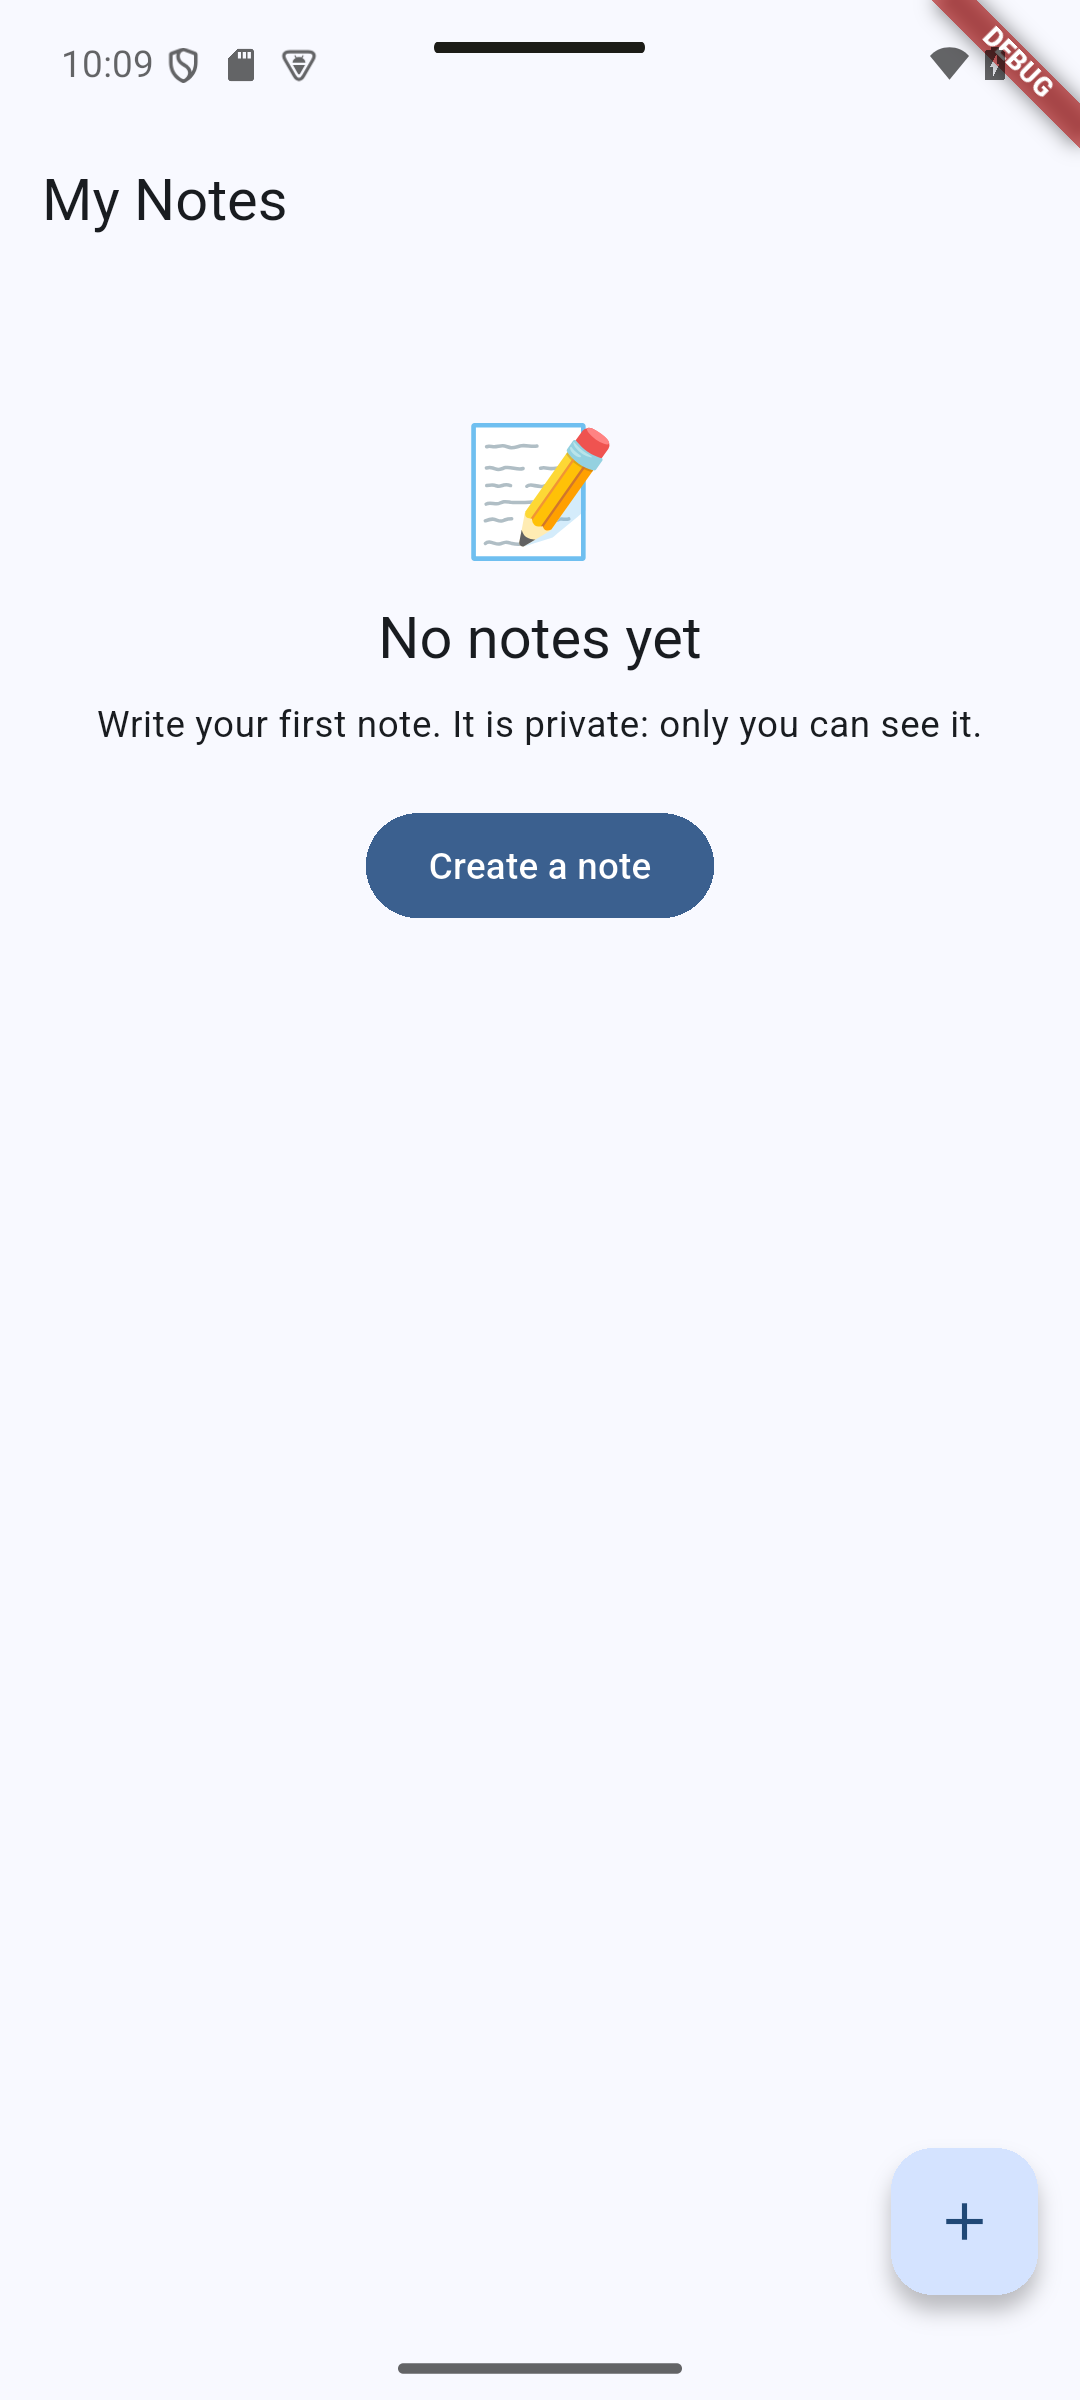
Expected result. A newly registered account has no notes and sees Create a note.
| React Native · Android | Flutter · Android |
|---|---|
|
|
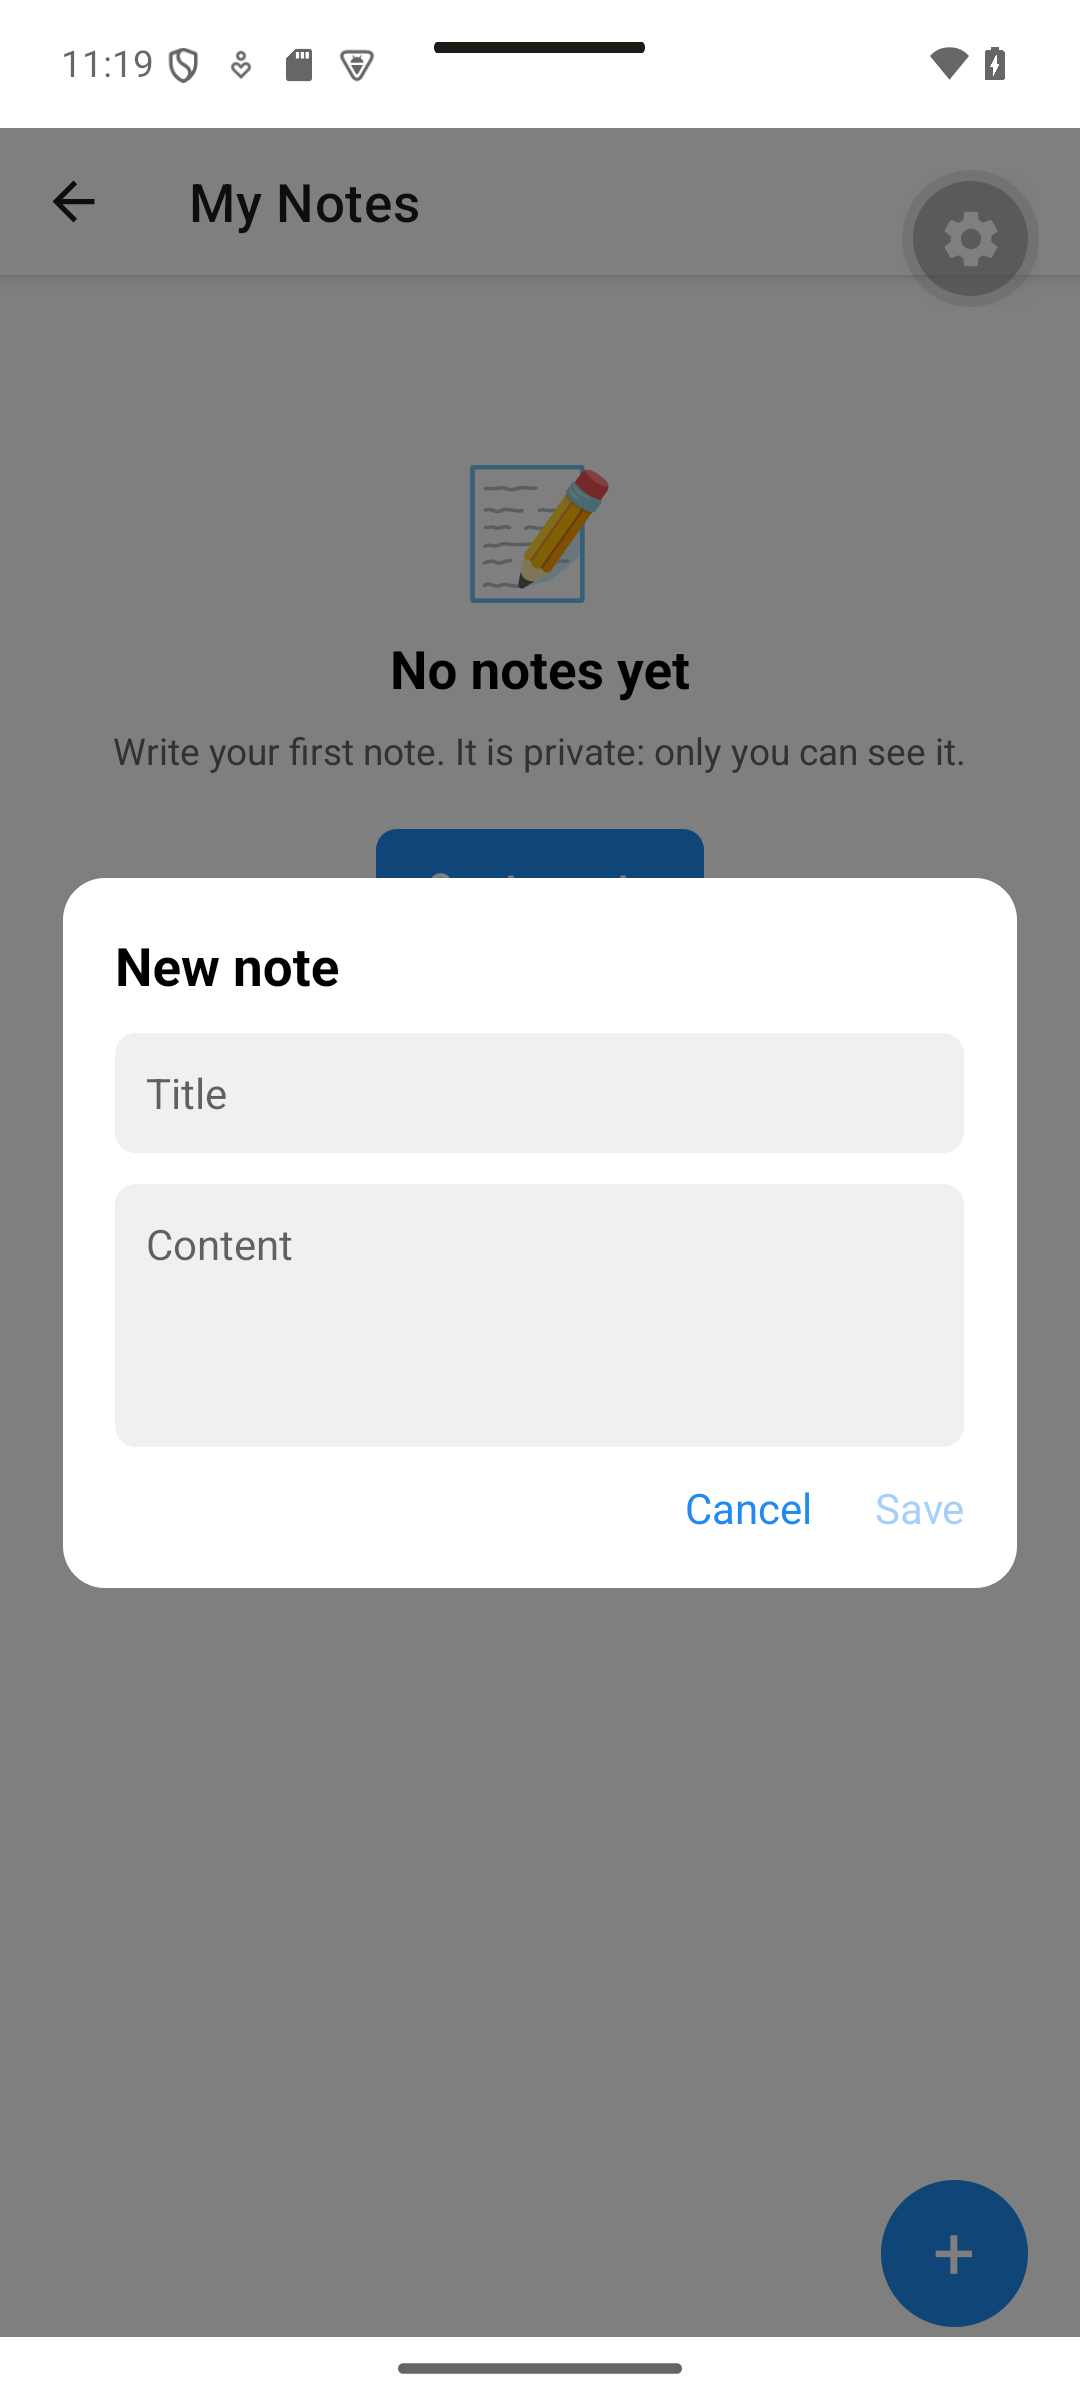
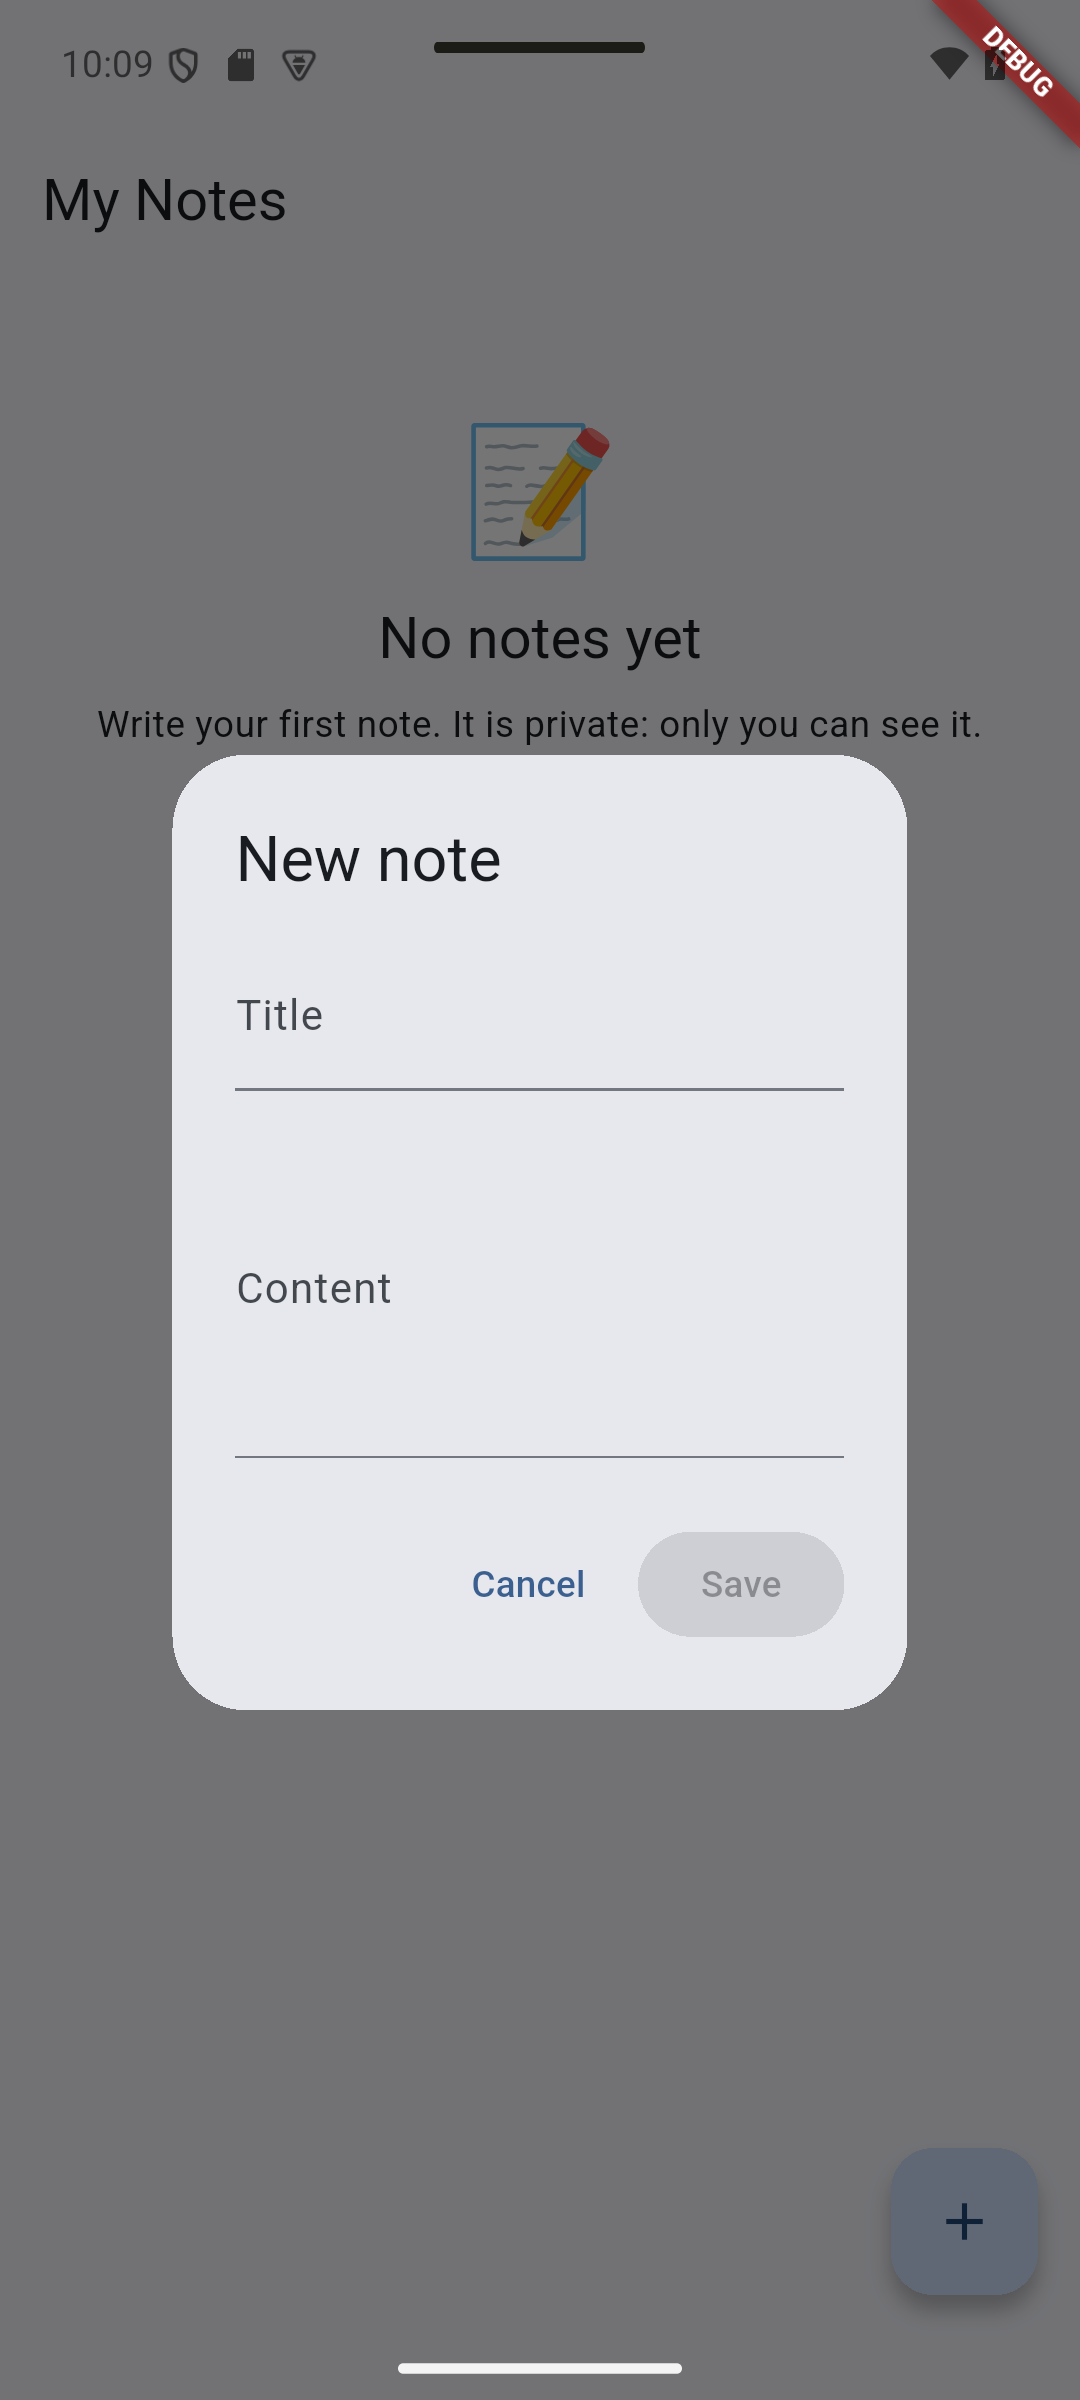
Create a note opens the same creation form from the empty state.
| React Native · Android | Flutter · Android |
|---|---|
|
|
Concepts in this section:
- An empty state is the screen a new user sees before having any data. Showing a blank list is confusing; a message and a call to action guide the user.
- Empty is not an error: it is a normal state, designed on purpose.
Visual guide. Compare the message and next action in each state, especially Empty and Error.
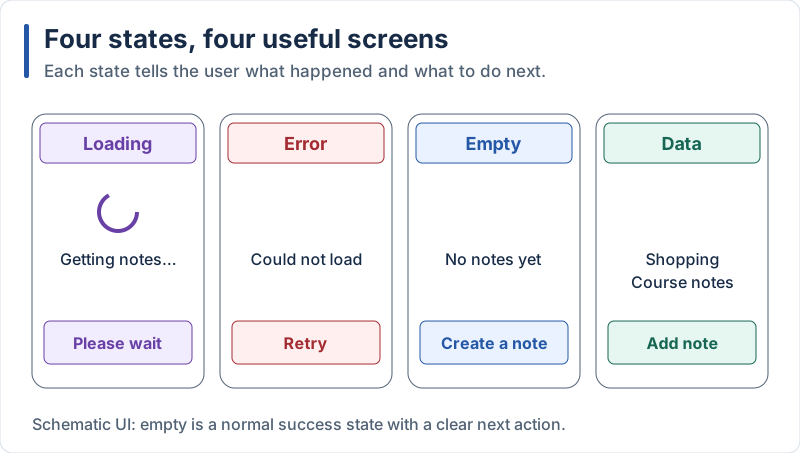
These wireframes explain behavior; styling remains framework-specific.
React Native
// src/components/EmptyState.tsx
import { Pressable, StyleSheet, Text, View } from 'react-native';

type Props = { onCreate: () => void };

export function EmptyState({ onCreate }: Props) {
  return (
    <View style={styles.container}>
      <Text style={styles.emoji}>📝</Text>
      <Text style={styles.title}>No notes yet</Text>
      <Text style={styles.text}>Write your first note. It is private: only you can see it.</Text>
      <Pressable style={styles.button} onPress={onCreate}>
        <Text style={styles.buttonText}>Create a note</Text>
      </Pressable>
    </View>
  );
}

const styles = StyleSheet.create({
  container: { alignItems: 'center', gap: 8, paddingVertical: 48, paddingHorizontal: 24 },
  emoji: { fontSize: 48 },
  title: { fontSize: 20, fontWeight: 'bold' },
  text: { color: '#60646c', textAlign: 'center' },
  button: { marginTop: 12, backgroundColor: '#208AEF', borderRadius: 8, paddingVertical: 12, paddingHorizontal: 20 },
  buttonText: { color: '#fff', fontWeight: 'bold' },
});
Use it in src/app/notes.tsx:
// src/app/notes.tsx (excerpt)
import { EmptyState } from '../components/EmptyState';

<FlatList
  // ...
  ListEmptyComponent={<EmptyState onCreate={() => setEditing('new')} />}
/>
Flutter
// lib/widgets/empty_state.dart
import 'package:flutter/material.dart';

class EmptyState extends StatelessWidget {
  const EmptyState({super.key, required this.onCreate});

  final VoidCallback onCreate;

  @override
  Widget build(BuildContext context) {
    final textTheme = Theme.of(context).textTheme;
    return Padding(
      padding: const EdgeInsets.symmetric(vertical: 48, horizontal: 24),
      child: Column(
        mainAxisSize: MainAxisSize.min,
        spacing: 8,
        children: [
          const Text('📝', style: TextStyle(fontSize: 48)),
          Text('No notes yet', style: textTheme.titleLarge),
          const Text(
            'Write your first note. It is private: only you can see it.',
            textAlign: TextAlign.center,
          ),
          const SizedBox(height: 4),
          FilledButton(onPressed: onCreate, child: const Text('Create a note')),
        ],
      ),
    );
  }
}
Use it in lib/screens/notes_screen.dart (replace the ListView(children: const [...]) shown when the list is empty):
// lib/screens/notes_screen.dart (excerpt)
import '../widgets/empty_state.dart';

child: _notes.isEmpty
    ? ListView(children: [EmptyState(onCreate: _add)])
    : ListView.builder(/* ... */),
Explanation:
- The component receives a callback (
onCreate): it does not know how to create a note, which keeps it reusable - On Flutter the list stays a
ListVieweven when empty so that pull-to-refresh keeps working - The same pattern (loading / error / empty / data) applies to every list in every app
10. Building and Publishing
Expected result. The app captures demonstrate Android development builds. Distribution steps below have different outputs and are identified separately; no store publication is implied.
10.1 Understanding App Releases
Expected result. A release produces a signed artifact, not a new application screen. Use the signing diagram below to distinguish local testing from store distribution.
Concepts in this section:
- Debug vs release build: a release build is optimized, has no development tools and is signed with your private key
- Signing: proves the app comes from you; the stores refuse unsigned apps and a lost key means you cannot update the app
- Android formats: APK (installable file, good for testing) and AAB (Android App Bundle, required by Google Play)
- Version numbers: a human version (
1.0.0) and a build number that must increase with every upload - Stores: Google Play (one-time fee) and App Store (yearly fee, needs a Mac for Flutter or a cloud build for Expo); both review your app
- Configuration per environment: the release app needs the same Appwrite settings as in development, and your app id must be registered as a platform in Appwrite
Visual guide. Follow the Android bundle from upload signing to the package installed on a device.
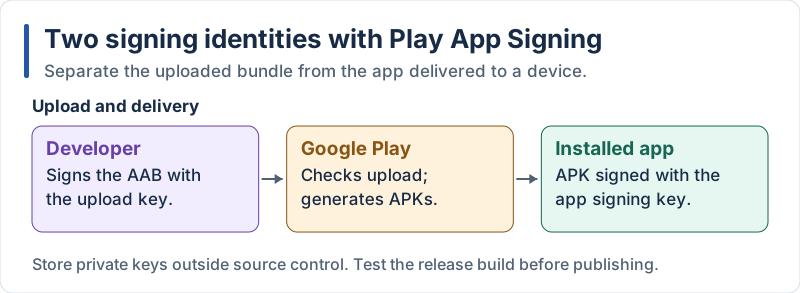
This figure describes Play App Signing; upload and app-signing keys have different roles.
Before building, choose the final application id and register it in Appwrite (Overview → Add platform). We use com.example.notesapp for the React Native app (same id on Android and iOS). Use your own reverse-domain name for a real app.
10.2 React Native with Expo EAS
Expected result. The React Native screens in this tutorial were run in Expo Go on Android. EAS cloud builds, AAB generation and store submission were not executed for these captures. The diagram below describes the expected pipeline rather than an observed EAS result.
Visual guide. Choose the platform lane, then distinguish a test artifact from a store submission.
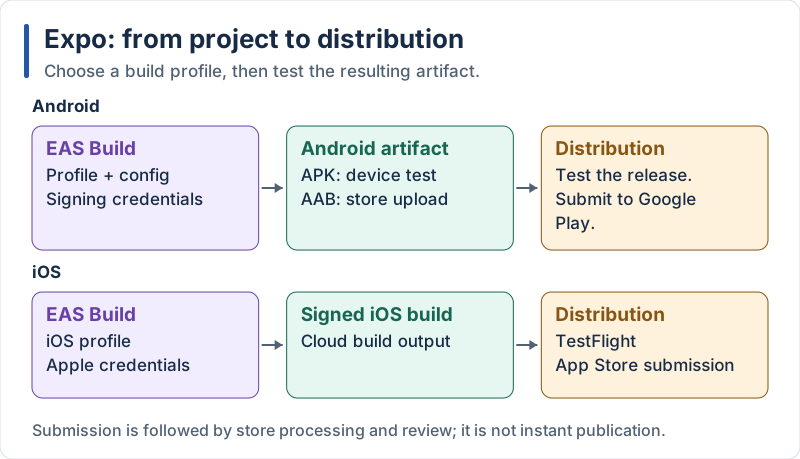
EAS builds the artifact; submission and store review are later steps.
EAS (Expo Application Services) builds your app in the cloud, so you can produce an Android build from Windows and an iOS build without a Mac.
Step 1 — Application id and metadata. Add these keys to app.json (do not replace the file):
{
  "expo": {
    "name": "Notes App",
    "slug": "notes-app",
    "version": "1.0.0",
    "ios": { "bundleIdentifier": "com.example.notesapp" },
    "android": { "package": "com.example.notesapp" }
  }
}
Step 2 — Log in and configure.
npx eas-cli@latest login
npx eas-cli@latest build:configure
build:configure creates eas.json with build profiles. Make it look like this:
{
  "cli": { "appVersionSource": "remote" },
  "build": {
    "development": {
      "developmentClient": true,
      "distribution": "internal",
      "environment": "development"
    },
    "preview": {
      "distribution": "internal",
      "android": { "buildType": "apk" },
      "environment": "preview"
    },
    "production": {
      "autoIncrement": true,
      "environment": "production"
    }
  },
  "submit": { "production": {} }
}
Explanation of the profiles:
development: a custom development client (Expo Go replacement) with dev toolspreview: a release build you install directly (an APK on Android) to test with real usersproduction: the store build (an AAB on Android);autoIncrementraises the build number for youenvironmentselects which EAS environment variables are injected in that build
Step 3 — Environment variables. The local .env file is not uploaded to EAS, so the cloud build would have no Appwrite settings. Create a file .env.build with the values for builds (note the platform id, which is now your own app id):
# .env.build
EXPO_PUBLIC_APPWRITE_ENDPOINT=https://<REGION>.cloud.appwrite.io/v1
EXPO_PUBLIC_APPWRITE_PROJECT_ID=your_project_id
EXPO_PUBLIC_APPWRITE_PLATFORM=com.example.notesapp
EXPO_PUBLIC_APPWRITE_DATABASE_ID=your_database_id
EXPO_PUBLIC_APPWRITE_TABLE_ID=your_table_id
and push it to the EAS environments:
npx eas-cli@latest env:push preview --path .env.build
npx eas-cli@latest env:push production --path .env.build
A single variable can also be set with eas env:set --name NAME --value VALUE --environment preview --visibility plaintext. As in section 6.3, these values end up inside the app: they are identifiers, never secrets.
Step 4 — Build.
# Installable APK for testing
npx eas-cli@latest build --platform android --profile preview

# Store builds
npx eas-cli@latest build --platform android --profile production
npx eas-cli@latest build --platform ios --profile production
The command uploads the project, builds it in the cloud and gives a link/QR code to download the result (follow it on https://expo.dev). EAS creates and stores the signing credentials for you the first time. iOS builds require a paid Apple Developer account.
Step 5 — Submit to the stores.
npx eas-cli@latest submit --platform android
npx eas-cli@latest submit --platform ios
For Google Play, create the app in the Play Console and upload the first build manually once; later versions can then be submitted with eas submit. For the App Store, create the app record in App Store Connect first.
Over-the-air updates (optional): expo-updates lets you ship JavaScript-only fixes without a new store review.
10.3 Flutter on Android
Expected result. A real local Flutter build produced an Android x64 release-mode APK.
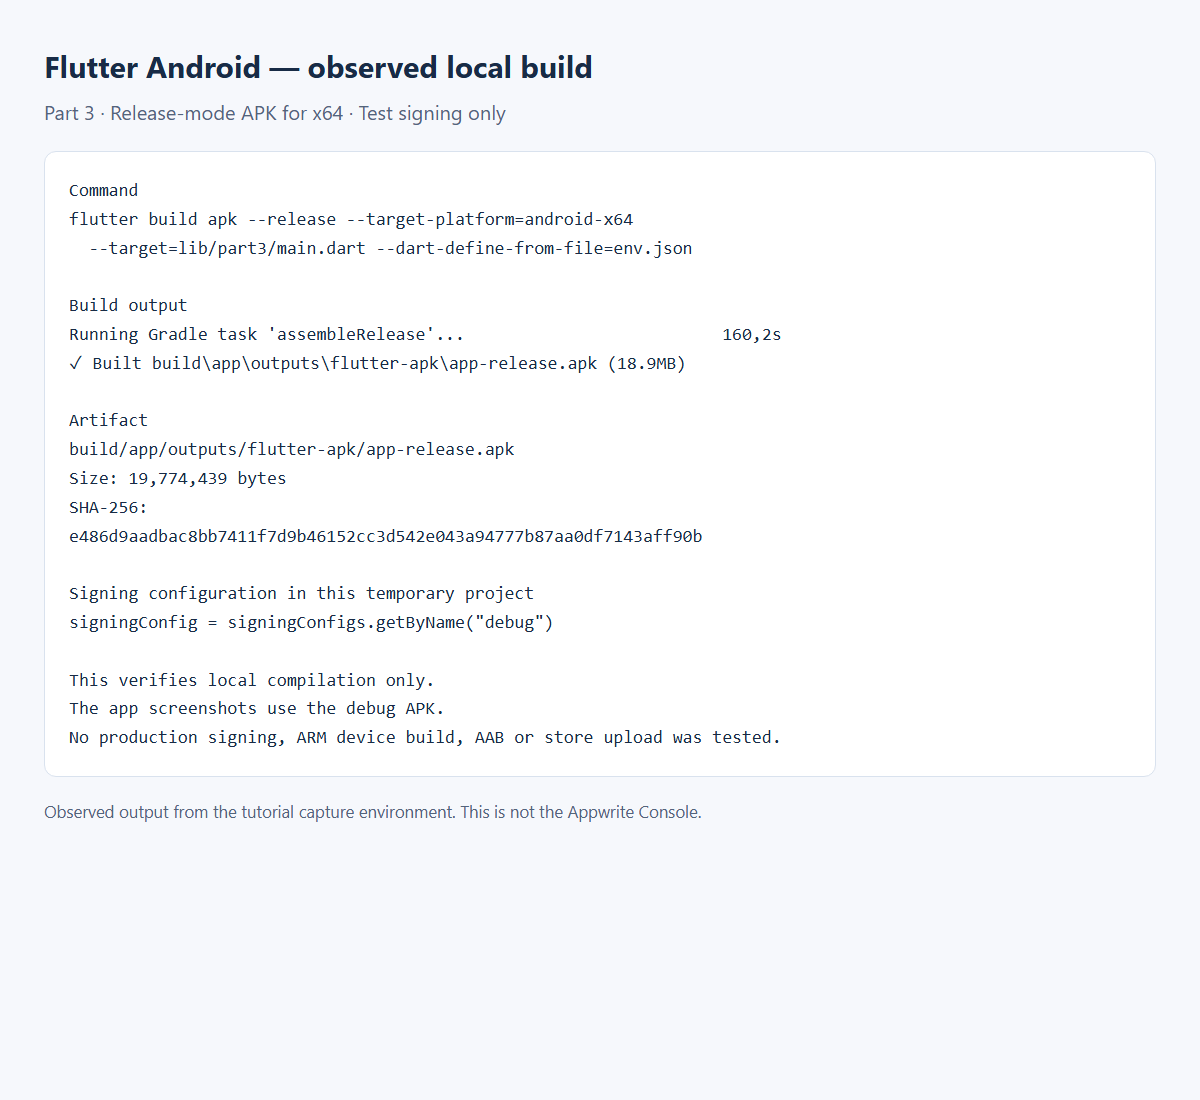
This temporary project uses the debug signing key even for this release-mode build. The app screenshots use the installed debug APK. Production signing, an ARM build, an AAB and Play Store submission were not verified; the report records the exact command and artifact.
Visual guide. Follow the Android lane here; section 10.4 uses the iOS lane of the same diagram.
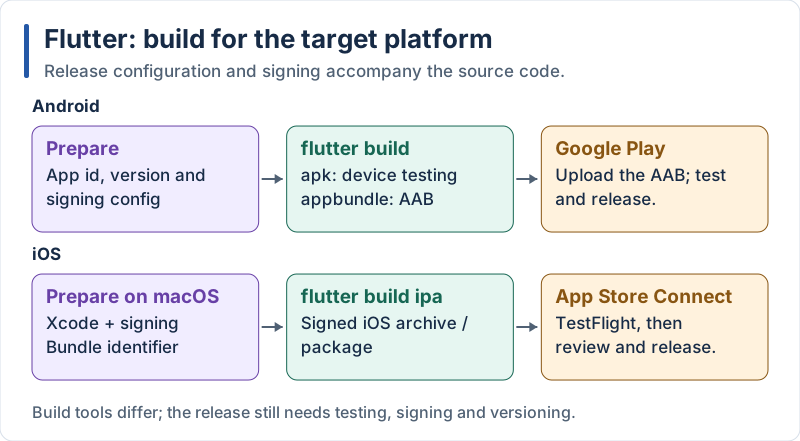
APK is for installation tests; AAB is uploaded to Google Play.
Step 1 — Application id. flutter create notes_app generated com.example.notes_app. Change it before publishing (in android/app/build.gradle.kts: namespace and applicationId) and register the final id in Appwrite.
Step 2 — Create an upload keystore (keep it safe and never commit it). On Windows PowerShell:
keytool -genkey -v -keystore $env:USERPROFILE\upload-keystore.jks `
        -storetype JKS -keyalg RSA -keysize 2048 -validity 10000 `
        -alias upload
On macOS/Linux:
keytool -genkey -v -keystore ~/upload-keystore.jks -keyalg RSA \
        -storetype JKS -keysize 2048 -validity 10000 -alias upload
Step 3 — Reference it from android/key.properties (add this file to .gitignore):
storePassword=<password>
keyPassword=<password>
keyAlias=upload
storeFile=C:\\Users\\<you>\\upload-keystore.jks
Step 4 — Use it in android/app/build.gradle.kts:
import java.io.FileInputStream
import java.util.Properties

val keystoreProperties = Properties()
val keystorePropertiesFile = rootProject.file("key.properties")
if (keystorePropertiesFile.exists()) {
    keystoreProperties.load(FileInputStream(keystorePropertiesFile))
}

android {
    // ...existing configuration...

    signingConfigs {
        create("release") {
            keyAlias = keystoreProperties.getProperty("keyAlias")
            keyPassword = keystoreProperties.getProperty("keyPassword")
            storeFile = keystoreProperties.getProperty("storeFile")?.let { file(it) }
            storePassword = keystoreProperties.getProperty("storePassword")
        }
    }
    buildTypes {
        release {
            signingConfig = signingConfigs.getByName("release")
        }
    }
}
Step 5 — Set the version in pubspec.yaml (1.0.0+1: version name 1.0.0, build number 1; increase the build number for each upload).
Step 6 — Build, passing the Appwrite settings:
flutter clean

# Installable APK for testing (one file per CPU architecture)
flutter build apk --split-per-abi --dart-define-from-file=env.json

# Bundle for Google Play
flutter build appbundle --dart-define-from-file=env.json
Results: build/app/outputs/flutter-apk/app-arm64-v8a-release.apk and build/app/outputs/bundle/release/app.aab. Upload the .aab in the Google Play Console (Production or Internal testing track).
Explanation:
- Without
--dart-define-from-file, the release app would start with empty Appwrite settings (andAppConfig.validate()would stop it with a clear message) --split-per-abiproduces smaller APKs, one per processor type; modern phones usearm64-v8a- In Flutter you manage the keystore yourself; in Expo, EAS manages it for you
10.4 Flutter on iOS
Expected result. No iOS capture or archive was produced in this Android-only run. The existing diagram shows the expected IPA/archive path; this section requires macOS, Xcode and the appropriate signing setup.
Visual guide. Follow the iOS lane in the Flutter release diagram: macOS/Xcode setup → signed IPA → TestFlight and App Store review.
An iOS build needs a Mac with Xcode and a paid Apple Developer Program membership (Flutter cannot build iOS on Windows or Linux; use EAS for React Native or a cloud CI service for Flutter).
-
Register the Bundle ID in your Apple Developer account (Certificates, Identifiers & Profiles → Identifiers, explicit App ID) and register the same id as an Apple platform in Appwrite.
-
Create the app record in App Store Connect (Apps → + → New App), selecting that Bundle ID.
-
Configure the project: run
open ios/Runner.xcworkspace. In Runner → General check the display name and bundle identifier; in Signing & Capabilities enable Automatically manage signing and choose your Team. -
Set icons and launch screen in
ios/Runner/Assets.xcassets. -
Set the version in
pubspec.yaml(version: 1.0.0+1), or pass--build-nameand--build-numberto the build command. -
Build the archive:
flutter build ipa --dart-define-from-file=env.jsonThe result is in
build/ios/ipa/. -
Upload it to App Store Connect with the Transporter app (drag and drop the
.ipa), or from Xcode by openingbuild/ios/archive/Runner.xcarchiveand choosing Validate App then Distribute App. -
Test with TestFlight (App Store Connect → TestFlight → internal testing), then complete the store listing and click Submit for Review.
11. Summary and Comparison
Expected result. Review the local list in Part 1, the Appwrite CRUD captures in Part 2, and the authenticated private lists and empty state above. These are the visible milestones reached by the two Android apps.
Visual guide. Read across a responsibility to compare names; read down a framework to reconstruct its architecture.
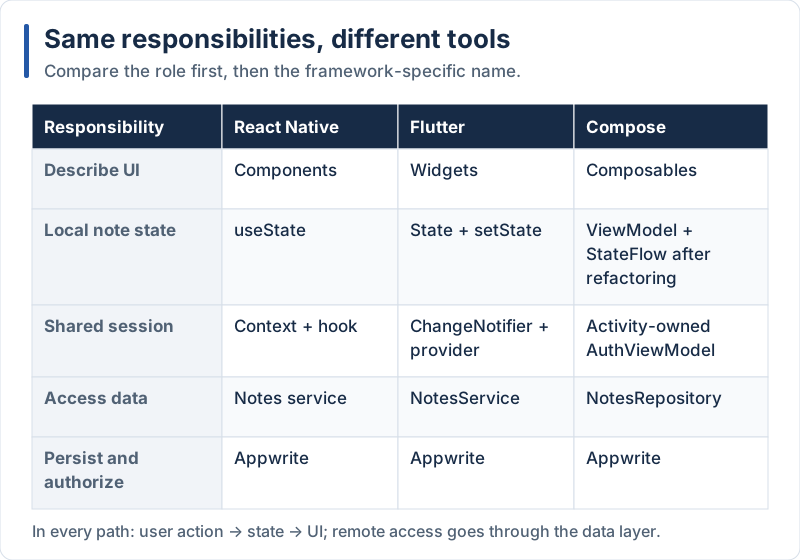
The note state and authentication state have different owners and scopes.
In three parts we built the same app twice:
- Part 1 — UI, layout, navigation, local state, reusable components
- Part 2 — remote data with Appwrite: service layer, configuration, loading/error states, CRUD
- Part 3 — authentication, global state, route guards, row permissions, empty state, release builds
React Native vs Flutter Comparison
Expected result. The paired screenshots in sections 7.4, 8.3 and 9 let you compare the actual controls, spacing and feedback of both implementations.
| Concept | React Native (Expo) | Flutter |
|---|---|---|
| Language | TypeScript | Dart |
| UI model | Components (JSX) rendered with native views (Fabric) | Widgets drawn by the Impeller engine |
| Navigation | Expo Router (files = routes, Stack.Protected) |
go_router (GoRoute, redirect, refreshListenable) |
| Local state | useState, useReducer |
StatefulWidget + setState |
| Global state | Context + custom hook (useAuth) |
ChangeNotifier + provider (context.watch / read) |
| Backend SDK | react-native-appwrite |
appwrite (Dart) |
| Configuration | EXPO_PUBLIC_* in .env |
--dart-define-from-file=env.json |
| Route protection | Declarative guard per screen group | One redirect function for the whole router |
| Android build | eas build (cloud, APK/AAB, managed signing) |
flutter build apk / appbundle (local, your keystore) |
| iOS build | eas build (cloud, no Mac needed) |
flutter build ipa (needs a Mac and Xcode) |
| Store submission | eas submit |
Play Console / Transporter / Xcode |
| Quick updates | Over-the-air JS updates (expo-updates) |
New store release |
| Testing in development | Expo Go / development build | flutter run, hot reload |
What you should remember
Expected result. Use the captured milestones as a checklist: create/edit/delete a remote note, sign in/out, restore a session, verify account isolation, and create a first note from the empty state.
- Separate concerns: screens → state → services → backend. The same layering worked in both frameworks.
- Treat every remote call as fallible: loading, error, empty and success states.
- Security lives on the server. Hiding screens or filtering in the app is a convenience; permissions are the protection.
- Never ship secrets in a mobile app. Everything inside the app can be read.
- Releases are a process: application id, signing, version numbers, store accounts and review.
The next step of this course is to build the same Notes app with native Android development using Kotlin and Jetpack Compose, to compare cross-platform and native approaches.
By Wahid Hamdi