Angular, Express & MongoDB - Full Stack Development - Part III
Previous: Part I - Angular & Next.js · Part II - Express, PostgreSQL & Prisma
In this part you build a small full stack application, “Appareils” (home appliances manager): an Angular + Bootstrap front-end, a Node.js/Express REST API and a MongoDB database (NoSQL) accessed with Mongoose. It revisits what you saw in Parts I and II with another data model and another database, so you can compare them.
Learning objectives
- build an Angular application with Bootstrap: components, data binding, events, services, routing
- build an Express REST API on top of MongoDB with Mongoose
- connect the front-end and the back-end (HTTP client, CORS)
- compare a relational approach (PostgreSQL + Prisma, Part II) with a document approach (MongoDB + Mongoose)
Prerequisites: Part I (Angular basics, routing, HTTP) and Part II (REST, Express). Docker Desktop (or a free MongoDB Atlas account).
Relational vs document database
| PostgreSQL + Prisma (Part II) | MongoDB + Mongoose (Part III) | |
|---|---|---|
| Data | tables, rows, columns, foreign keys | collections of JSON-like documents |
| Schema | strict, defined in schema.prisma, migrations |
flexible, defined in the application (Mongoose schema) |
| Identifier | id (integer) |
_id (ObjectId, a 24-character string) |
| Relations | joins, foreign keys | embedded documents or references |
| Good fit | structured data, relations, transactions | evolving structures, nested data, fast prototyping |
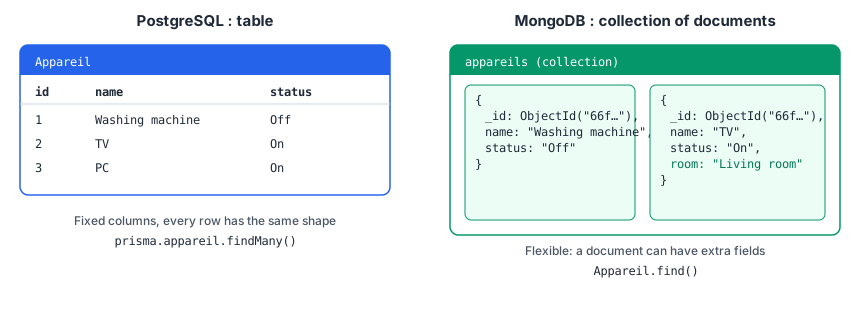
Figure 1 - Table row vs document
Versions used
Node.js 24 LTS, Angular 22, Bootstrap 5, Express 5, Mongoose 9, MongoDB 8 (check with npm view <package> version).
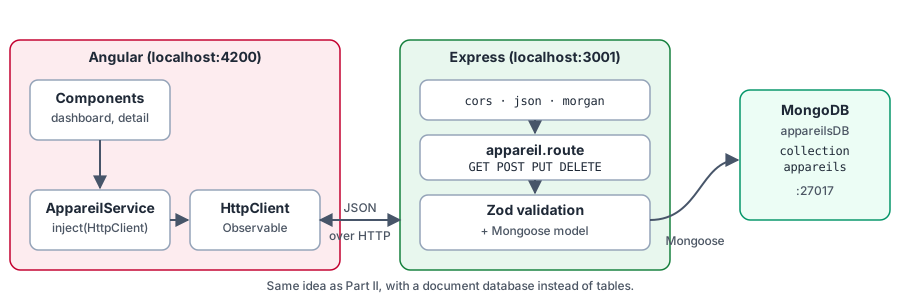
Figure 2 - Architecture: Angular, Express, MongoDB
Final layout
appareils-tp/
├── front/                # Angular
├── api/                  # Express + Mongoose
└── docker-compose.yml    # MongoDB (and later the API)
Part A: Frontend (Angular)
A.1 Create the project and add Bootstrap
mkdir appareils-tp
cd appareils-tp
npx @angular/cli@latest new front
cd front
ng serve- Replace the content of
src/app/app.htmlwith<router-outlet />for now (we will build the page step by step). - Install Bootstrap as the CSS library:
npm install bootstrap- Tell Angular to include it: in
angular.json, add this line to thestylesarray of thebuildtarget (notscripts, this is a stylesheet):
"node_modules/bootstrap/dist/css/bootstrap.min.css"
angular.jsonis read at startup: stop and restartng serveafter changing it.
- Check that Bootstrap works by adding a button in
app.html:
<button class="btn btn-warning">Back</button>- Prepare a responsive layout (Bootstrap grid: 12 columns,
col-6= half the width):
<div class="container">
  <div class="row">
    <div class="col-6"></div>
  </div>
</div>
A.2 First components
- Create a component
premier:
ng generate component premierLook at the new folder src/app/premier/: the CLI created the component class (premier.ts), its template (premier.html), its style (premier.css) and a test file (premier.spec.ts).
- Write some content in
premier.html, then use it inapp.htmlthrough its selector. A standalone component must also be listed in theimportsarray of the component that uses it (App):
<app-premier />// app.ts
import { Premier } from './premier/premier';
@Component({
selector: 'app-root',
imports: [RouterOutlet, Premier],
...
})- Create a component
appareil. Inapp.html, add aullist; theligoes intoappareil.html(one component = one appliance).
A.3 Dynamic data
String interpolation
- Add the properties
nameandstatusto theAppareilcomponent and display them:
// appareil.ts
export class Appareil {
  name = 'Washing machine';
  status = 'Off';

  getStatus() {
    return this.status;
  }
}
<!-- appareil.html -->
{{ name }} - {{ getStatus() }}- Add a button Switch on for each list item.
- Add a button Switch on all in the main component
App. - Disable the button Switch on all (
[disabled]="!allowed"), then enable it 4 seconds after the page loads withsetTimeout():
export class App {
  allowed = false;

  constructor() {
    setTimeout(() => (this.allowed = true), 4000);
  }

  onSwitchOnAll() {
    console.log('All appliances switched on');
  }
}<button class="btn btn-success" [disabled]="!allowed" (click)="onSwitchOnAll()">Switch on all</button>(click) is an event binding, [disabled] a property binding.
Passing a list to child components
- Add a list of appliances in
App. Note the property names:nameandstatuseverywhere (be consistent, a typo such asstatutbreaks the display):
appareilList = [
  { name: 'Washing machine', status: 'Off' },
  { name: 'TV', status: 'On' },
  { name: 'Air conditioner', status: 'Off' },
  { name: 'PC', status: 'On' },
  { name: 'Microwave', status: 'Off' },
  { name: 'Oven', status: 'On' },
  { name: 'Vacuum cleaner', status: 'Off' },
];- The
Appareilcomponent receives its data from its parent. Useinput()(as in Part I):
import { Component, input } from '@angular/core';

export class Appareil {
  appareilName = input.required<string>();
  appareilStatus = input.required<string>();
}
<!-- appareil.html -->
<li>{{ appareilName() }} - {{ appareilStatus() }}</li>- Display the list dynamically with
@for:
<!-- app.html -->
<ul>
  @for (a of appareilList; track a.name) {
    <app-appareil [appareilName]="a.name" [appareilStatus]="a.status" />
  }
</ul>
Styling: navbar and cards
- Add a dark blue Bootstrap navbar (
navbar navbar-dark bg-primary, see the Bootstrap documentation). - Put each list item in a Bootstrap Card (
card,card-body).
Two-way binding
- In the
Appareilcomponent, add an input bound with[(ngModel)](two-way binding). ImportFormsModulein theimportsarray of the component. Sinceinput()values are read-only, use a local copy in amodel()/property:
import { Component, input, model } from '@angular/core';
import { FormsModule } from '@angular/forms';

@Component({
  selector: 'app-appareil',
  imports: [FormsModule],
  templateUrl: './appareil.html',
})
export class Appareil {
  appareilName = model.required<string>();   // model() = input + output, allows [(...)]
  appareilStatus = input.required<string>();
}<input type="text" class="form-control" [(ngModel)]="appareilName" />- Show the appliance in green if it is on and red if it is off with class bindings:
<li [class.text-success]="appareilStatus() === 'On'" [class.text-danger]="appareilStatus() === 'Off'">
  {{ appareilName() }} - {{ appareilStatus() }}
</li>([ngClass]="{ 'text-success': … }" does the same; import NgClass if you use it.)
A.4 A service to share data
A service centralizes code and data used by several parts of the application (or by the whole application). To be used, a service must be injected.
- Create the service:
ng g service services/appareil- Move the appliances list into the service and add methods to change the status:
import { Injectable } from '@angular/core';

@Injectable({ providedIn: 'root' })
export class AppareilService {
  appareilList = [
    { name: 'Washing machine', status: 'Off' },
    { name: 'TV', status: 'On' },
    // ...
  ];

  switchOnAll() {
    this.appareilList.forEach((a) => (a.status = 'On'));
  }

  switchOffAll() {
    this.appareilList.forEach((a) => (a.status = 'Off'));
  }

  switchOnOne(index: number) {
    this.appareilList[index].status = 'On';
  }

  switchOffOne(index: number) {
    this.appareilList[index].status = 'Off';
  }
}- Inject it in
Appwithinject(), and initialize the component list inngOnInit()(interfaceOnInit):
import { Component, OnInit, inject } from '@angular/core';

export class App implements OnInit {
  private appareilService = inject(AppareilService);
  appareilList: { name: string; status: string }[] = [];

  ngOnInit() {
    this.appareilList = this.appareilService.appareilList;
  }
}- Activate the buttons Switch on all and Switch off all. Ask for a confirmation before switching everything off:
onSwitchOffAll() {
  if (confirm('Are you sure you want to switch off all your appliances?')) {
    this.appareilService.switchOffAll();
  }
}- Activate the buttons Switch on / Switch off of each appliance with a method
onSwitch. Use the index provided by@for(@for (a of appareilList; track a.name; let i = $index)) to target the right appliance, and callswitchOnOne(i)/switchOffOne(i)in the service.
Checkpoint: the list is displayed with colors, each button works, “Switch off all” asks for confirmation.
A.5 Routing
- Create a component
authentif(login page, a simple message for now) and a componentappareil-dashboard(it will contain the appliances list, to better organize the components). Also createwelcomeandcontactcomponents. - Add the menus Login and Appliances to the navbar.
- Declare the routes in
src/app/app.routes.ts:
import { Routes } from '@angular/router';

export const routes: Routes = [
  { path: 'home', component: Welcome },
  { path: 'appareils', component: AppareilDashboard },
  { path: 'contact', component: Contact },
  { path: 'login', component: Authentif },
  { path: '', redirectTo: 'home', pathMatch: 'full' },
  { path: '**', redirectTo: 'home' },
];
The
pathis the string after the/in the URL: the second route matcheslocalhost:4200/appareils. Order matters: the first matching route wins, so the wildcard**must be last.
- Make sure
app.htmlcontains<router-outlet />(the place where the routed component is displayed) and thatRouterOutletandRouterLinkare imported inApp. - Use
routerLinkin the navbar:
<a class="nav-link" routerLink="/appareils">Appliances</a>- Add a component
appareil-detailthat displays the details of one appliance when clicking a Detail button (to add) on each list item. Use a route with a parameter ({ path: 'appareils/:id', component: AppareilDetail }) andActivatedRouteas in Part I.
Part B: Backend (Node.js, Express and MongoDB)
What are Node.js, Express and MongoDB?
Node.js is the runtime that lets you write server-side tasks in JavaScript: business logic, data persistence, security. It also offers features the browser does not have, such as access to the local file system.
Express is a framework built on Node.js that makes creating and managing servers easier.
MongoDB is a NoSQL database. Data is stored as collections of individual documents described in JSON. Its main advantages are scalability and flexibility.
Mongoose is a library that lets you describe the shape of your documents (a schema) and query MongoDB from Node.js with a friendly API (
Model.find(),save(), …).
B.1 A minimal Node.js server
- At the root of the project (
appareils-tp), create the folderapiand initialize it (ES modules + TypeScript, as in Part II):
mkdir api
cd api
npm init -y
npm install express cors morgan zod dotenv mongoose
npm install -D typescript tsx @types/node @types/express @types/cors @types/morgan
Add "type": "module" to package.json with these scripts, and reuse the tsconfig.json of Part II, section 3:
"scripts": {
  "dev": "tsx watch src/server.ts",
  "build": "tsc",
  "start": "node dist/server.js"
}
tsx watchrestarts the server whenever you save a file. It replaces the globalnodemontool used in older tutorials (no morenpm install -g).
- First, let us see what Node does alone, without Express. Create
src/plain.ts:
import http from "node:http";

const server = http.createServer((req, res) => {
  res.end("Hello everyone!");
});

server.listen(process.env.PORT || 3001, () => {
  console.log("Server listening on port 3001...");
});
You import Node’s native HTTP module and create a server by passing a function that runs on every request. The function receives the req (request) and res (response) objects; res.end() sends a string back. Run it with npx tsx src/plain.ts and open http://localhost:3001 (or send a request with Postman / the VS Code REST Client). The server answers the same thing to any URL and any HTTP verb.
B.2 Express
Writing servers with plain Node is possible but long: each incoming request must be analysed by hand. Express does it for you. Create src/app.ts (you can delete plain.ts):
import express from "express";
import cors from "cors";
import morgan from "morgan";

export const app = express();

app.use(morgan("dev"));
app.use(cors({ origin: "http://localhost:4200" }));
app.use(express.json());            // without this, req.body is undefined on POST / PUT

app.get("/api/health", (_req, res) => {
  res.json({ status: "ok" });
});src/server.ts:
import "dotenv/config";
import { app } from "./app.js";

const port = Number(process.env.PORT ?? 3001);
app.listen(port, () => console.log(`Server listening on port ${port}...`));
Run npm run dev and check http://localhost:3001/api/health.
B.3 Serve the Angular application (optional)
Express can also deliver the built Angular site, so one server serves both the site and the API (useful in production).
- Build Angular into the API folder. From the
frontfolder:
ng build --output-path ../api/publicAngular puts the files in a browser subfolder: api/public/browser.
- In
src/app.ts, serve them after the API routes. The paths are relative to the file (with ES modules useimport.meta.dirname):
import path from "node:path";

const publicDir = path.join(import.meta.dirname, "../public/browser");

app.use(express.static(publicDir));
// any other URL -> index.html, so a browser refresh on /appareils still works
app.get("/{*splat}", (_req, res) => {
  res.sendFile(path.join(publicDir, "index.html"));
});
express.static(path)exposes the files of a folder. A wrong relative path is the most common reason for aCannot GET /message. In Express 5 a catch-all route is written/{*splat}.
B.4 A first route with an in-memory list
Create src/routes/appareil.route.ts:
import { Router } from "express";

export const appareilRouter = Router();

const appareilList = [
  { name: "Washing machine", status: "Off" },
  { name: "TV", status: "On" },
  { name: "Air conditioner", status: "Off" },
  { name: "PC", status: "On" },
  { name: "Vacuum cleaner", status: "Off" },
];

appareilRouter.get("/", (_req, res) => {
  res.status(200).json(appareilList);
});
Register it in src/app.ts (before the static files):
import { appareilRouter } from "./routes/appareil.route.js";

app.use("/api/appareils", appareilRouter);
Test http://localhost:3001/api/appareils.
B.5 MongoDB
You need a MongoDB server. Two options:
Option 1 (recommended): MongoDB with Docker. At the root of the project create docker-compose.yml:
services:
  mongo:
    image: mongo:8
    restart: unless-stopped
    ports:
      - "27017:27017"
    volumes:
      - mongodata:/data/db

volumes:
  mongodata:
docker compose up -d mongoConnection string: mongodb://localhost:27017/appareilsDB
Option 2: MongoDB Atlas (free cloud version, https://www.mongodb.com/atlas). Create an account and a free cluster, a database user, then in Network Access allow your IP address. Click Connect to copy the connection string, which looks like mongodb+srv://USER:[email protected]/appareilsDB?retryWrites=true&w=majority.
In both cases the database is named appareilsDB; Mongoose creates the collection appareils automatically when you save the first document.
Never write your connection string in the code (and never commit it to Git). Put it in
api/.envand add.envto.gitignore:MONGODB_URI="mongodb://localhost:27017/appareilsDB" PORT=3001
- Connect in
src/server.tsbefore starting the server:
import "dotenv/config";
import mongoose from "mongoose";
import { app } from "./app.js";

const port = Number(process.env.PORT ?? 3001);

try {
  await mongoose.connect(process.env.MONGODB_URI!);
  console.log("MongoDB connection successful!");
  app.listen(port, () => console.log(`Server listening on port ${port}...`));
} catch (error) {
  console.error("MongoDB connection failed!", error);
  process.exit(1);
}Checkpoint: the message MongoDB connection successful! is displayed in the terminal.
B.6 Model: the Mongoose schema
Create src/models/appareil.model.ts:
import mongoose from "mongoose";

const appareilSchema = new mongoose.Schema(
  {
    name: { type: String, required: true, trim: true },
    status: { type: String, enum: ["On", "Off"], required: true },
  },
  { timestamps: true }        // adds createdAt and updatedAt
);

export const Appareil = mongoose.model("Appareil", appareilSchema);
The schema describes the document fields, their types and constraints (required, enum). Note: here again the field is named status everywhere (API, model, Angular).
B.7 Validation with Zod
As in Part II, validate incoming data. Create src/schemas/appareil.ts:
import { z } from "zod";
import mongoose from "mongoose";

export const appareilBody = z.object({
  name: z.string().trim().min(1),
  status: z.enum(["On", "Off"]),
});

export const appareilPatch = appareilBody.partial();

export const idParam = z.object({
  id: z.string().refine((v) => mongoose.isValidObjectId(v), "Invalid id"),
});
Reuse the validate middleware from Part II, section 5 (src/middlewares/validate.ts).
B.8 CRUD routes
Replace src/routes/appareil.route.ts:
import { Router } from "express";
import { Appareil } from "../models/appareil.model.js";
import { validate } from "../middlewares/validate.js";
import { appareilBody, appareilPatch, idParam } from "../schemas/appareil.js";

export const appareilRouter = Router();

// READ all
appareilRouter.get("/", async (_req, res) => {
  res.status(200).json(await Appareil.find());
});

// READ one
appareilRouter.get("/:id", validate(idParam, "params"), async (_req, res) => {
  const appareil = await Appareil.findById(res.locals.params.id);
  if (!appareil) return res.status(404).json({ error: "Appareil not found" });
  res.status(200).json(appareil);
});

// CREATE
appareilRouter.post("/", validate(appareilBody), async (_req, res) => {
  const appareil = await Appareil.create(res.locals.body);
  res.status(201).json(appareil);
});

// UPDATE
appareilRouter.put("/:id", validate(idParam, "params"), validate(appareilBody), async (_req, res) => {
  const appareil = await Appareil.findByIdAndUpdate(res.locals.params.id, res.locals.body, {
    new: true,               // return the updated document
    runValidators: true,
  });
  if (!appareil) return res.status(404).json({ error: "Appareil not found" });
  res.status(200).json(appareil);
});

// DELETE
appareilRouter.delete("/:id", validate(idParam, "params"), async (_req, res) => {
  const result = await Appareil.deleteOne({ _id: res.locals.params.id });
  if (result.deletedCount === 0) return res.status(404).json({ error: "Appareil not found" });
  res.status(204).end();
});
Add a central error handler at the end of app.ts (Express 5 forwards errors thrown in async handlers automatically), as in Part II:
app.use((err: unknown, _req: express.Request, res: express.Response, _next: express.NextFunction) => {
  console.error(err);
  res.status(500).json({ error: "Internal server error" });
});
Compared to a
.then().catch()chain,async/awaitreads top to bottom. Status codes follow the REST table of Part II:201on creation,204on deletion,400invalid data,404unknown id.
- Test every route with a
requests.httpfile (or Postman): list, get by id, create, update, delete, invalid body (400), unknown id (404), malformed id (400).
Exercise: add a route PATCH /api/appareils/switch-all that sets the status of all appliances (Appareil.updateMany).
Part C: Connecting frontend and backend
C.1 Enable the HTTP client
In src/app/app.config.ts, add provideHttpClient() to the providers:
import { provideHttpClient, withFetch } from '@angular/common/http';

export const appConfig: ApplicationConfig = {
  providers: [
    provideRouter(routes),
    provideHttpClient(withFetch()),
  ],
};
C.2 Model and environment
- The API URL depends on the environment.
ng generate environmentscreatessrc/environments/environment.ts:
export const environment = { apiUrl: 'http://localhost:3001/api/appareils' };- Define the shape of an appliance as an interface (no need for a class with a constructor). Note the
_idgenerated by MongoDB, and that it is not sent when creating:
// src/app/models/appareil.model.ts
export interface Appareil {
  _id: string;
  name: string;
  status: 'On' | 'Off';
}
C.3 The service calls the API
Update AppareilService (inject(HttpClient) replaces the constructor injection). The methods return an Observable: an object that represents an asynchronous call (the response arrives later). Nothing happens until someone subscribes.
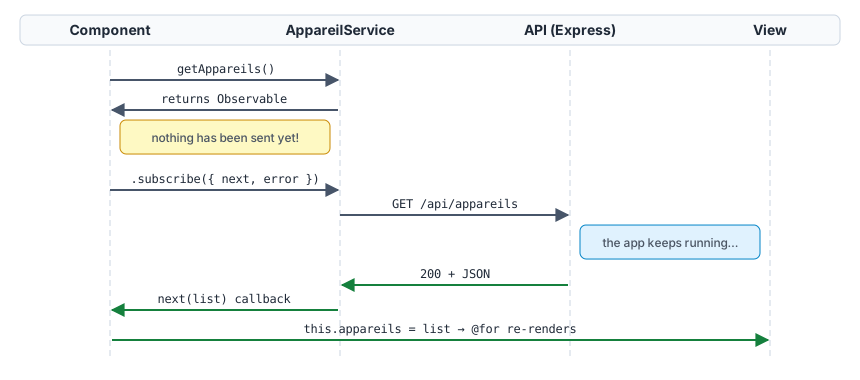
Figure 3 - Nothing is sent until you subscribe
import { Injectable, inject } from '@angular/core';
import { HttpClient } from '@angular/common/http';
import { Observable } from 'rxjs';
import { environment } from '../../environments/environment';
import { Appareil } from '../models/appareil.model';

@Injectable({ providedIn: 'root' })
export class AppareilService {
  private http = inject(HttpClient);
  private apiUrl = environment.apiUrl;

  getAppareils(): Observable<Appareil[]> {
    return this.http.get<Appareil[]>(this.apiUrl);
  }

  getAppareil(id: string): Observable<Appareil> {
    return this.http.get<Appareil>(`${this.apiUrl}/${id}`);
  }

  addAppareil(appareil: Omit<Appareil, '_id'>): Observable<Appareil> {
    return this.http.post<Appareil>(this.apiUrl, appareil);
  }

  updateAppareil(id: string, appareil: Omit<Appareil, '_id'>): Observable<Appareil> {
    return this.http.put<Appareil>(`${this.apiUrl}/${id}`, appareil);
  }

  deleteAppareil(id: string): Observable<void> {
    return this.http.delete<void>(`${this.apiUrl}/${id}`);
  }
}
C.4 Use it in the dashboard
In appareil-dashboard, load the data in ngOnInit(). The subscribe() method handles the asynchronous call: the callback runs when the response arrives.
export class AppareilDashboard implements OnInit {
  private appareilService = inject(AppareilService);
  appareils: Appareil[] = [];
  error = '';

  ngOnInit() {
    this.appareilService.getAppareils().subscribe({
      next: (list) => (this.appareils = list),
      error: () => (this.error = 'Unable to load the appliances'),
    });
  }
}
Show the list with @for (use _id in track) and display error when it is not empty.
C.5 Complete the application
- Add a form to create an appliance (
[(ngModel)]fields +addAppareil()), then refresh the list. - The buttons Switch on / Switch off of an appliance must call
updateAppareil()(status persisted in the database). - The button Delete calls
deleteAppareil()after aconfirm(). appareil-detailreads the:idfrom the route and callsgetAppareil(id).
CORS
The Angular page is served from http://localhost:4200 and calls an API on http://localhost:3001: two different origins, so the browser blocks the response unless the API sends the right CORS headers (the cors middleware configured in B.2). Try removing it and read the error in the browser console, then put it back.
Alternative without CORS: a proxy (
proxy.conf.jsongiven tong serve --proxy-config) forwarding/apitolocalhost:3001, or serving the Angular build from Express (B.3).
Challenge Activity
- Complete the CRUD in Angular: list, detail, create form (with validation, see Part I - Forms), edit, delete with confirmation, loading and error messages.
- Add a second collection, e.g.
Room(name), and link each appliance to a room (a referenceroom: { type: ObjectId, ref: "Room" },populate()in Mongoose). Show the room in the list. - Add
helmet, and aGET /api/appareils?status=Onfilter. - Run everything with Docker:
docker-compose.ymlwithmongoandapi(Dockerfile as in Part II, section 9, without Prisma; the connection string becomesmongodb://mongo:27017/appareilsDB). - README with the steps to run the project and the list of endpoints.
Bonus: compare with Part II: reimplement the Appareil API with PostgreSQL and Prisma and write a short comparison (schema, queries, migrations, ease of use).
Common errors
| Symptom | Likely cause |
|---|---|
Cannot GET / |
wrong path in express.static, or the Angular build was not generated |
| CORS error in the browser | origin http://localhost:4200 not allowed by the API |
MongooseServerSelectionError |
MongoDB not started (Docker) or your IP not allowed in Atlas Network Access |
req.body is undefined |
app.use(express.json()) missing, or placed after the routes |
| Appliances not shown, no error | forgot to subscribe() (an Observable does nothing until subscribed) |
Cast to ObjectId failed |
invalid id in the URL (validated by idParam → 400) |
| Status shown empty | status / statut naming mismatch between Angular, API and schema |
Changes in angular.json ignored |
restart ng serve |
Angular page refreshed on /appareils gives 404 (served by Express) |
missing catch-all route returning index.html |