Lab 03 — EC2: Compute, Key Pairs, and Security Groups
Series: Le Café ☕ — AWS Hands-On Labs with LocalStack
Level: Intermediate | Duration: ~90 min
Prerequisites: Labs 00, 01, and 02 complete, LocalStack running,awslocalconfigured
🎯 Learning Objectives
By the end of this lab you will be able to:
- Explain what EC2 is and how virtual machines are provisioned in AWS
- Understand the relationship between AMIs, instance types, and key pairs
- Create and manage a key pair for secure SSH access
- Design a security group as a virtual firewall with inbound and outbound rules
- Launch an EC2 instance and attach the IAM role you built in Lab 01
- Describe the EC2 instance lifecycle: pending, running, stopping, terminated
- Connect all three labs into a coherent, working application stack
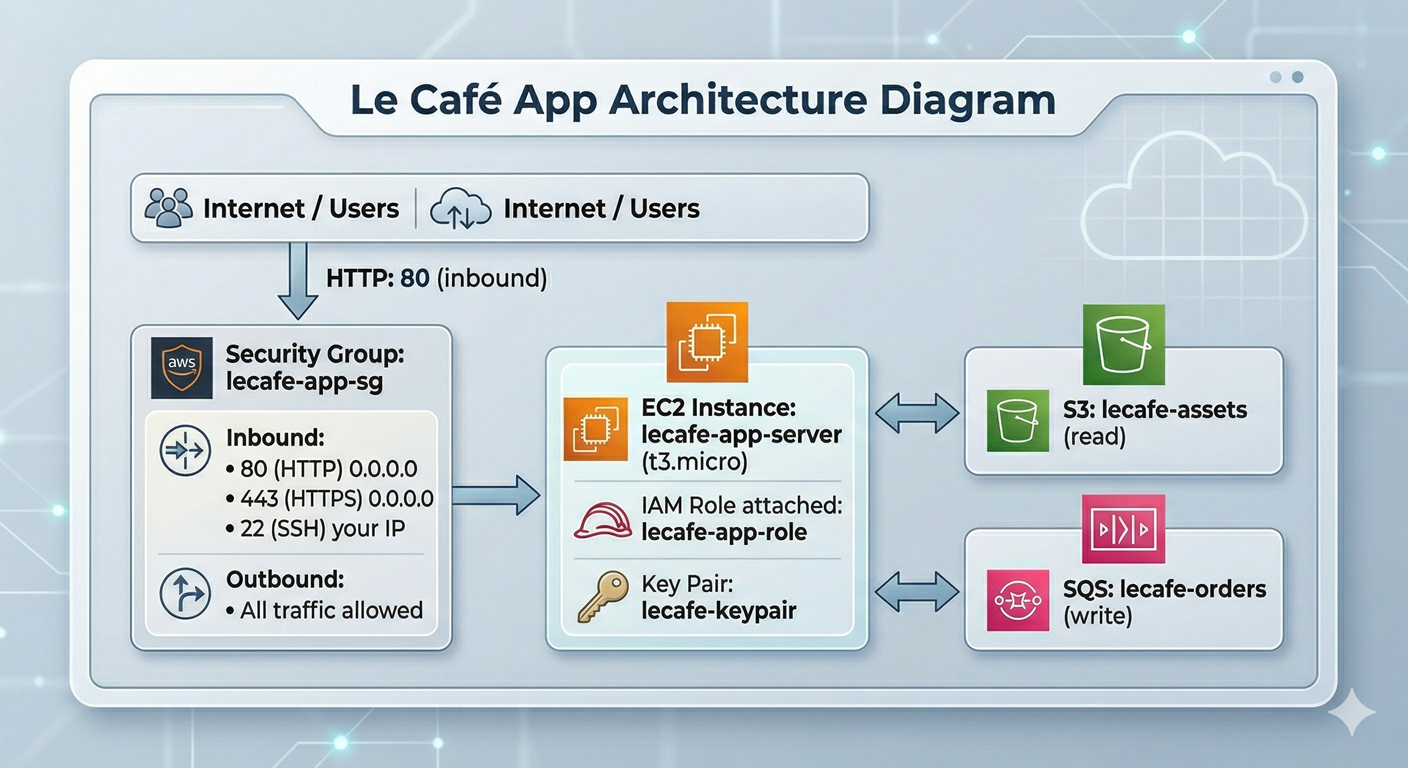
🏪 Scenario — Le Café Needs a Server
Le Café’s ordering application has outgrown its local development environment. The backend service — the one that reads assets from S3 and sends orders to SQS — needs to run on a proper server. The infrastructure team has decided to host it on EC2 for now, before eventually migrating to containers.
Your mission in this lab is to provision the EC2 infrastructure for that backend service: a key pair for SSH access, a security group that allows only the traffic the application needs, and an EC2 instance attached to the lecafe-app-role you created in Lab 01. By the end, you will have a complete stack — identity, storage, and compute — all wired together.
🧠 Concept — What EC2 Actually Is
EC2 stands for Elastic Compute Cloud, and despite the elaborate name, the core idea is beautifully simple: EC2 lets you rent a virtual machine running in an AWS data centre and pay for it by the second. You choose how much CPU and memory you need, which operating system to start from, where to put it in the network, and how to control who can connect to it. AWS handles the physical hardware underneath.
To really understand EC2, you need to understand four concepts that work together every time you launch an instance.
AMIs — the template. An Amazon Machine Image is a snapshot of a preconfigured disk that serves as the starting point for your instance. Think of it like a cookie cutter: the AMI is the cutter (the shape and content), and every instance you launch from it is a fresh cookie. An AMI captures the operating system, any pre-installed software, and the initial disk layout. AWS provides hundreds of public AMIs — Amazon Linux, Ubuntu, Windows Server — and you can create your own. When you launch an instance, EC2 copies the AMI’s disk image onto fresh storage for that instance, so every instance starts life as an identical clone of the template.
Instance types — the hardware. Once you have chosen your template, you choose how much horsepower to give it. EC2 instance types follow a naming pattern like t3.micro or m5.large. The letter prefix (t, m, c, r) indicates the family — what the hardware is optimised for (general purpose, compute, memory, etc.). The number indicates the hardware generation. The suffix (micro, small, medium, large) indicates how much CPU and RAM the instance gets. A t3.micro has 2 vCPUs and 1 GB of RAM — enough for a small web application. A c5.18xlarge has 72 vCPUs and 144 GB of RAM — sized for high-performance computing workloads.
Key pairs — the door key. EC2 instances running Linux do not use password authentication by default; they use SSH public-key cryptography. When you create a key pair, AWS generates a public key and a private key. The public key is stored inside your instance (in the ~/.ssh/authorized_keys file of the default user). The private key is given to you as a .pem file — a one-time download that AWS never stores. To SSH into your instance, you present your private key and the instance verifies it against the stored public key. If anyone else wants to connect, they need that .pem file. This means losing the .pem file means losing SSH access permanently, and sharing it means sharing the keys to your server.
Security groups — the firewall. A security group is a stateful virtual firewall that controls traffic in and out of your EC2 instance. “Stateful” means that if you allow inbound traffic on a given port, the response traffic is automatically allowed out — you do not need to write an explicit outbound rule for every inbound rule you define. Security groups work on an allow-only model: everything is denied by default, and you open specific ports to specific sources. You can reference another security group as a source, which is how you express “allow traffic from any instance in the web tier, but not from the public internet.”
💡 Bringing it together with a metaphor: Think of launching an EC2 instance like moving into a new apartment. The AMI is the floor plan and furnishings (what the place looks like when you arrive). The instance type is how large the apartment is. The key pair is your door key (only you have a copy). The security group is the building’s intercom system (it decides who can ring your buzzer).
🏗️ Architecture — Le Café Compute Stack
⚙️ Part 1 — Prepare the Environment
Step 1 — Start LocalStack and Recreate Lab 01 Resources
This lab builds directly on the IAM role from Lab 01. Because LocalStack is stateless, we need to recreate those resources. Rather than repeating all the manual steps, we will use a small setup script — which also introduces you to the concept of idempotent infrastructure scripts, a foundational DevOps practice.
localstack start -d
localstack status services
export AWS_PROFILE=localstack
# Create the trust policy for the app role
cat > /tmp/trust-policy.json << 'EOF'
{
"Version": "2012-10-17",
"Statement": [{
"Effect": "Allow",
"Principal": { "Service": "ec2.amazonaws.com" },
"Action": "sts:AssumeRole"
}]
}
EOF
# Create the role (ignore the error if it already exists from a previous run)
awslocal iam create-role \
--role-name lecafe-app-role \
--assume-role-policy-document file:///tmp/trust-policy.json 2>/dev/null || \
echo "Role already exists — continuing."
# Attach the S3 and SQS permissions inline
cat > /tmp/app-role-policy.json << 'EOF'
{
"Version": "2012-10-17",
"Statement": [
{
"Sid": "AllowS3AssetRead",
"Effect": "Allow",
"Action": ["s3:GetObject","s3:ListBucket"],
"Resource": [
"arn:aws:s3:::lecafe-assets",
"arn:aws:s3:::lecafe-assets/*"
]
},
{
"Sid": "AllowSQSOrderWrite",
"Effect": "Allow",
"Action": ["sqs:SendMessage","sqs:GetQueueUrl","sqs:GetQueueAttributes"],
"Resource": "arn:aws:sqs:us-east-1:000000000000:lecafe-orders"
}
]
}
EOF
awslocal iam put-role-policy \
--role-name lecafe-app-role \
--policy-name LeCafe-App-Permissions \
--policy-document file:///tmp/app-role-policy.json
echo "IAM setup complete."Why the
2>/dev/null || echopattern? In a real DevOps workflow, setup scripts are run repeatedly — by multiple developers, in CI/CD pipelines, during disaster recovery. Writing a script that fails if a resource already exists creates fragile automation. The|| echoconstruct says “if this command fails, print a message and keep going.” This is a simple form of idempotency. Tools like Terraform take this idea much further, but the underlying principle is identical.
Step 2 — Recreate the Supporting S3 and SQS Resources
# Create assets bucket (ignore error if it already exists)
awslocal s3 mb s3://lecafe-assets 2>/dev/null || echo "Bucket exists — continuing."

# Add a sample asset so the instance has something to read
echo "Le Café App Config — v1.0" > config.txt
awslocal s3 cp config.txt s3://lecafe-assets/app/config.txt

# Create the orders queue
awslocal sqs create-queue --queue-name lecafe-orders 2>/dev/null || echo "Queue exists — continuing."

echo "S3 and SQS setup complete."
🔑 Part 2 — Create a Key Pair
Step 3 — Generate the Key Pair
A key pair is created in one operation: AWS (or LocalStack) generates the public/private key pair, stores the public half permanently, and hands you the private half exactly once. You are responsible for saving it securely.
# Generate the key pair and save the private key to disk
awslocal ec2 create-key-pair \
  --key-name lecafe-keypair \
  --query 'KeyMaterial' \
  --output text > lecafe-keypair.pem
Let’s examine this command carefully because every part of it matters. create-key-pair tells EC2 to generate the RSA key pair and register the public key under the name lecafe-keypair. The --query 'KeyMaterial' flag uses JMESPath (the JSON query language built into the AWS CLI) to extract only the private key from the full response — without this, the private key would be buried inside a JSON object. The --output text flag removes the JSON formatting so the key is written as raw text. The > lecafe-keypair.pem redirects that raw text into a file. If you omit any one of these flags, the file will either be missing or malformed, and SSH will refuse to use it.
# Set the correct file permissions — SSH refuses keys that are too permissive
chmod 400 lecafe-keypair.pem

# Verify the key pair is registered in EC2
awslocal ec2 describe-key-pairs
The chmod 400 step is not optional. The SSH client enforces that private key files are readable only by their owner. If the file permissions are too open (for example, 644 which allows group and world read), SSH will print “Permissions are too open” and refuse to connect. This is a security control: a private key accessible to other users on the same system is not really private.
🔥 Part 3 — Create a Security Group
Step 4 — Understand What You Are Designing
Before writing the command, think through the access requirements deliberately — this is the professional habit that separates well-secured infrastructure from accidentally permissive infrastructure.
The Le Café ordering application needs to accept HTTP requests from the internet (port 80), and HTTPS once we add TLS (port 443). The operations team needs SSH access for maintenance (port 22), but only from trusted IP addresses — not the whole internet. The application itself needs to make outbound calls to the LocalStack S3 and SQS endpoints. Everything else should be blocked.
Step 5 — Create the Security Group
A security group lives inside a VPC (Virtual Private Cloud). In LocalStack, a default VPC is created automatically. We will retrieve its ID first so we can place our security group inside it.
# Retrieve the default VPC ID
VPC_ID=$(awslocal ec2 describe-vpcs \
  --filters "Name=isDefault,Values=true" \
  --query 'Vpcs[0].VpcId' \
  --output text)

echo "Default VPC ID: $VPC_ID"
# Create the security group inside the default VPC
SG_ID=$(awslocal ec2 create-security-group \
--group-name lecafe-app-sg \
--description "Security group for the Le Cafe ordering application" \
--vpc-id $VPC_ID \
--query 'GroupId' \
--output text)
echo "Security Group ID: $SG_ID"Notice the pattern of capturing the output into a shell variable (SG_ID) using $(). This is a technique you will use constantly in infrastructure automation: instead of copy-pasting IDs between commands, you let the shell manage them. It makes scripts reproducible and eliminates human transcription errors.
Step 6 — Add Inbound Rules
By default, a new security group allows all outbound traffic and blocks all inbound traffic. We add inbound rules one by one, each explicitly opening a port and defining the allowed source.
# Allow HTTP from anywhere on the internet
awslocal ec2 authorize-security-group-ingress \
  --group-id $SG_ID \
  --protocol tcp \
  --port 80 \
  --cidr 0.0.0.0/0

# Allow HTTPS from anywhere on the internet
awslocal ec2 authorize-security-group-ingress \
  --group-id $SG_ID \
  --protocol tcp \
  --port 443 \
  --cidr 0.0.0.0/0

# Allow SSH only from your own machine (replace with your actual public IP in production)
# Using 0.0.0.0/0 here for lab convenience — never do this in production
awslocal ec2 authorize-security-group-ingress \
  --group-id $SG_ID \
  --protocol tcp \
  --port 22 \
  --cidr 0.0.0.0/0
⚠️ A critical production note on that last rule. Opening SSH to
0.0.0.0/0means anyone on the entire internet can attempt to connect to port 22. In a real environment, you should replace0.0.0.0/0with your organisation’s specific IP range (e.g., your office’s public IP as a/32). Alternatively, many teams remove SSH from security groups entirely and use AWS Systems Manager Session Manager instead, which provides shell access through the AWS API without opening any inbound ports at all.
# Verify all three inbound rules were applied
awslocal ec2 describe-security-groups --group-ids $SG_ID
Study the output carefully. Each rule shows the IpProtocol, FromPort, ToPort, and IpRanges. Notice that the default outbound rule (allow all traffic to 0.0.0.0/0) was added automatically — you only need to add explicit outbound rules if you want to restrict egress traffic, which is an advanced practice for high-security environments.
🚀 Part 4 — Launch the EC2 Instance
Step 7 — Find an AMI
Every EC2 instance starts from an AMI. In LocalStack, AMI IDs are simulated — any well-formed AMI ID string will be accepted. In real AWS, you would query describe-images to find the latest Amazon Linux or Ubuntu AMI for your region. Let’s practise that query pattern so it becomes familiar.
# In real AWS you would filter for the official Amazon Linux 2023 AMI
# LocalStack accepts any AMI ID, so we will use a realistic placeholder
AMI_ID="ami-0c02fb55956c7d316"

echo "Using AMI: $AMI_ID"
💡 For real AWS use: The canonical way to always find the latest Amazon Linux AMI without hardcoding an ID is
aws ssm get-parameter --name /aws/service/ami-amazon-linux-latest/al2023-ami-kernel-default-x86_64 --query Parameter.Value --output text. This uses the SSM Parameter Store as a stable reference that AWS updates whenever a new AMI is released. Hardcoding AMI IDs in scripts causes them to break when the AMI is deprecated.
Step 8 — Create an Instance Profile
Before we can attach the lecafe-app-role to an EC2 instance, we need to wrap it in an instance profile. An instance profile is a container object that EC2 uses as the bridge between the instance and the IAM role. The distinction exists for historical reasons — IAM roles were introduced after EC2, and this wrapper was the integration mechanism. In the console, AWS creates the instance profile automatically whenever you create a role intended for EC2, which is why most beginners never notice it. In the CLI, you manage it explicitly.
# Create the instance profile with the same name as the role (convention)
awslocal iam create-instance-profile \
  --instance-profile-name lecafe-app-profile

# Attach the role to the instance profile
awslocal iam add-role-to-instance-profile \
  --instance-profile-name lecafe-app-profile \
  --role-name lecafe-app-role

echo "Instance profile ready."
Step 9 — Write the User Data Script
User data is a shell script that EC2 executes automatically on the instance’s very first boot, running as root. It is the standard mechanism for bootstrapping an instance: installing packages, writing configuration files, starting services. You pass it to run-instances and it runs once, silently, in the background while the instance transitions to the running state.
cat > /tmp/userdata.sh << 'EOF'
#!/bin/bash
# This script runs once on first boot as root.
# It sets up the Le Café ordering application environment.

# Update the package index and install the AWS CLI
yum update -y
yum install -y aws-cli

# Create the application directory
mkdir -p /opt/lecafe

# Write a placeholder application config
cat > /opt/lecafe/config.env << 'ENVEOF'
APP_NAME=lecafe-ordering
S3_BUCKET=lecafe-assets
SQS_QUEUE=lecafe-orders
AWS_REGION=us-east-1
ENVEOF

# Pull the app config from S3 using the instance's IAM role credentials
# The instance role (lecafe-app-role) provides the credentials automatically
# via the EC2 instance metadata service — no access keys needed in this script
aws s3 cp s3://lecafe-assets/app/config.txt /opt/lecafe/app-config.txt \
  --region us-east-1

echo "Le Café bootstrap complete." >> /var/log/lecafe-setup.log
EOF
Notice the comment inside the script about credentials. The most important thing to understand about user data scripts running on an instance with an attached role is that you never need to put AWS credentials in the script. The EC2 instance metadata service (accessible at the special IP 169.254.169.254) automatically vends temporary credentials for the attached role. Any AWS CLI call or SDK call made from within the instance automatically uses those credentials. This is the entire point of instance profiles — no credential management, no secrets in code.
Step 10 — Launch the Instance
Now we have everything we need: an AMI, an instance type, a key pair, a security group, and an instance profile. Let’s launch.
INSTANCE_ID=$(awslocal ec2 run-instances \
  --image-id $AMI_ID \
  --instance-type t3.micro \
  --key-name lecafe-keypair \
  --security-group-ids $SG_ID \
  --iam-instance-profile Name=lecafe-app-profile \
  --user-data file:///tmp/userdata.sh \
  --tag-specifications 'ResourceType=instance,Tags=[{Key=Name,Value=lecafe-app-server},{Key=Project,Value=LeCafe},{Key=Environment,Value=development}]' \
  --count 1 \
  --query 'Instances[0].InstanceId' \
  --output text)

echo "Instance launched: $INSTANCE_ID"
The --tag-specifications flag deserves special attention. Tags are key-value metadata that you attach to any AWS resource. They seem trivial at first, but in a real account with dozens or hundreds of resources, tags are what make cost reporting, access control, and operational management possible. The Name tag is special — it is what the AWS Console displays in the instance list. The Project and Environment tags are examples of the kind of tagging convention your organisation should define and enforce consistently.
🔍 Part 5 — Inspect and Manage the Instance Lifecycle
Step 11 — Observe the Instance State
EC2 instances move through a defined sequence of states. Understanding these states is essential for writing reliable automation and for troubleshooting.
# Check the current state of the instance
awslocal ec2 describe-instances \
  --instance-ids $INSTANCE_ID \
  --query 'Reservations[0].Instances[0].{
    State:State.Name,
    PublicIP:PublicIpAddress,
    PrivateIP:PrivateIpAddress,
    ImageId:ImageId,
    InstanceType:InstanceType,
    KeyName:KeyName,
    IAMProfile:IamInstanceProfile.Arn
  }' \
  --output table
In LocalStack, the instance transitions to running almost immediately. In real AWS, the pending state lasts 30–60 seconds as the hypervisor allocates hardware, copies the AMI disk image, and initialises the instance. The --query flag here uses a JMESPath projection to select specific fields and display them as a table — this is a much more readable output format than the full JSON response when you only care about a subset of attributes.
# List all instances and their states with a concise table view
awslocal ec2 describe-instances \
  --query 'Reservations[].Instances[].{
    ID:InstanceId,
    Name:Tags[?Key==`Name`]|[0].Value,
    State:State.Name,
    Type:InstanceType
  }' \
  --output table
Step 12 — Understand the Full Lifecycle
The EC2 instance lifecycle has five main states, and knowing the difference between them prevents costly mistakes.
Pending is the transitional state immediately after launch. The instance is being initialised and is not yet accepting connections. You cannot SSH in and you will not be billed for compute (though you may be billed for attached storage).
Running means the instance is fully booted and operational. Billing for compute begins the moment the instance enters this state.
Stopping is the transitional state when you call stop-instances. The OS is being shut down gracefully. A stopped instance retains its configuration, its attached EBS volumes, and its private IP address within the VPC.
Stopped means the instance is off. You are not billed for compute, but you are still billed for attached EBS storage. This is the right state for development instances you only need during business hours.
Terminated is permanent deletion. Once an instance is terminated, it is gone — configuration, attached volumes (unless you opted to keep them), and the instance ID are all destroyed and cannot be recovered. There is no “undo.” This is why production environments use Auto Scaling groups and infrastructure-as-code rather than manually launched instances — you should always be able to recreate an instance from code, never depending on a specific running instance surviving.
# Stop the instance (like shutting down a computer — preserves config)
awslocal ec2 stop-instances --instance-ids $INSTANCE_ID

# Check that it reaches the stopped state
awslocal ec2 describe-instances \
  --instance-ids $INSTANCE_ID \
  --query 'Reservations[0].Instances[0].State.Name' \
  --output text

# Start it again
awslocal ec2 start-instances --instance-ids $INSTANCE_ID

# Verify it returns to running
awslocal ec2 describe-instances \
  --instance-ids $INSTANCE_ID \
  --query 'Reservations[0].Instances[0].State.Name' \
  --output text
Step 13 — Simulate an SSH Connection
In LocalStack, EC2 instances do not run actual operating systems — they are simulated API objects. You cannot actually SSH in. However, let’s practise the exact command you would use against a real instance, so the pattern is in your muscle memory when you need it.
# Retrieve the public IP that would be assigned in a real environment
PUBLIC_IP=$(awslocal ec2 describe-instances \
  --instance-ids $INSTANCE_ID \
  --query 'Reservations[0].Instances[0].PublicIpAddress' \
  --output text)

echo "Would connect to: $PUBLIC_IP"

# The exact SSH command you would use against a real instance:
echo "ssh -i lecafe-keypair.pem ec2-user@$PUBLIC_IP"
The default username for Amazon Linux instances is ec2-user. For Ubuntu instances it is ubuntu, and for older RHEL-based instances it is root or centos. This trips up many beginners who try admin or administrator and cannot understand why the key is rejected.
🔗 Part 6 — Verify the Full Stack Integration
Step 14 — Confirm the Instance Has the Role Attached
In real AWS, you can inspect the IAM credentials vended to an instance by querying the metadata service from inside the instance. Since we cannot SSH in, we will verify from the outside that the role is correctly attached.
# Confirm the instance profile is attached
awslocal ec2 describe-instances \
  --instance-ids $INSTANCE_ID \
  --query 'Reservations[0].Instances[0].IamInstanceProfile'
You should see the ARN of the lecafe-app-profile. From inside the instance, this profile allows the application code to call boto3.client('s3') (in Python) or aws s3 cp (in the CLI) without a single access key in the environment — the SDK automatically retrieves temporary credentials from the instance metadata service.
Step 15 — Review the Complete Stack
Let’s pause and appreciate the full architecture you have built across three labs. Each component exists for a specific reason, and they are designed to work together.
# Show the IAM role configuration
awslocal iam get-role --role-name lecafe-app-role \
  --query 'Role.{Name:RoleName, ARN:Arn, Created:CreateDate}'

# Show the S3 asset bucket
awslocal s3 ls s3://lecafe-assets/ --recursive

# Show the SQS queue
awslocal sqs get-queue-url --queue-name lecafe-orders

# Show the running EC2 instance with its attached profile
awslocal ec2 describe-instances \
  --instance-ids $INSTANCE_ID \
  --query 'Reservations[0].Instances[0].{
    Instance:InstanceId,
    State:State.Name,
    Role:IamInstanceProfile.Arn,
    SecurityGroup:SecurityGroups[0].GroupName,
    KeyPair:KeyName
  }' \
  --output table
Reading this output from bottom to top tells the security story of the stack. The EC2 instance can only be reached on ports 22, 80, and 443 (security group). Only holders of the .pem file can SSH in (key pair). Inside the instance, application code authenticates to AWS using the attached role (instance profile). That role can only read from lecafe-assets and write to lecafe-orders (IAM permissions). The S3 bucket additionally has a bucket policy that denies all other principals from accessing it (resource-based policy). Every layer reinforces the one below it — this is defence in depth.
🛡️ Defender’s Perspective
EC2 is where many theoretical security concepts become concrete operational risks.
Instance metadata service (IMDS) attacks are real. The metadata service at 169.254.169.254 is accessible to any code running on the instance, including malicious code injected via a web application vulnerability. If an attacker can make the EC2 instance itself issue an HTTP request to that IP — a technique called Server-Side Request Forgery (SSRF) — they can steal the temporary credentials for the attached IAM role and use them to access S3, SQS, or any other service the role permits. This was the exact mechanism behind the 2019 Capital One breach mentioned in Lab 01. AWS introduced IMDSv2, which requires a session token and a specific HTTP header, making SSRF attacks against the metadata service dramatically harder. In a real account, you should require IMDSv2 on all instances using --metadata-options HttpTokens=required on run-instances.
Security group sprawl is a real operational risk. Security groups are easy to create but rarely cleaned up. After a few months, a busy AWS account typically has dozens of security groups with overlapping, poorly documented rules, many of which are no longer used. Auditing security groups regularly — looking for 0.0.0.0/0 on port 22, unused groups with no associated instances, and groups whose rules are broader than their stated purpose — is a valuable security hygiene practice. AWS Config rules and Security Hub can automate this audit.
Terminated instances are gone, but their data may not be. By default, the root EBS volume attached to an EC2 instance is deleted when the instance is terminated. However, additional data volumes that you attach may be configured to persist after termination, and EBS snapshots taken from those volumes survive indefinitely. Before terminating sensitive workloads, confirm that all data-bearing volumes are either intentionally preserved or will be deleted, and that no snapshots of sensitive data are left accessible.
🧩 Challenge Tasks
Challenge 1 — Describe Instances with Filters. Use awslocal ec2 describe-instances with a --filters argument to list only instances tagged with Project=LeCafe. This is the pattern used in automation scripts and monitoring tools to target a specific fleet without hardcoding instance IDs. Research the tag:Key filter syntax in the EC2 CLI documentation.
Challenge 2 — Launch a Second Instance in a Different Zone. EC2 instances are placed in an Availability Zone, which is an isolated data centre within a region. Launch a second t3.micro instance with the same configuration but add the --placement AvailabilityZone=us-east-1b flag. Then use describe-instances to confirm the two instances are in different zones. In a real environment, distributing instances across zones is how you build applications that survive a data centre failure.
Challenge 3 — Security Group Self-Reference. Create a second security group called lecafe-db-sg that allows inbound traffic on port 5432 (PostgreSQL) only from the lecafe-app-sg security group — not from the internet. Use the --source-group argument instead of --cidr. This pattern — allowing traffic only from a known security group — is how you enforce that your database tier can only be reached from your application tier, never directly from the outside world.
🤔 Reflection Questions
-
An EC2 instance with an attached IAM role retrieves temporary credentials automatically from the instance metadata service. These credentials expire every hour and are automatically refreshed. How does this behaviour change the operational burden of credential rotation compared to an application that uses a long-lived access key stored in an environment variable?
-
Security groups are stateful, meaning response traffic is automatically allowed for any connection that was initiated in the allowed direction. Network Access Control Lists (NACLs), which operate at the subnet level, are stateless — both inbound and outbound rules must be explicitly defined. What are the practical consequences of this difference if you were to accidentally delete all outbound NACL rules on a subnet running your application?
-
The user data script runs once at first boot and can install software, configure files, and make API calls. However, if the script fails halfway through, the instance reaches the
runningstate anyway — there is no automatic rollback. What strategies would you use in a production environment to detect and respond to user data script failures, given that the instance appears healthy from EC2’s perspective regardless?
🧹 Cleanup
Cleanup order matters here. You must terminate the instance before deleting the security group (EC2 will refuse to delete a group that is still in use), and you must remove the role from the instance profile before deleting either.
# Terminate the instance
awslocal ec2 terminate-instances --instance-ids $INSTANCE_ID

# Wait for termination (poll until the state is 'terminated')
echo "Waiting for instance to terminate..."
awslocal ec2 describe-instances \
  --instance-ids $INSTANCE_ID \
  --query 'Reservations[0].Instances[0].State.Name' \
  --output text

# Delete the key pair registration from EC2
# (also delete the local .pem file — never leave private keys on disk)
awslocal ec2 delete-key-pair --key-name lecafe-keypair
rm -f lecafe-keypair.pem

# Delete the security group
awslocal ec2 delete-security-group --group-id $SG_ID

# Remove the role from the instance profile, then delete the profile
awslocal iam remove-role-from-instance-profile \
  --instance-profile-name lecafe-app-profile \
  --role-name lecafe-app-role

awslocal iam delete-instance-profile \
  --instance-profile-name lecafe-app-profile

# Delete the inline role policy, then the role
awslocal iam delete-role-policy \
  --role-name lecafe-app-role \
  --policy-name LeCafe-App-Permissions

awslocal iam delete-role --role-name lecafe-app-role

# Clean up S3 and SQS
awslocal s3 rm s3://lecafe-assets --recursive
awslocal s3 rb s3://lecafe-assets

QUEUE_URL=$(awslocal sqs get-queue-url \
  --queue-name lecafe-orders \
  --query 'QueueUrl' --output text)
awslocal sqs delete-queue --queue-url $QUEUE_URL

localstack stop
echo "All resources cleaned up."
📋 Quick Reference
| Task | Command |
|---|---|
| Get default VPC ID | awslocal ec2 describe-vpcs --filters Name=isDefault,Values=true --query 'Vpcs[0].VpcId' --output text |
| Create key pair | awslocal ec2 create-key-pair --key-name NAME --query 'KeyMaterial' --output text > key.pem |
| Set key permissions | chmod 400 key.pem |
| Create security group | awslocal ec2 create-security-group --group-name NAME --description "DESC" --vpc-id VPC_ID |
| Add inbound rule | awslocal ec2 authorize-security-group-ingress --group-id SG_ID --protocol tcp --port N --cidr 0.0.0.0/0 |
| Create instance profile | awslocal iam create-instance-profile --instance-profile-name NAME |
| Attach role to profile | awslocal iam add-role-to-instance-profile --instance-profile-name NAME --role-name ROLE |
| Launch instance | awslocal ec2 run-instances --image-id AMI --instance-type TYPE --key-name KEY --security-group-ids SG --iam-instance-profile Name=PROFILE |
| Check instance state | awslocal ec2 describe-instances --instance-ids ID --query 'Reservations[0].Instances[0].State.Name' --output text |
| Stop instance | awslocal ec2 stop-instances --instance-ids ID |
| Start instance | awslocal ec2 start-instances --instance-ids ID |
| Terminate instance | awslocal ec2 terminate-instances --instance-ids ID |
| SSH connect (real AWS) | ssh -i key.pem ec2-user@PUBLIC_IP |